Home
>
Archive
>
SSW Standards Internal
>
Computer Setup
>
SSW CRM 4 Up and Running
SSW CRM 4 Up and Running
This standard is provided to give you information related to your
CRM account and settings.
-
How to Install Outlook CRM 4 Add-in
Below is an instruction on how to to install Outlook CRM Add-in:
-
Copy Outlook CRM setup files from folder
\\fileserver\setupfiles\SetupMS\SetupProgram\MSCRM4\Outlook
Client to your local machine
-
Run setupclient.exe from this folder to install CRM for
Outlook add-on
-
-
Figure: At "Select Components to Install" screen, select the
recommended option
-
-
Figure: sure you get all green ticks. Follow the on-screen
instruction to finish your installation.
-
-
Figure: After the installation is completed successfully,
click on Start | All Programs | Microsoft Dynamics CRM 4.0 |
Configuration Wizard.
-
-
Figure: Select "My company" at the "Connect to Microsoft
Dynamics CRM" screen.
-
-
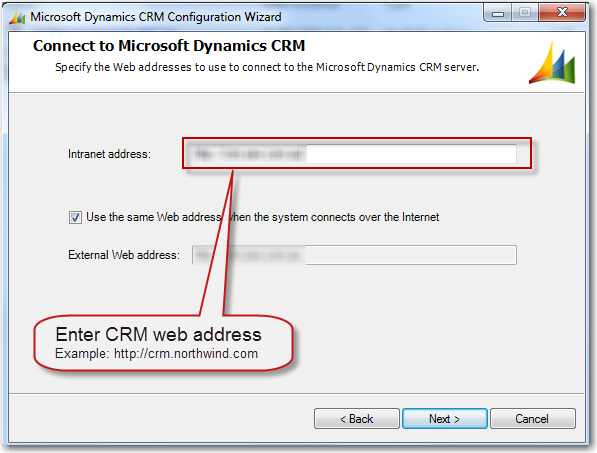
Figure: Configure CRM Server address. Finish the rest of
configuration.
-
After finish installation and configuration you will need to
enable “Auto Update? So that Every time you open your
outlook, there will be a popup if there is a new update
available.
-
- Figure: Run regedit from your “Start?menu
-
-
Figure: On 32bit machine - Browse to registry key
HKEY_LOCAL_MACHINE\SOFTWARE\Microsoft\MSCRMClient
-
-
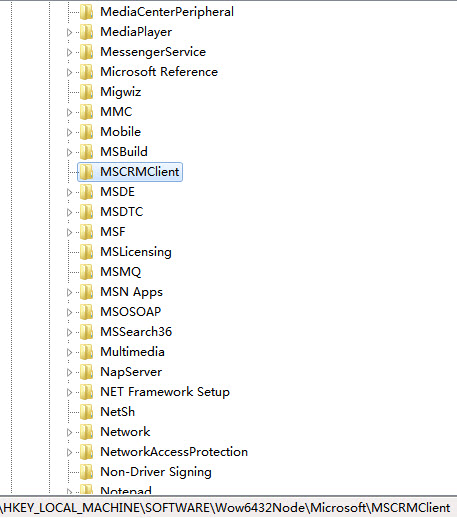
Figure: On 64bit machine - Browse to registry key
HKEY_LOCAL_MACHINE\SOFTWARE\Wow6432Node\Microsoft\MSCRMClient
-
- Figure: Add a new string value to this key
-

-
Figure: Enter the name of new string value as
“AutoUpdateDownloadUrl?/dd>
-
-
Figure: Right click to Modify the string value
“http://aphrodite/crmoutlookpatches/?/dd>
- Restart your outlook if you are having it running.
-
-
Figure: you start up your outlook, you can see popup tell
you if there is an available update.
-
-
Figure: While running update installation, you may get a
popup saying “Files are in use? please click
“Ignore?to proceed with the installation.
-
-
Figure: After finishing updating, Outlook CRM updater may
ask you to reboot your machine. This is because it needs to
update the files which were in use during the installation.
Note: For CRM Developer and System Administrator, CRM
Customization is not available if you have your Outlook CRM
running.
-
How to configure your Outlook CRM personal options
-
-
Figure: From Outlook Home Tab, go to CRM | More | Options.
-
-
Figure: On “Synchronization?tab, ensure you have the
above checkboxes checked.
-
-
Figure: On “Email?tab, ensure you have the above
options.
-
How to record a sales opportunity
-
-
Figure: Go to Microsoft Dynamics CRM | Sales | Opportunities |
New.
-
-
Figure: This allows better understanding of opprotunity when
look at opportunity list.
-

-
Figure: Setting potential customer of an opportunity to a
company instead of contact will avoid problem when the contact
moves to another company.
-
-
Figure: Recording revenue in the right field allows us to give
a better report on our sales pipeline.
-

-
Figure: This allows us reporting on our oppotunities base on
sales stage and work out what to do next.
After creating opportunities you will need:
- Keep Sales Stage up to date.
-
Close Opportunity whenever we win or lose the opportunity.
Closing opportunity is important because if the opportunity is
won, it will create a Project record in CRM. This allows
Project Manager to record montly projected income.
-
How to Track Contact, Email, Task, etc.. from Outlook in CRM
To track a contact, email, task, etc.. from Outlook in CRM, you
need to:
- Open the record in outlook
-
Hit "Track In CRM" button in Outlook toolbar
-
- Figure: Tracking an outlook contact in CRM
Only track activities as per rule
Sales - Do you know when to track activities in CRM?
to avoid CRM becoming a spam place of all activities.
When tracking a contact in CRM, company field in outlook does
not sync with CRM. You need to click on "Set Parent" and choose
approritate company in CRM:
-
- Figure: Set Parent Company for Outlook Contact
Any contact without a company/account will automatacally go to
account name "Outlook contacts - Please set parent company" in
CRM.
-
- Figure: Outlook Contact without Parent Company
-
How to send outstanding invoice reminder
-
Create a new email, fill in necessary fields and save it as a
draft email. You will use this email as your template.
-
CRM uses your subject line to save the record in correct
category in TimePRO. It's important that your subject must
start with one of the following:
- Outstanding Account with SSW - First Reminder
- Outstanding Account with SSW - Second Reminder
- Outstanding Account with SSW - Third Reminder
- Outstanding Account with SSW - Fourth Reminder
- Outstanding Account with SSW - Legal
-

- Figure: Example of outstanding invoice first reminder
-
Go to draft folder in your outlook and make a copy of the
email you just created. Each time you want to send an email,
you will need to make a copy so that you don't loose the
template.
-
-
Figure: Highlight the email you want to copy, hit CTRL + C
then CTRL + V
-
Go to
TimePRO Online Oustanding Invoice
page
-
Click "Preview" button on the row of the client that you want
to send the email to. This will open up the oustanding invoice
details.
-
-
Figure: Click on preview button to open up the details
-
- Figure: Client oustanding invoice details
- Open up your copy of draft email in your outlook.
-
Copy the details such as the contact's email address, invoice
details, etc. from TimePRO online to your outlook draft email.
-
-
Figure: Sample outstanding invoice email with TimePRO
details
- From Outlook email, hit "Track In CRM" button.
-
- Figure: Track Outstanding Invoice email in CRM
-
From Outlook email, hit "Set Regarding" button and select
"More".
-
- Figure: Set regarding for outstanding invoice email
-
Search for the client account that you want to send invoice
email to, then click "Ok".
-
- Figure: Select the client to set regarding
- Send your outstanding invoice email from outlook.