Do you know how to fetch data in Next.js?
Loading last updated info...
Next.js is great, as it gives you the ability to run code on the server-side. This means there are now new ways to fetch data via the server to be passed to Next.js app. Next.js also handles the automatic splitting of code that runs on the server and the client, meaning you don't have to worry about bloating your JavaScript bundle when you add code that only runs on the server.
For an overview of CSR, SSR, SSG, ISR and PPR, see how to choose the right rendering strategy. The examples below use the Pages Router; for the App Router, see the Next.js data-fetching documentation.
Server Side Fetching
There are three primary ways with the Next.js Pages Router to fetch data on the server:
- Server-side data fetching with
getServerSideProps - Static site generation (SSG) with
getStaticProps - Hybrid static site generation with incremental static regeneration (ISR) enabled in
getStaticProps
getServerSideProps
getServerSideProps allows for server-side fetching of data on each request from the client, which makes it great for fetching of dynamic data. It can also be used for secured data, as the code within the function only runs on the server.
The below example shows an example of how we can use getServerSideProps to fetch data. Upon each user's request, the server will fetch the list of posts and pass it as props to the page.
// pages/index.tsxexport const getServerSideProps = async (context) => {const res = await fetch("https://jsonplaceholder.typicode.com/posts");const posts = await res.json();return { props: { posts } };};export default function Page(props) {return (<div>{props.posts.map((post) => (<div><h2>{post.title}</h2><p>{post.body}</p></div>))}</div>);}
This is great for dynamic data that may not be best suited for getStaticProps such as fetching from a database or an API route with data that changes often.
The context parameter also has a lot of useful information about the request, including the request path, cookies sent from the client, and more that can be found on the official Next.js documentation.
You can use https://next-code-elimination.vercel.app/ to verify what code is sent to the client when using getServerSideProps.
getStaticProps
We can develop a staticly generated site in Next.js by using getStaticProps. Having a statically generated site is great for SEO, as it makes it much easier for Google to index your site compared to a site with complex JavaScript logic, which is harder for web crawlers to understand. When you run npm build, Next.js will run the code inside the getStaticProps method and generate associated static HTML or JSON data.
For example, using dynamic routing we can create a static page to show post data based on the URL:
// pages/[slug].tsxexport const getStaticProps = async ({ params }) => {const id = params.slug;const res = await fetch(`https://jsonplaceholder.typicode.com/posts/${id}`);const post = await res.json();return {props: { post },};};export const getStaticPaths = async () => {const res = await fetch("https://jsonplaceholder.typicode.com/posts");const posts = await res.json();const paths = posts.map((post) => ({params: { slug: String(post.id) },}));return { paths, fallback: false };};export default function Page(props) {return (<div><h2>{props.post.title}</h2><p>{props.post.body}</p></div>);}
Incremental Static Regeneration (ISR)
ISR serves pre-rendered HTML while allowing cached pages to be regenerated without rebuilding the entire site. With time-based revalidation, the first request after the interval receives the cached page and triggers regeneration in the background. Requests receive the updated page after regeneration succeeds.
export const getStaticProps = async () => {const res = await fetch(`https://jsonplaceholder.typicode.com/comments`);const comments = await res.json();return {props: { comments },revalidate: 60,};};
Here, the first request after 60 seconds triggers regeneration. The interval is not a timer that rebuilds the page every 60 seconds.
For CMS edits, use on-demand revalidation: a webhook triggers revalidation of the affected pages when content changes.
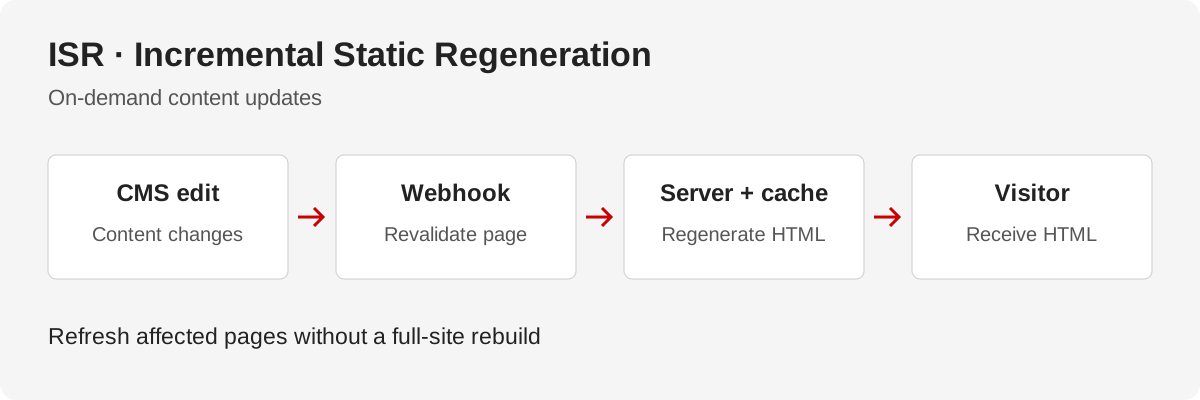
✅ Figure: Good example - ISR refreshes affected pages without rebuilding the whole site
SSW Rules uses ISR and a TinaCloud webhook to revalidate affected pages. With over 3,000 rules, a rule update takes about 7 minutes to appear.
Client-Side Rendering (CSR) and fetching
CSR means Client-Side Rendering: the browser runs JavaScript and fetches data to display content. It is a poor default for public content pages because visitors wait for JavaScript and data, and search engines may have more difficulty indexing the content. Prefer pre-rendered content with SSG, ISR or SSR when possible.
Sometimes CSR is the only practical option, such as a static-only deployment that needs live data or a browser-only integration. It also suits interactive dashboards where SEO is not a priority. Show loading and error states, and keep credentials on the server.
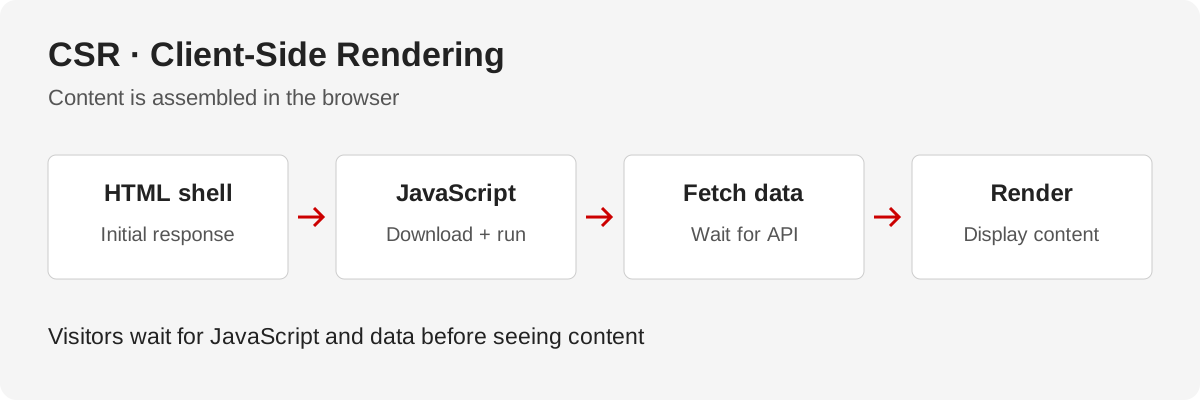
Figure: CSR delays content until browser-side JavaScript and data are ready
When client-side fetching needs a server-held API key, use an API route to call the upstream service. Keep the key on the server and return only data the user is authorized to see. An API route is publicly reachable; private data still requires authentication and authorization.
This would be written in the component like so:
const Component = () => {const [data, setData] = useState(null);useEffect(() => {fetch("/api/your-api-route").then((res) => res.json()).then((data) => {setData(data);});}, []);return <> ... </>;};
Then place a file in the /pages/api directory named with the required API route path (i.e. pages/api/{{ API_ROUTE_HERE }}.ts):
// pages/api/your-api-route.tsimport { NextApiRequest, NextApiResponse } from "next";export default async function handler(req: NextApiRequest,res: NextApiResponse) {if (req.method == "GET") {const res = await fetch("https://jsonplaceholder.typicode.com/posts");const data = await res.json();res.status(200).send(data);} else {res.status(405).json({ error: "Unsupported method" });}}
This is a great workaround for the limitation of only being able to use the above server-side fetching functions at a page-level - as it allows for server-side fetching from components. However, keep in mind that this may result in performance impacts from blocking calls to API routes.
This is also a great way to reduce the occurrence of CORS errors, as you can proxy API data through a simple Next.js API route.
You can learn more about how to fetch with NextJS in the official Next.js documentation.