Home
>
Archive
>
StandardsInternal
>
DeveloperGeneral
>
Using FTPSync
FTPSync is the software we use to upload the changes we make on the
local web server, Ant, to Seal, our external web server. FTPSync is a
powerful tool, which can simplify the synchronising of your work and
the external web server, but if not used properly FTPSync can cause
problems severe enough to stop SSWs web site working at all!
The most important thing to remember above all else when using FTPSync
is:
No matter what it suggests,
NEVER
synchronise from Seal to Ant.
By default FTPSync will synchronise completely so that both web sites
are identical, this is not what we want; as it would wipe any
work-in-progress on Ant. Well see that there are some settings to be
aware of to stop FTPSync doing its default behaviour.
-
To begin using FTPSync you will need to make a connection to the
Seal server.
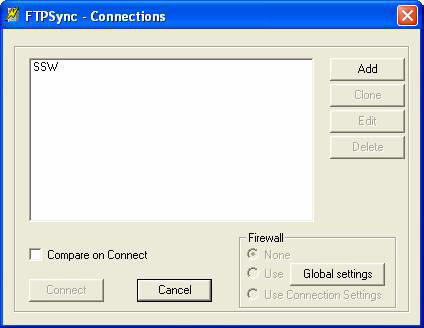
If no SSW connection exists on the start up window, click the Edit
button and enter the details shown below:
You will need to obtain the password from the SSW entry in Time PRO!
Note
: Make sure "Passive Mode" is on as some servers and firewalls require
it and it will still work with those that don't require it.
Passive mode is required by some firewalls/proxy servers and is when
the remote server waits (passively) for a data connection from the
client, FTPSync, rather than actively making a connection to the
client. If you're unsure whether you require passive mode, then set it
on.
-
Once the SSW connection is configured, select the compare checkbox
 to compare things like date updated and file size and report which
file is newer and what files will be overridden by uploading or
downloading.
to compare things like date updated and file size and report which
file is newer and what files will be overridden by uploading or
downloading.
-
Click on the connect button to establish a connection.
-
Begin by browsing to the folder on Ant that you wish to
synchronise. Tip: If you have multiple folders, do them one folder
at a time it saves making errors.
Before going any further, select the Options page from the Tools menu
and select the Folder Exclusions tab. Then add
_vti_cnf
and
zz
to the exclusions list and check "Activate exclusions". This is a
FrontPage folder and is not needed for synchronisation, so excluding
it makes comparisons faster.
-
Browse to the matching location on Seal. Make sure that the path
name begins /Inetpub, not /D:/Inetpub

-
If synchronising involves the creation of new folders on Seal then
browse to the folder level above the new folders and make sure you
have the Include sub-folders check box checked.
-
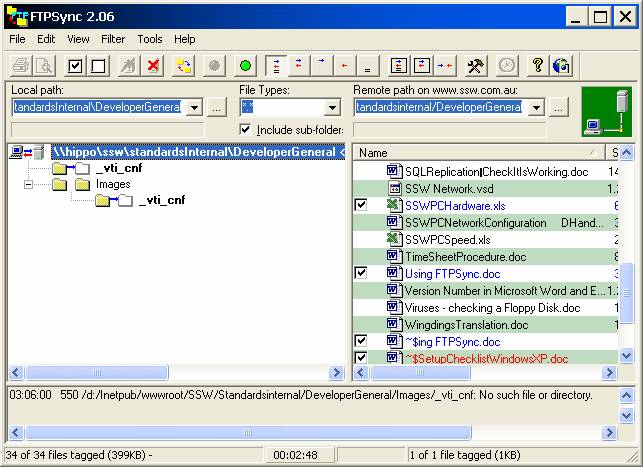
Click on the top item in the left hand pane and the file list will
appear.

-
The files that FTPSync thinks it should synchronise are colour
coded. The blue ones are newer on Ant and should go to Seal, the
red ones are newer on Seal but remember the rule above you wont
sync those red coloured files. Files in black are already in sync.
Note: If everything is blue (or red) and you are not creating an
entirely new section of the web site then check that the locations at
the top of the right and left panes correspond they probably dont!
-
The boxes next to the files will be checked, if you want to be
extra cautious you should uncheck the ones next to any red files.
-
Click on the green Synchronise button.

-
When the next screen appears, take care:
Make sure that the Transfer 0 files from Remote to Local check box is
unchecked. Then click the OK button. The transfer will proceed and the
window advising of the progress will appear at the start and disappear
when finished.
-
Check that the transfer was successful and that you didnt get any
errors.
Copyright 1998, 1999 - FileWare Limited
Acknowledgements
David Reidy
Peter Ahn
Jatin Valabjee