Enhance your code's integrity with these vital guidelines focused on maintaining high standards of quality. This collection emphasizes best practices for code health checks, consistent styling, and ensuring security against common vulnerabilities.
The real value of the code health system is that is made improvements in code quality more visible to the team and managers. By including several steps to the build process, the results of the analysers included in previous steps can be extracted out and summarised in a report spanning the project's lifetime.
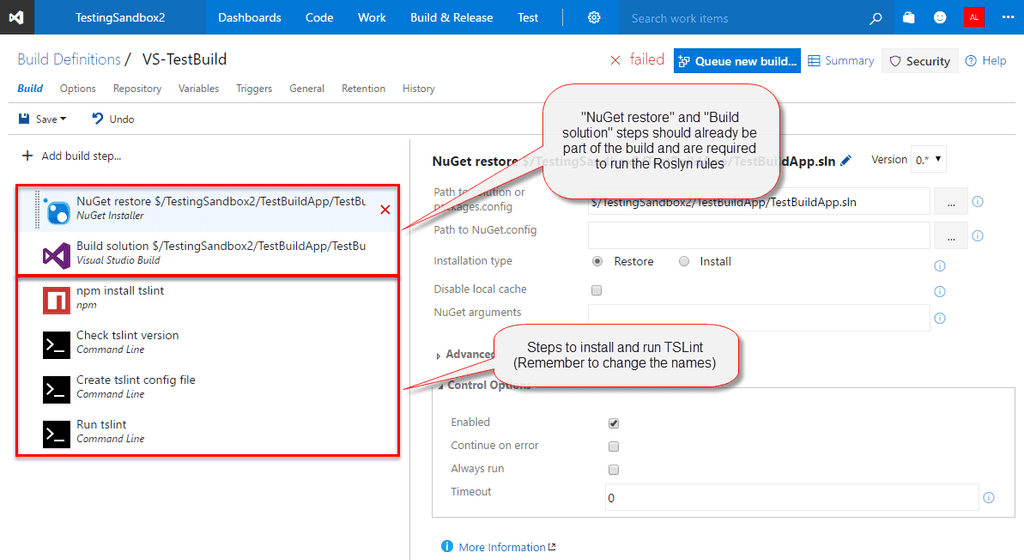
Ensure "Restore NuGet Packages" & "Build Solution" are in the build definition to run the Roslyn analysers.
Add several npm and command line steps to the build definition to run tslint. (On premises builds require an additional step).
Include an identifying variable "PrimaryBuild" to the build definition.
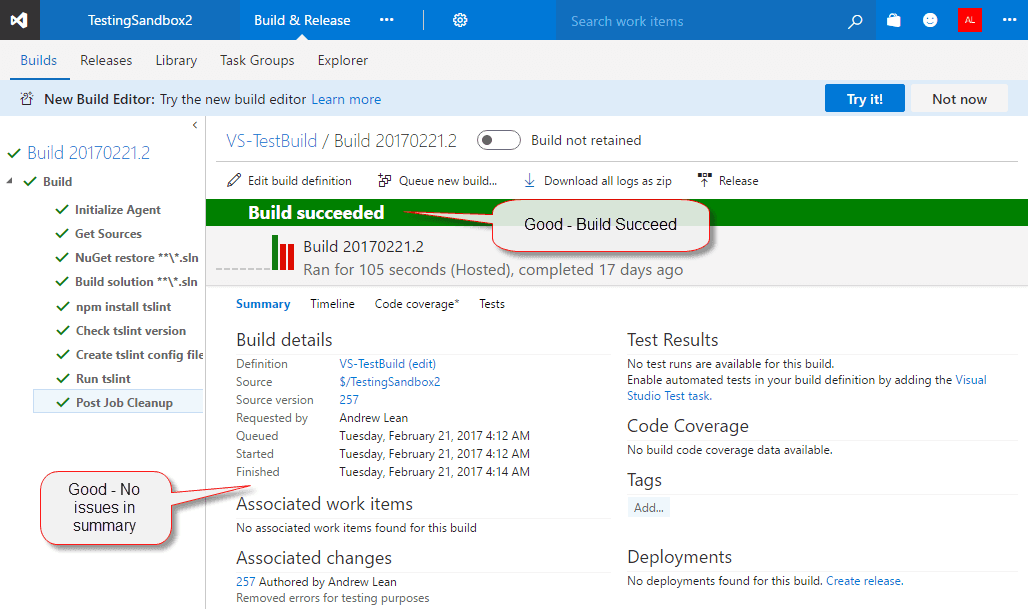
Check the build is running without issues.
The resulting build should look like this:
Figure: Good example - Build Passing with no summary issues
Ensure utilisation of TeamBuild2015 or higher. (No support for XAML builds)
Edit the build definition on <CompanyName>.visualstudio.com, and add the following build tasks.
If your project does not contain TypeScript files, then you do not need to include the TSLint build tasks.
Figure: Good example - Steps added to build definition
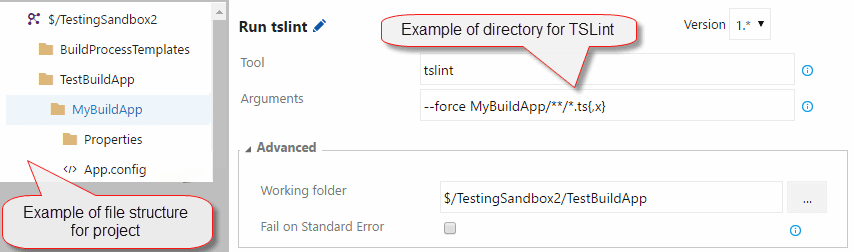
Figure: Example directory for TSLint run commands
Under advanced for the Command Line tasks, the Working Directory can be specified if necessary.
TsLint
 **Npm** - Install tslint and typescript
 **Name:** npm install tslint
 **Working Folder:** <Top Directory>
 **Npm Command:** install
 **Arguments:** -g tslint typescript

 **Command Line** - Check the version (Useful to determine rule discrepancies across builds)
 **Name:** Check tslint version
 **Tool:** tslint
 **Arguments:** -v

 **Command Line** - Builds a default configuration file for the build (Without it issues can differ between build and development environment
 **Name:** Create tslint config file
 **Tool:** tslint
 **Arguments:** --init

 **Command Line** - Run tslint, force is required to stop the build from crashing (TSLint will return and exit code of 1 regardless of if issues exist)
 **Name:** Run tslint
 **Tool:** TSLint
 **Arguments:** --force <Solution Directory>/\*\*/\*.ts{,x}
If your build is being hosted, then the config file must be reloaded every time. If your build is running on premises, the config file will attempt to load over the existing one and break the build.
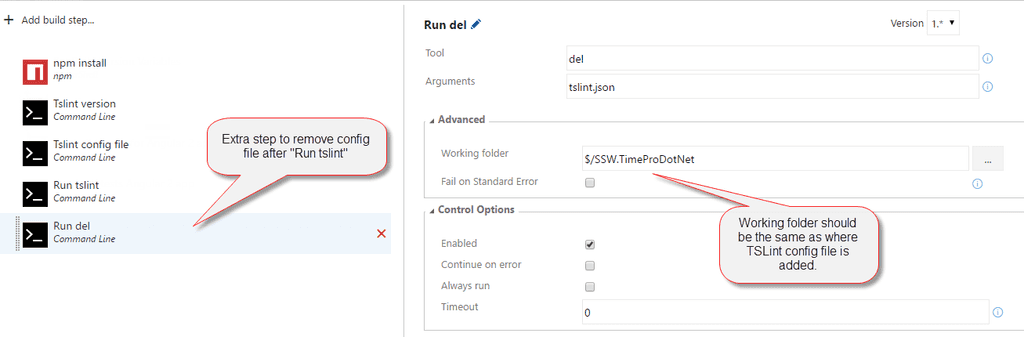
If this is the case, just add a step to delete your config file after the scan is complete.
Figure: Command line step to remove the config file (tslint.json) after the linter has run
 **Command Line** - Remove the tslint config file, as it will break future scan if the build is on premises if a config file already exists and an attempt to add another one is made.
 **Name:** Remove tslint config
 **Tool:** del
 **Arguments:** tslint.json
Once complete, save the build definition and run the build.
Then check the build is successful.
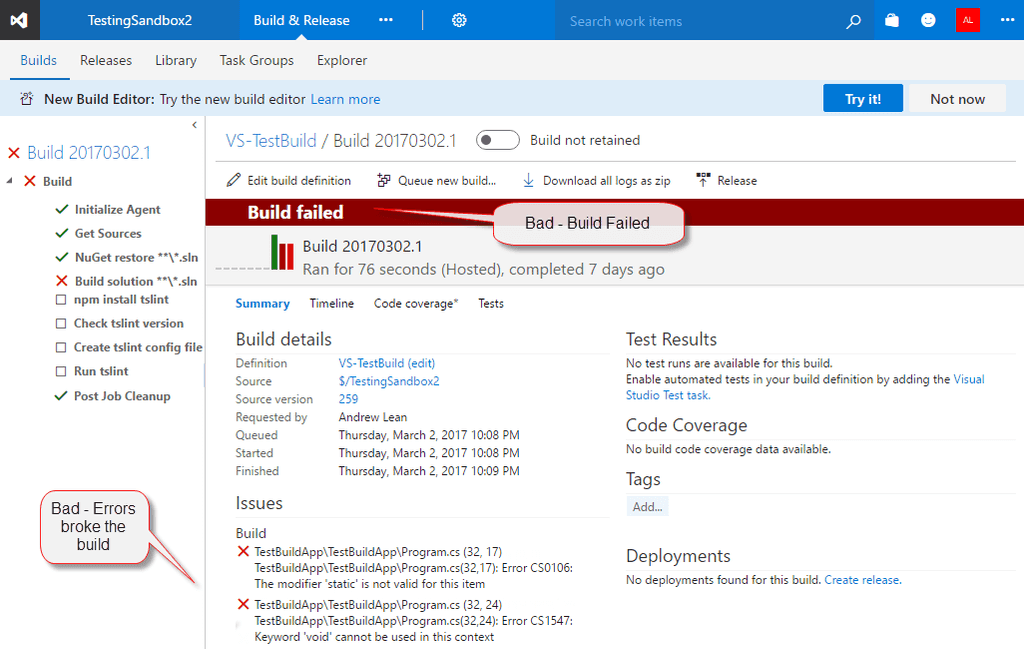
If the build fails (due to errors), these should be corrected in the development environment.
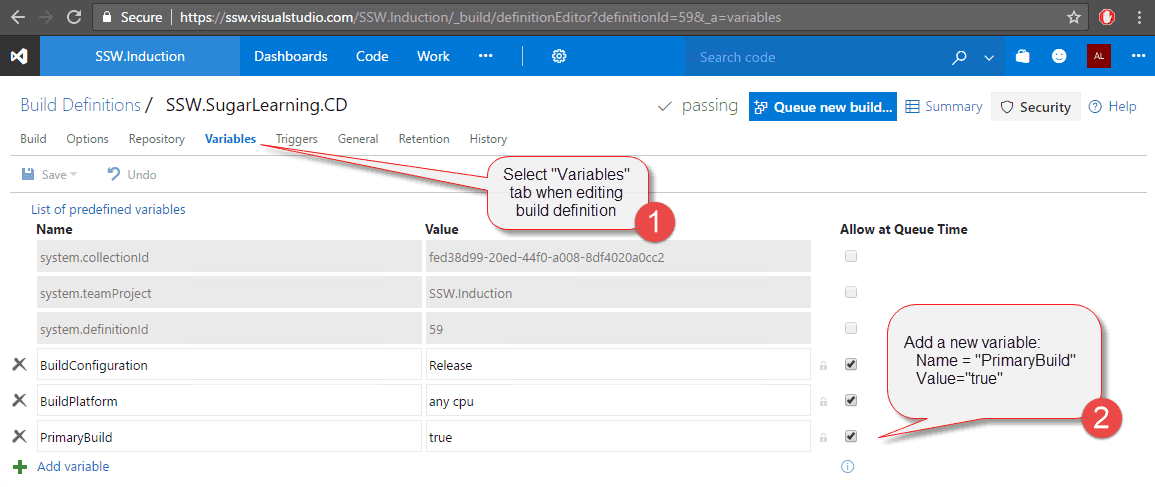
Include "PrimaryBuild" variable
For the purposes of reporting, a unique tag must be added to the build definition which the Code Health steps have been applied to.This is done with the addition of a variable (Name = PrimaryBuild, Value = true)
Figure: Steps to add PrimaryBuild variable to build definition
Check the build is running without issues
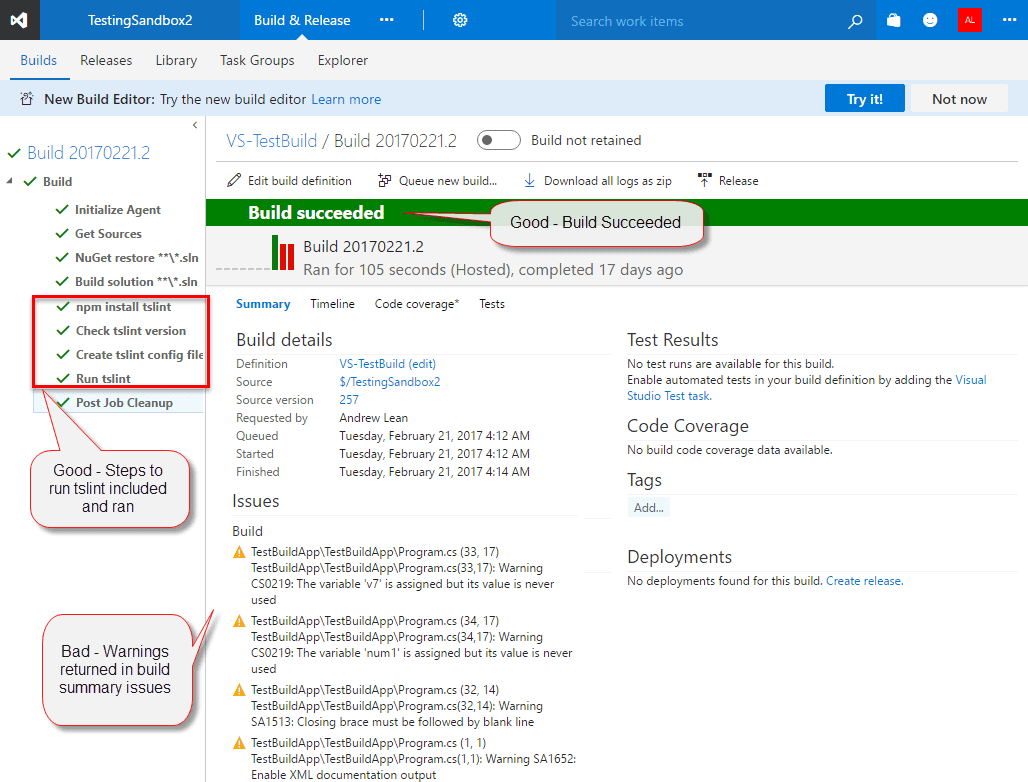
Figure: Bad Code with a Good Code Health Implementation - Build broke due to compile errors. Must fix to proceed
Figure: Bad Code with a Good Code Health Implementation - Successful build with warnings. These should be reprioritised as errors, or removed
Figure: Good Code with a Good Code Health Implementation - Successful build with no warnings
The real value of the code health system is that is made improvements in code quality more visible to the team and managers. By including several steps to the build process, the results of the analysers included in previous steps can be extracted out and summarised in a report spanning the project's lifetime.
For lightweight web projects such as Angular, often VS Code is more appropriate than Visual Studio. So make sure your code quality remains consistent with CSSLint and ESLint.
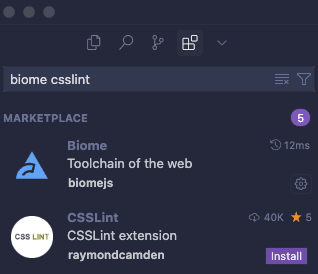
For web projects, we advocate the use of CSSLint for css files and Biome for typescript files. (Why you should be using TypeScript instead of JavaScript)
Linters for these can be easily added to VS Code via extensions.
Simply select the "Extensions" tab, search for "CSSLint" and "Biome" and click "Install" on each respectively.
Figure: Addition of CSSLint and ESLint to VS Code Project
If you prefer not to use the Extensions, you can install them using npm as normal.CSSLint (CSSLint npm guide)
Biome (Biome npm guide)
For lightweight web projects such as Angular, often VS Code is more appropriate than Visual Studio. So make sure your code quality remains consistent with CSSLint and ESLint.
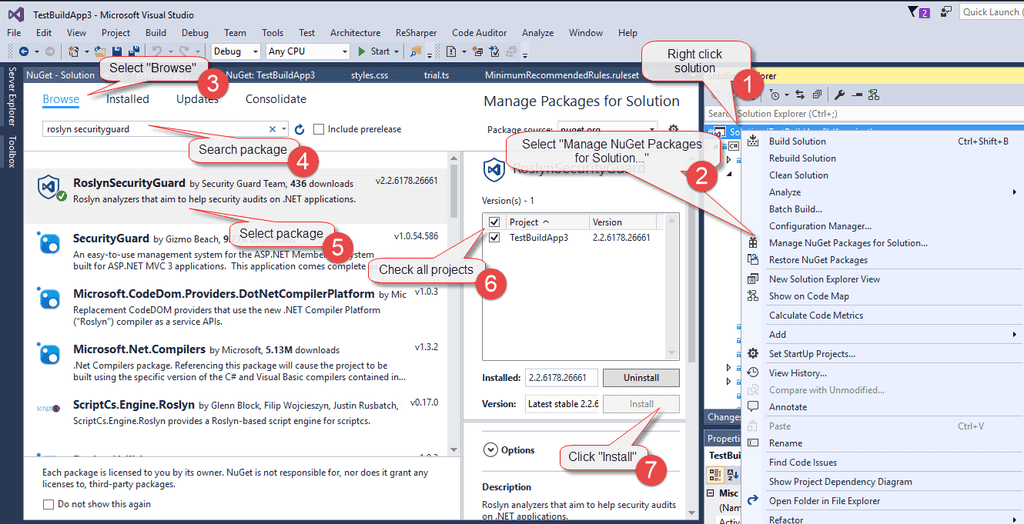
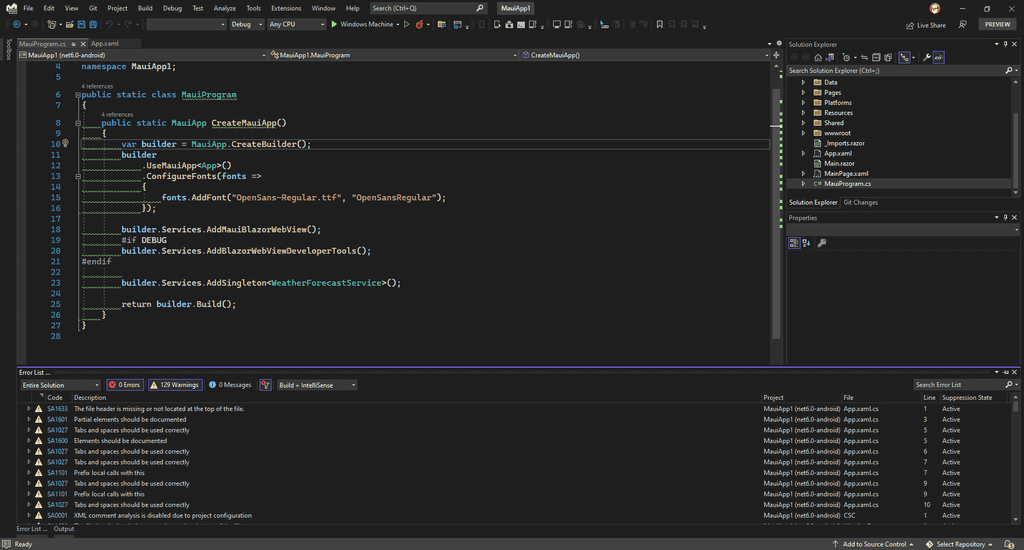
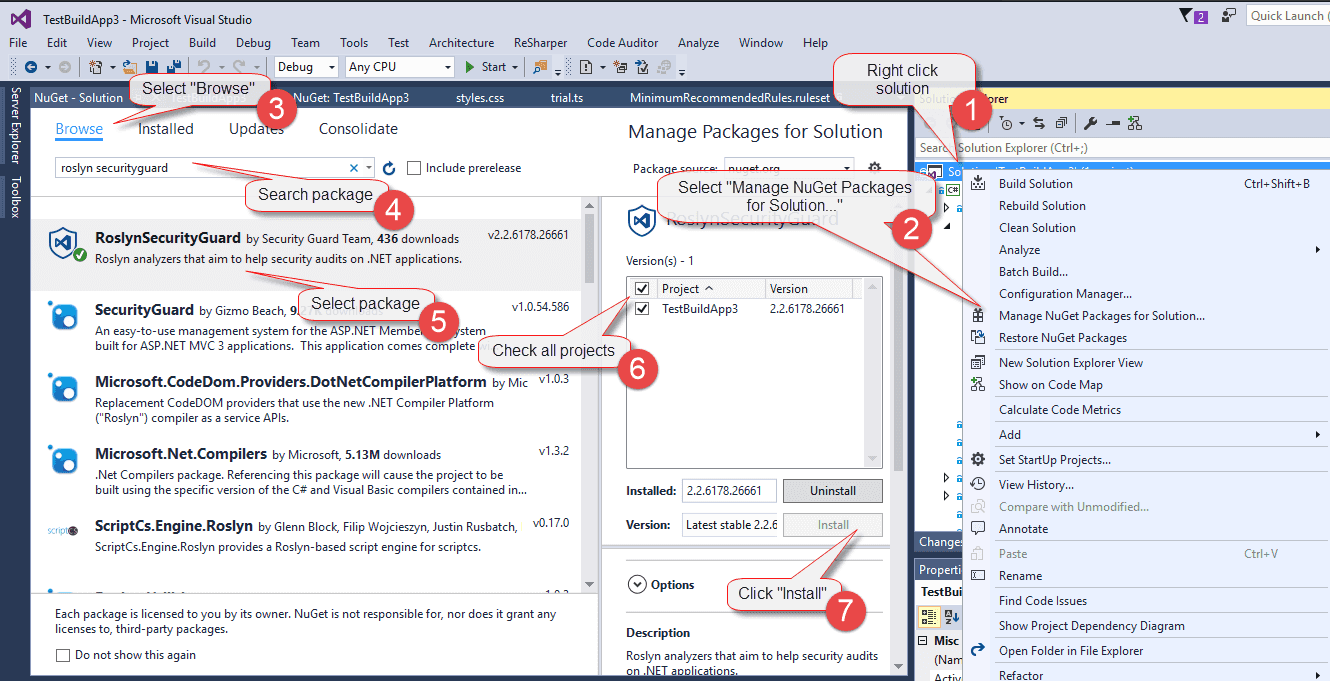
The code quality standard should extend the Visual Studio Analyzer. A wide variety of additional analyzers can be included via Nuget, the minimum standard should include Roslyn Security Guard.
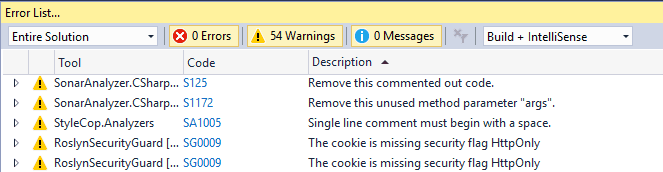
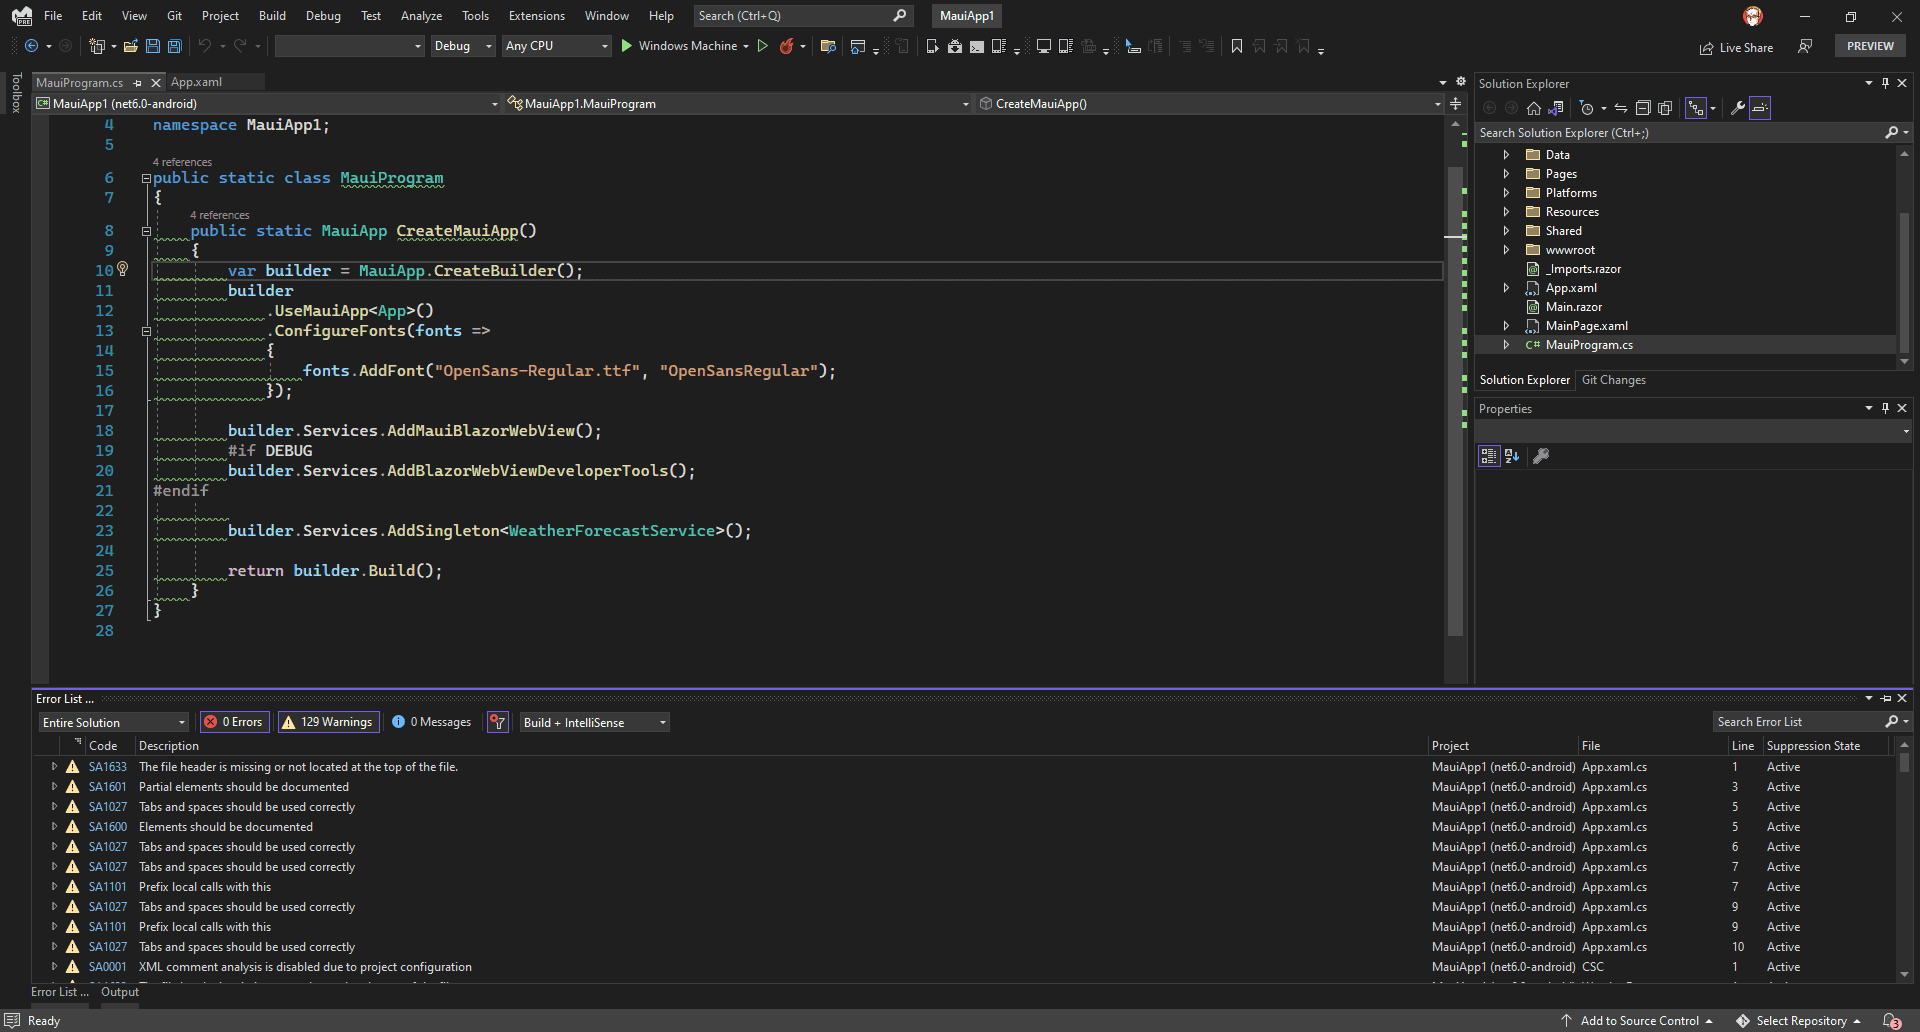
Issues from these will now be returned in the Visual Studio analyzer error list.
Figure: New Roslyn Rule issues raised in Visual Studio Analyzer
Your goal should be to get the issues in a solution down to zero.
If you believe the issues being raised are not important, please check the section below which outlines how to change the ruleset.
Modify Visual Studio Analysis Ruleset
The goal is to develop a shared ruleset across projects. This will ensure the same standard and quality of code is maintained across all of the company's projects.
Any project specific rules should be documented in "_docs\Instructions-CodeHealth.md" which is to be kept in the solution as per Do you make awesome documentation?
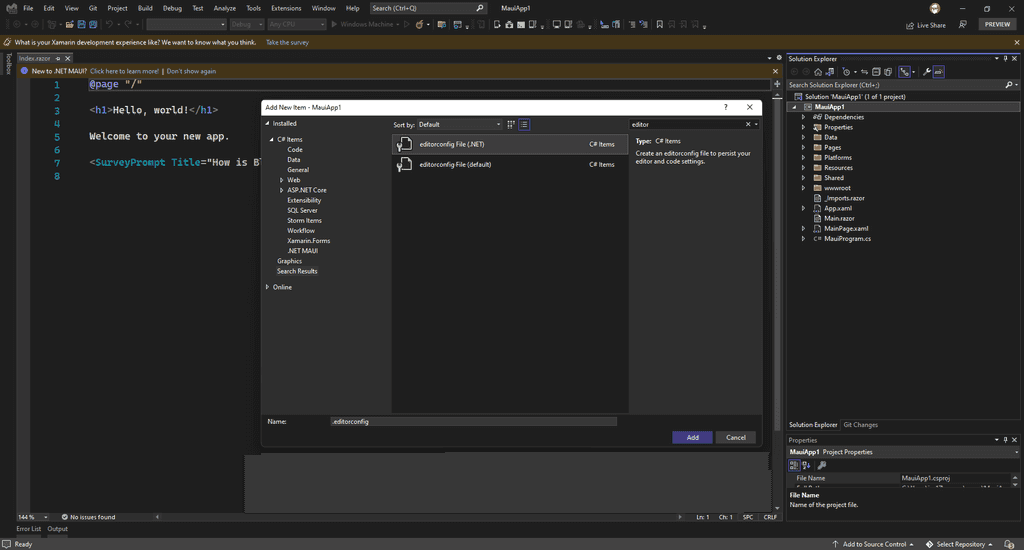
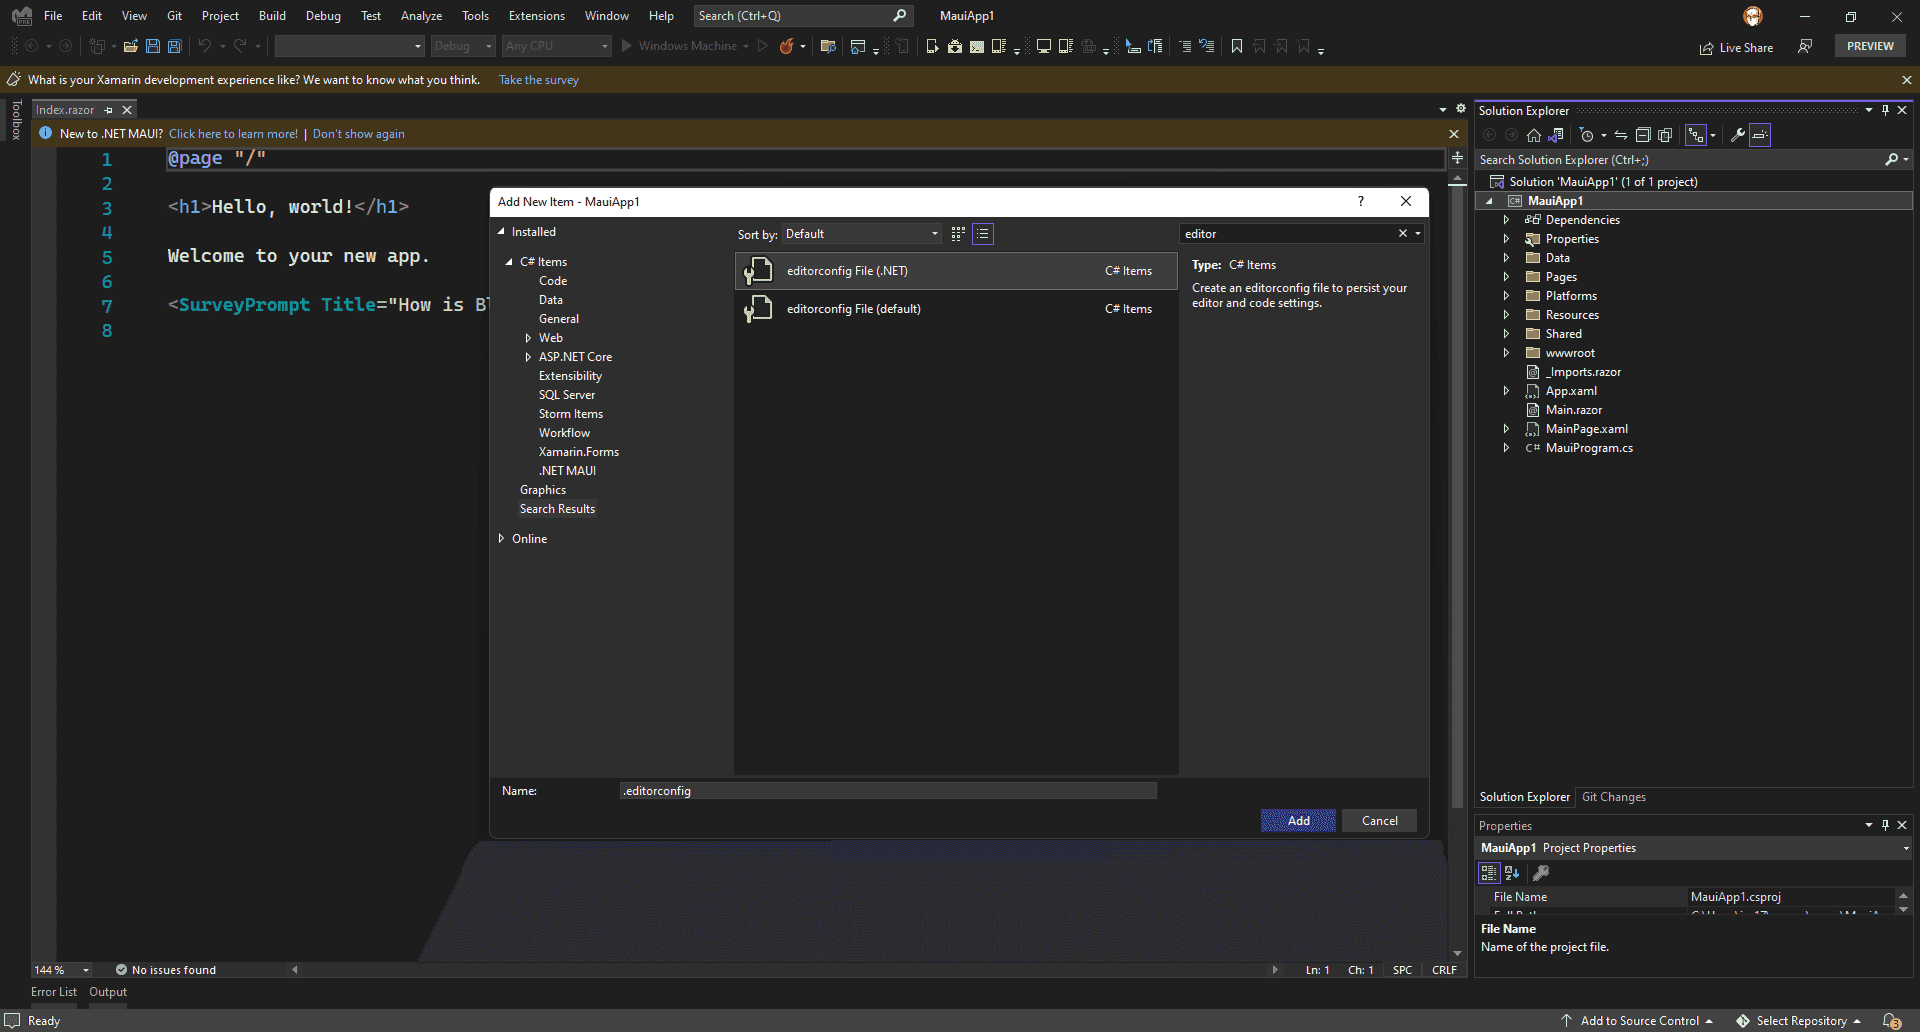
You can configure the severity of analyzer rules in an EditorConfig file.
The code quality standard should extend the Visual Studio Analyzer. A wide variety of additional analyzers can be included via Nuget, the minimum standard should include Roslyn Security Guard.
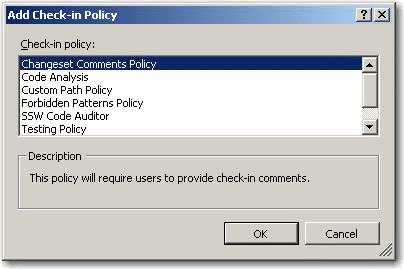
Check-in policies are a great tool to enforce quality code before it hits your source control repository. SSW recommends that the following check-in policies be enabled by default on your project:
Changeset Comments Policy - To enforce that all check-in contain comments
SSW Code Auditor - To enforce coding standards and best practices before check-in
Testing Policy - To enforce that unit tests should all pass before code can be checked-in
Code Analysis Policy – To enforce that code analysis rules are not broken
Builds Policy – To enforce that the developer has built the project end to end before they check-in
More Information
To enable these policies:
Right click the Team Project in Team Explorer > Team Project Settings > Source Control
Select the check-in policies above
Click OK
Chose check in policy Figure: Chose check-in policies in TFS
Check-in policies are a great tool to enforce quality code before it hits your source control repository. SSW recommends that the following check-in policies be enabled by default on your project:
The Open Web Application Security Project (OWASP) is a non-profit charity organization whose sole purpose is to enable other organizations to develop applications that can be trusted. Their most prominent piece of literature is the OWASP Top 10 – a list of the most critical risks found in software. It is a “living” list, which means it is updated as vulnerabilities become known and more or less common.
OWASP Top 10 2021
The current OWASP Top 10 states the following are the top risks for web applications today. Knowing and securing against these will give the biggest bang-for-buck in securing your website.
Broken Access Control: Insufficient controls in place to implement the principle of least privilege, insufficient access control protections
Cryptographic Failures: Data transmitted in clear text, sensitive data not encrypted at rest, using weak or broken cryptography algorithms
Injection: Failure to validate user-supplied data, queries not parameterized
Insecure Design: Security not considered as a baseline principle, security added as an after-thought (essentially, need to "shift-left" security)
Security Misconfiguration: Insecure default configurations, misconfigured HTTP headers and verbose error messages containing sensitive information
Vulnerable and Outdated Components: Packages and dependencies not kept up to date, versions with known vulnerabilities kept in the product
Identification and Authentication Failures: Brute force attacks, credential stuffing, missing MFA, permits weak passwords, simple password recovery
Software and Data Integrity Failures: Failure of infrastructure configuration to protect against exploits, e.g. supply chain attacks, dependency package spoofing
Security Logging and Monitoring Failures: Not logging security events, not monitoring or auditing logs, not raising alerts for suspicious events
Server-Side Request Forgery: Arbitrarily fetching data from user supplied URLs
Other resources
Protecting against these is a large topic in their own right. There are plenty of resources with information on protecting against these, linked below:
OWASP Top 10 - The OWASP home page is a little difficult to navigate but contains fantastic information on the risks and how to protect against them. Use the link above to get details on each of the vulnerabilities, with examples on attacking, “Cheat Sheets” for prevention and risk/impact assessment
The Open Web Application Security Project (OWASP) is a non-profit charity organization whose sole purpose is to enable other organizations to develop applications that can be trusted. Their most prominent piece of literature is the OWASP Top 10 – a list of the most critical risks found in software. It is a “living” list, which means it is updated as vulnerabilities become known and more or less common.
When working on software projects, it’s important to keep track of your codebase's size and structure. Code line metrics help you understand the scope of the code, identify potential areas for refactoring, and maintain a healthy balance between files, blank line comments, and code. Without these metrics, your project can become difficult to manage, and you may struggle to track progress or maintain code quality.
Using cloc to measure code line metrics
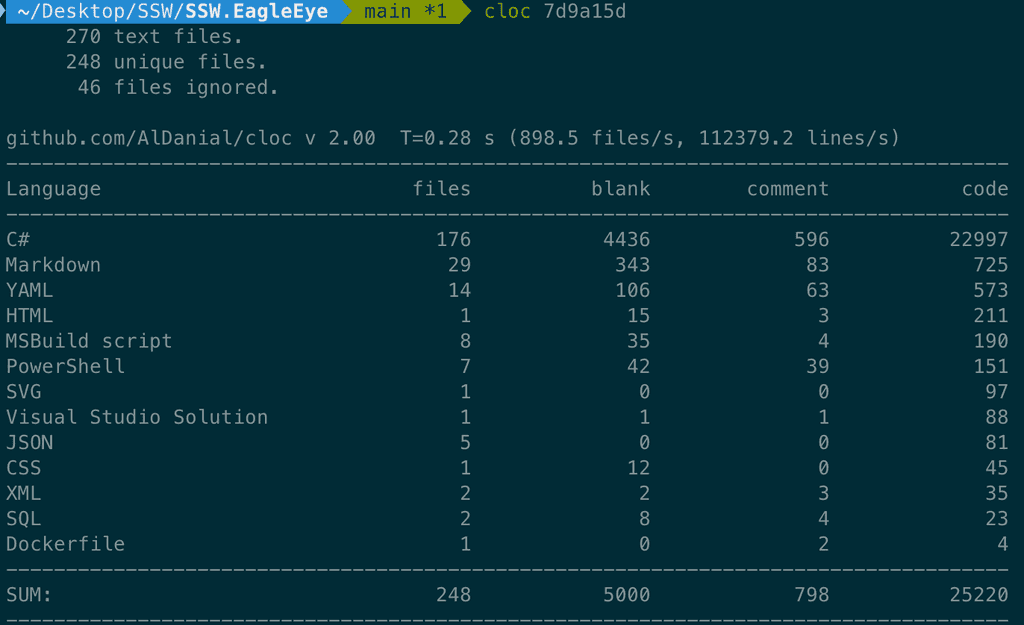
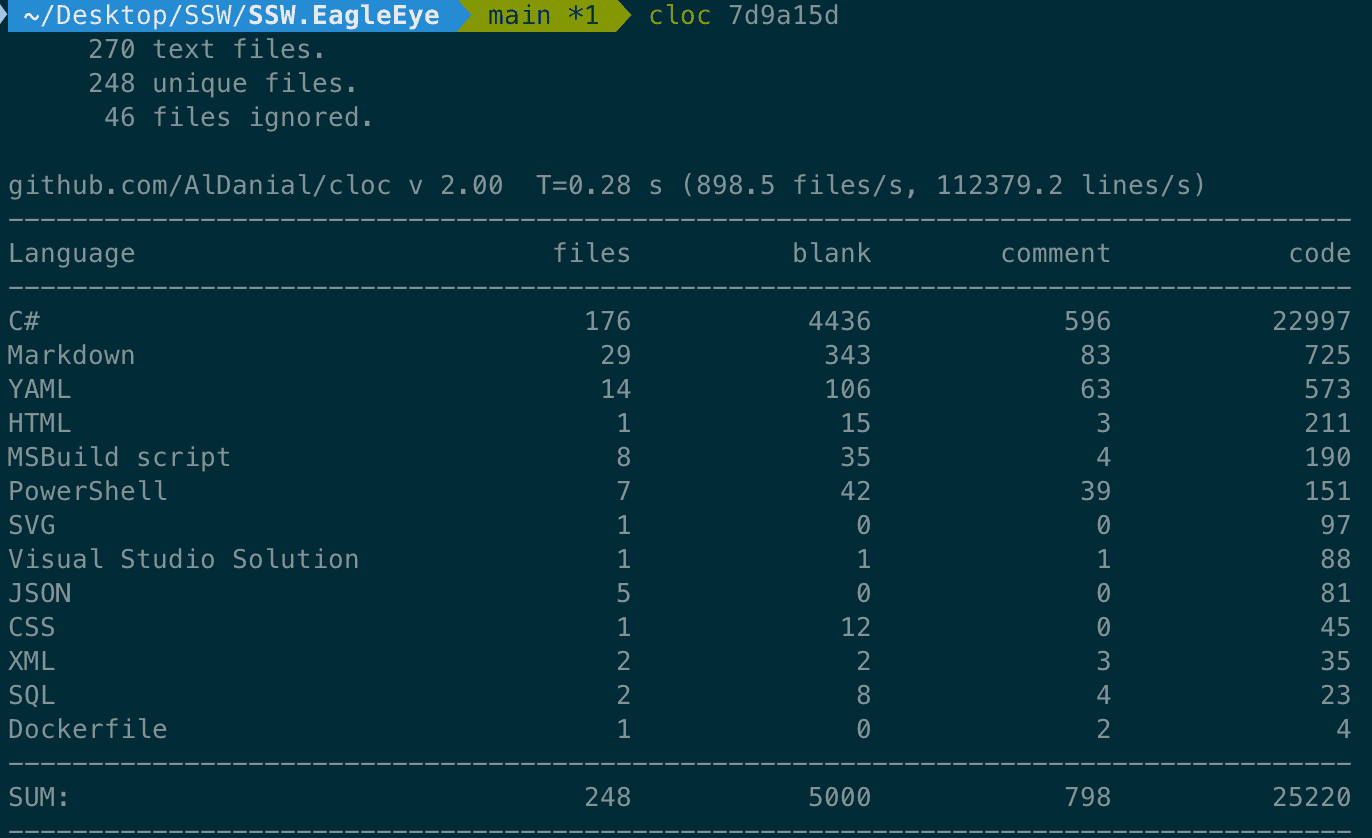
The tool cloc is a straightforward yet powerful way to count the number of files, blank lines, comment lines, and physical lines of source code across various programming languages. Here’s how you can use it effectively:
Figure: Good example - Running cloc on EagleEye project
Understand the output
File Count: The number of files in your project. Helps you understand the size and complexity
Blank Lines: These can indicate the organization of your code. Provides insights into the readability
Comment Lines: The number of lines that contain comments. Helps you gauge how well-documented the code is
Physical Lines of Code (LOC): Counts the actual code lines, excluding blank lines and comments
✅ Benefits of tracking code metrics
Tracking code metrics with cloc helps in maintaining clean and well-documented code. It provides insights that can lead to:
Improved code quality: By identifying parts of the code that are poorly documented or unnecessarily complex
Better project management: Enabling project leads to assess the size and complexity of the codebase and plan accordingly
Code review efficiency: Assisting in identifying files that have changed significantly and might require more thorough reviews
By integrating cloc into your workflow, you can ensure that your codebase remains manageable, maintainable, and well-documented as your project evolves.
When working on software projects, it’s important to keep track of your codebase's size and structure. Code line metrics help you understand the scope of the code, identify potential areas for refactoring, and maintain a healthy balance between files, blank line comments, and code. Without these metrics, your project can become difficult to manage, and you may struggle to track progress or maintain code quality.