> Screenshots
Welcome to the 'SSW Data Renovator' User Guide. This
help facility is designed to let you quickly and easily
start using 'SSW Data Renovator'.
-
Prerequisites
-
How it works
SSW Data Renovator works on two databases that have
similar structure.
Data Renovator can automatically clear data from the
new version. This is useful when you are about to give
a client a new version of your application and you
want the data mdb file to be blank. To clear data, it
analyzes database relationships and deletes the
records in the appropriate order.
Between two databases 'SSW Data Renovator' compares
structure (asks a few questions about the deleted
tables and fields - as these may be renames) and
generates reports. These reports indicate what
operations (i.e. add, delete or rename) need to be
performed on the old database structure, so they can
use the new front end.
For remote deployment upgrades, the above information
can also be converted to a table that can be used with
'SSW Data PRO!'. ie. when the data upgrade is to be
done at the client's site.
The most popular option is the 'Automatic Data
Upgrade'. It can clear one database (the master copy)
and copy the data from the second database (the
client's data) into the master database.
-
Getting Started
After installing 'SSW Data Renovator', it will create
an icon on your start menu. Click on "Start", select
"Programs" and look for the 'SSW Data Renovator'
group. Click on the 'SSW Data Renovator' icon and the
application will start.
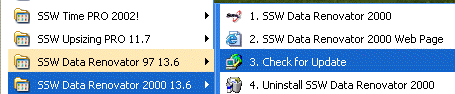
Figure: SSW Data Renovator options appear in your
start menu once installed
-
First time use
When 'SSW Data Renovator' is installed
NorthwindDATA(97/2000)_Ver1.mdb (Old DataVersion) and
NorthwindDATA(97/2000)_Ver2.mdb are added to the 'SSW
Data Renovator' sample folder on the C: drive....
C:\DataPRORenovator(97/2000)\Sample (drive letter will
be different depending upon where 'SSW Data Renovator'
is installed).
This user guide uses the above sample files
The 'Select the Project' screen appears when the
application starts. This screen has an existing
project called 'Northwind'. You can use this project
for practicing.
-
Choose 'Northwind' In Projects window.
-
Then make sure the Master and Old database
path is valid. If not choose the databases
using the browse button. Read above for
which databases to select.
-
When you have completed these steps, click
on "Next".
|
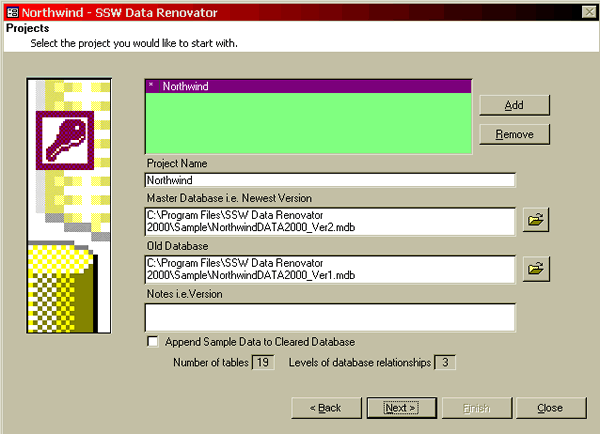
Figure: Set up the Northwind database for testing
-
Tutorial
Now we will guide you through the use of 'SSW Data
Renovator', using a step by step tutorial.
|
Example
Microsoft purchased your database last year.
Since then you have made a new version of your
application (front end), in addition you have
also made structural changes to your back end.
Now they want the latest version of the
database. To do this you will need to update
their back end first.
In the following examples we will explore how
you can do this job painlessly by using 'SSW
Data Renovator'.
Important
The following the steps in the tutorial
example will modify the sample database
NorthwindDATA2000_Ver2.mdb (and possibly
NorthwindDATA2000_Ver1.mdb).
Please make a backup of:
-
NorthwindDATA2000_Ver1.mdb to
NorthwindDATA2000BACKUP_Ver1.mdb and
-
NorthwindDATA2000_Ver2.mdb to
NorthwindDATA2000BACKUP_Ver2.mdb.
Now you are ready to continue the tutorial on
the original *.mdbs.
|
It is assumed that you have installed 'SSW Data
Renovator' and will toggle between the tutorial and
utility when following instructions.
It is strongly recommended that you follow all step by
step instructions to reduce learning time.
-
New Project
You can create a new project by clicking the 'Add'
button on the 'Select the Project' screen.
The 'New Project' screen will appear after you
click 'Add'.
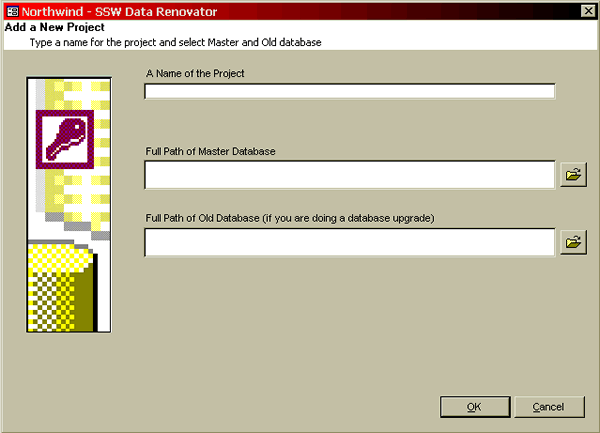
Figure: Create a new project
-
Main Menu
After you have created or selected a project 'Main
Menu' screen shows. This screen displays the main
options available with 'SSW Data Renovaor'.
On this screen when you select an option it displays
more information on the method at the bottom.
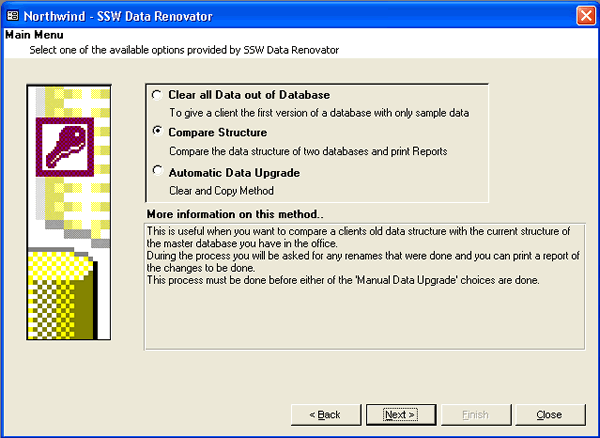
Figure: Select one of the available options to see
its description
-
Sample Data
|
Append Sample Data
'The 'Append Sample Data' option is located on
the 'Data to Delete' screen. After deleting
all data from a Database SSW Data Renovator
can append data from Sample tables found in
the database.
For example the Categories Table in the
Northwind sample database contains a list of
product categories. If this table is empty and
referential integrity is enabled then products
will not be able to be added without having a
matching product category.
SSW Data Renovator allows Sample tables to be
stored in a database and appended after all
the data is removed from the database. This
means that lookup tables can be populated with
basic information before distribution to new
sites.
Defining Sample Tables
To define a sample table, create an exact copy
of the table with the same table name plus
'Sample' on the end of the name. i.e. the
sample table for the Categories table would be
CategoriesSample.
SSW Data Renovator detects sample tables and
shows which tables have sample tables defined.
You can then set which tables should have
sample data appended.
|
Figure: Set which tables should have sample data
appended.
|
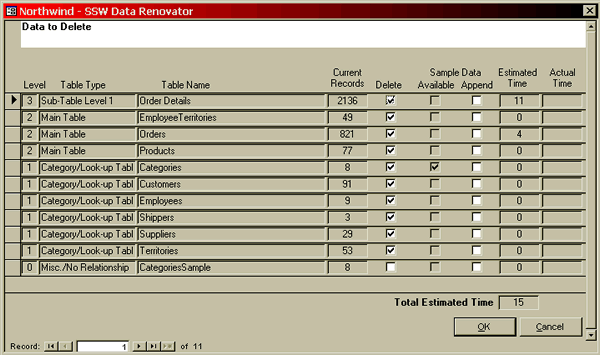
Example
Appending Sample Data
In the figure 'Data To Delete' you can see
check boxes for 'Sample Data Available' and
'Sample Data Append'. The 'Available' checkbox
lets you know if there is any sample data
available for that Table. Checking the
'Append' checkbox will append sample data
after all data has been deleted from the
database.
To continue the Tutorial, check the 'Append
Sample Data' box for the Categories Table.
Next, press the 'Start >' button to begin
deleting data.
|
-
Clear Data
|
Example
Clear all Data out of Database
You have a new customer and you need to make a
blank copy of the back end.
After you are sure that you want to clear the
master database, click the 'Next >' button
to proceed. 'SSW Data Renovator' analyzes the
database relationships and works out the order
to delete.
|
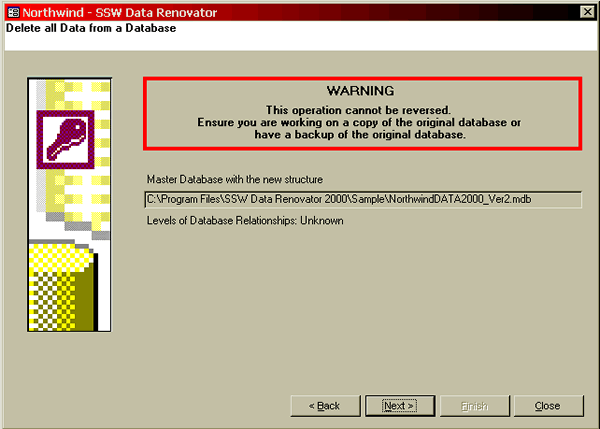
Figure: With the 'Clear all Data out of Database'
option you can delete all the existing data out of
your master database
Figure: The order that tables will be deleted from
is show on the 'Data to Delete' screen. Tables at
the top of the list will have their data deleted
first.
-
Compare Structure
'Compare Database Structure' compares the structure of
the master and old databases. This is useful when you
want to compare the client's old data structure with
the current structure of the new master database.
During the process you will be asked for any renames
that were done and you can print the report of
changes. You can then make this changes manually.
|
The following options on the left are
available -->
Details for all the options available are
explained later.
Initially, only the first and the fourth
options are available. To compare
relationships and indexes 'SSW Data Renovator'
needs to compare the database structure first.
|
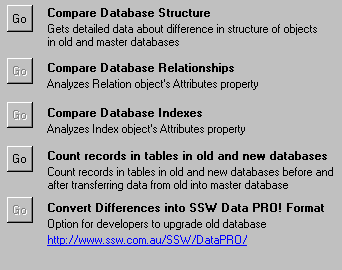
Figure: Available options for comparing
structure
|
-
Database Structure
Compare Database Structure
'Compare Database Structure' compares the structure of
the master and old databases.
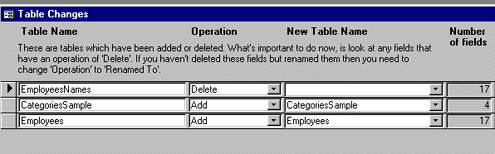
First of all it compares the tables and generates the
'Table Changes' form. This form displays the
information of tables added or deleted.
'SSW Data Renovator' cannot determine if any tables
have been renamed. This is where you can help.
|
Example
Checking for renamed Tables
In the figure below the developer has made a
rename of the 'EmployeesNames' table to a
shorter and more practical 'Employees'.
-
To let 'SSW Data Renovator' know about this,
select 'Rename To' from the 'Operation'
combo and 'Employees' in the 'New Table
Name' combo.
-
Upon saving (go to a new record) please note
that the corresponding record above has the
'Operation' and 'New Table Name'
automatically filled in.
-
Click 'Next' and 'SSW Data Renovator' will
start checking the fields.
|
|
Example
Checking for renamed Fields
In the figure below the developer has made a
rename of the 'PostalCodeOfAust' field to a
shorter and more practical 'PostalCode'.
-
To let 'SSW Data Renovator' know about this
select 'Rename To' from the 'Operation'
combo and 'PostalCode' in the 'New Field
Name' combo.
-
Upon saving please note that the
corresponding record above has the
'Operation' and 'New Field Name'
automatically filled in.
- Click 'Next'
-
You will get a message box with the
fillowing message "Do you wish to analyze
the properties of the fields in both
databases? Esitmated time: 1 minute". Click
'Yes' to compare the properties of the
fields in both databases.
|
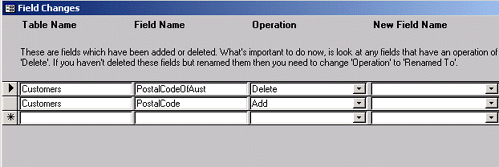
Figure: Field Changes
The following four reports are generated after the
above process:
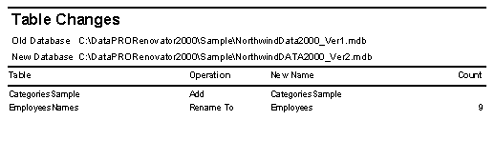
Figure: Table Changes Report - This report shows
what changes need to be made to tables in the old
database
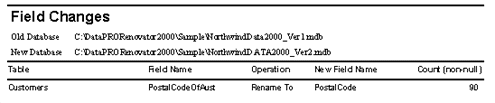
Figure: Field Changes Report - This report shows
what changes need to be made to the fields in tables
in the old database
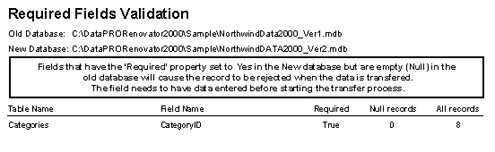
Figure: Required Field Validation Report - This
report shows the fields that have 'Required'
property set to 'Yes' in the New database but are
empty (NULL) in the old database
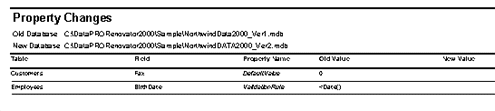
Figure: Property Changes Report - This report shows
what changes need to be made to the properties of
table fields in the old database
-
Change Relationships
Compare Database Relationships
You have already compared the structure. Now you can
compare the relationships. This process just takes on
click.
|
Example
Comparing Relationships
Click the 'Go' button for 'Compare Database
Relationships' on 'Compare Structure' form.
|
This process compares the relationships and generates
the following reports:
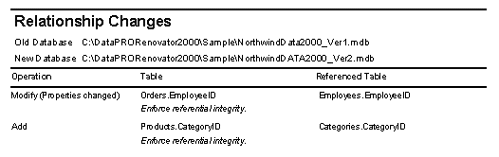
Figure: Relationship Changes Report - This report
shows the relationships that need to be added,
deleted and changed in the old database
Many database programmers use standard naming
conventions ie. using ID in the field name to indicate
a relationship with another table. ie. ClientID has
many Invoices.
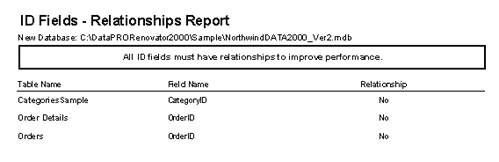
Figure: ID Fields - Relationship report - This
report shows all Fields with ID characters without a
relationship in the new database
-
Change Indexes
Compare Database Indexes
Like relationships, after comparing the structure you
can compare the Indexes.
This process creates three reports after comparing the
indexes of master and old database.
|
Example
Comparing Indexes
Click the 'Go' button for 'Compare Database
Indexes' on 'Compare Structure' form.
|
The reports are:
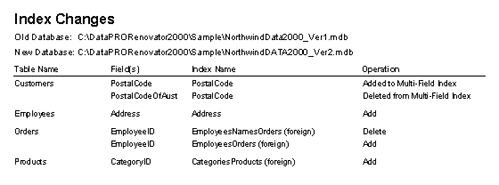
Figure: Index Changes - This report shows the all
indexes that need to be added, deleted and changed
in the old database
This report checks all exact indexes that needs to be
added or deleted. If you have only renamed a
relationship (using utility like SSW Data PRO!) you do
not need to delete and add index because they are
still the same. For example compare the two reports
'Index Changes' and 'Exact Index Changes', you will
find that with Products and Orders tables you do not
need to delete and add the indexes.
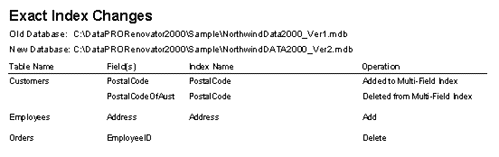
Figure: Report - Exact Index Changes
Many database programmers use standard Indexing
conventions ie. using ID in the field name to indicate
an Index ie. ClientID has an Index.
This report shows all Fields with ID characters
without an Index in the new database.
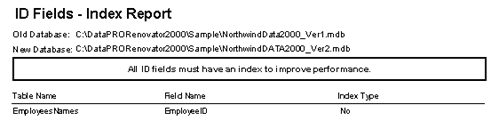
Figure: Report - ID Fields Index
-
Count Records
Count records in tables in old and new databases
This option lets you count the records in your old and
new databases simultaneously. After counting the
records it generates a report so you can be assured
that the records are as you expect:
|
Example
Counting number of records in tables
Click the 'Go' button for 'Count records in
tables in old and new databases' on 'Compare
Structure' form.
|
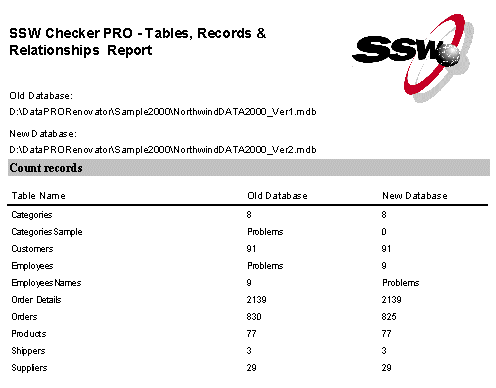
Figure: Report - Count Records in New Database -
This report gives the record count in tables of new
and old database. If any problems (i.e. table does
not exist) it will display 'Problems'
|
Implementing Changes
After completing this part you can use the
printed reports to make manual changes to the
old database on the basis of the reports.
|
-
Data PRO! Format
Convert Differences into 'SSW Data PRO!' Format
Before we talk about this new feature..... lets face
it, the job that 'SSW Data Renovator' does itself is
amazing. The time saved is a a big relief to
programmers even if they are just using the reports
(that tell them the differences) and implementing the
changes manually.
A commonly requested feature of earlier versions went
along the lines of...
"I email the new application version to the client
and use
the reports from 'The Renovator' to talk the client
through all the changes to the data mdb over the
phone. Still a pain on neck!!!! Can't I email them a
little converter program?"
'SSW Data Renovator' can convert all report content
into a table that can be used by 'SSW Data PRO!' for
automatic changes.
So now we use 'SSW Data Renovator' to convert all the
report content into a table that can be used by 'SSW
Data PRO!' (a separate product*) to replay the changes
automatically. (ie. Especially good in deployment).
After you use this option a table called
'DPRDataChange' is created in 'SSW Data Renovator'. To
replay this changes automatically your customer's
front end and backend should be under 'SSW Data PRO!'
control. In the front-end of your customer's database
there should be a table called 'zsDPDataChange'. You
need to copy all the records from 'DPRDataChange' in
'SSW Data PRO!' to 'zsDPDataChange' in your customer's
front-end. Next time your customer runs the front end
it will automatically replay the changes.
*'SSW Data PRO!' is a utility developed by SSW to
automatically commit structural changes into a
Microsoft Access database.
-
Automatic Upgrade
Automatic Data Upgrade
This should be your favourite option. 'Automatic Data
Upgrade' automatically works out the structural
difference between your old and new databases and
copies the data from your old to your new database.
You do not have to print any reports or worry about
manually changing the structure and copying data (like
the other options).
When will you need to use it?
-
If your new database has significant changes to the
data structure.
-
You have taken the database off-line. ie. You are
not the going to make data changes in the client's
database (old structure) while you have the copy of
their data. Once you use this option to copy the
data from the old database to the new database you
will return this mdb in the new structure to the
client.
-
The client has been instructed not to use the
database until you send them the new data version.
When you may not want to use this option?
If you have a very large database (>100MB) and have
only made a few changes ( i.e added relationship or
changed properties of a table) it is going to be a lot
quicker to use the 'Compare Database Structure' method
and make the few changes manually.
This is because the 'Automatic Data Upgrade' option,
copies all data from the old database to the new
database.
|
Example
Using Automatic Upgrade
You made few structural changes to in your
database that you do not remember. Now you
need to go out to customers and upgrade their
database. You just want to copy the old data
to the new database.
-
You will need to
clear all data out of the new database
before you can append the old data into the
new database. To do this click on the 'Clear
New Database' button.
-
Click 'Start >' on the 'Data To Delete'
form. This will clear all the data from the
new database.
|
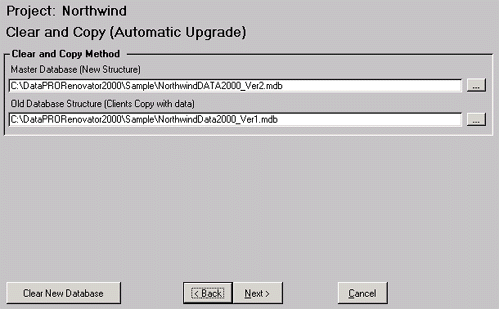
Figure: Using Automatic Upgrade
Before it copies data it needs to analyze the
structure of the old and new databases.
|
Example
Using Automatic Upgrade (continued..)
After clearing the data in above example,
click the 'Next >' button to start
analyzing the structures. This will take you
through the steps explained in
Compare Structure.
After comparing the structures it will show
the 'Data Transfer' form. This form shows the
record count in all tables of the old and new
databases. Click 'Next >' to start
appending data from the old database to new
database.
|
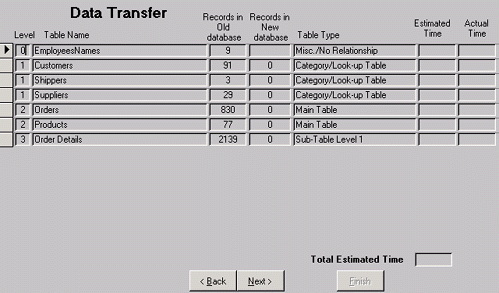
Figure: Using Automatic Upgrade #2
|
Example
Deployment of the new database.
On completion of data append process, click on
'Finish' to get to the main menu.
Now you can distribute the new database with
all the old data to your client.
|