Rules to Better User Acceptance Tests (UAT) for Bug Management - 12 Rules
Ensuring a robust testing process is crucial for successful development. Key practices like incorporating Acceptance Criteria in User Stories and leveraging Acceptance Tests for validation are essential. These practices contribute to efficient testing workflows. They not only enhance the QA (Quality Assurance) process but also ensure the delivery of high-quality software with Agile teams.
If you still need help, visit SSW Consulting Services and book in a consultant.
Acceptance Criteria (from the Product Owner) help to answer the question "How will I know when I'm done with this Product Backlog Item (PBI)?". It defines the exact requirements that must be met for the PBI to be completed. It is the Product Owner's responsibility to ensure that all Acceptance Criteria has been added - otherwise they should not expect that work to be done.
Acceptance Criteria are useful to every person who deals with a PBI. Developers know what they are required to implement and how their work will be tested. Testers have a basis for knowing what tests to create.
What do good Acceptance Criteria look like?
Product Owners should make an effort to specify all of their requirements for a PBI in the Acceptance Criteria. For example, Product Owners should not assume things like:
- They will get a message that says ‘no records found’ or
- The grid will support features such as pagination or sorting
They must be specified in the Acceptance Criteria if required for the PBI to be considered complete.
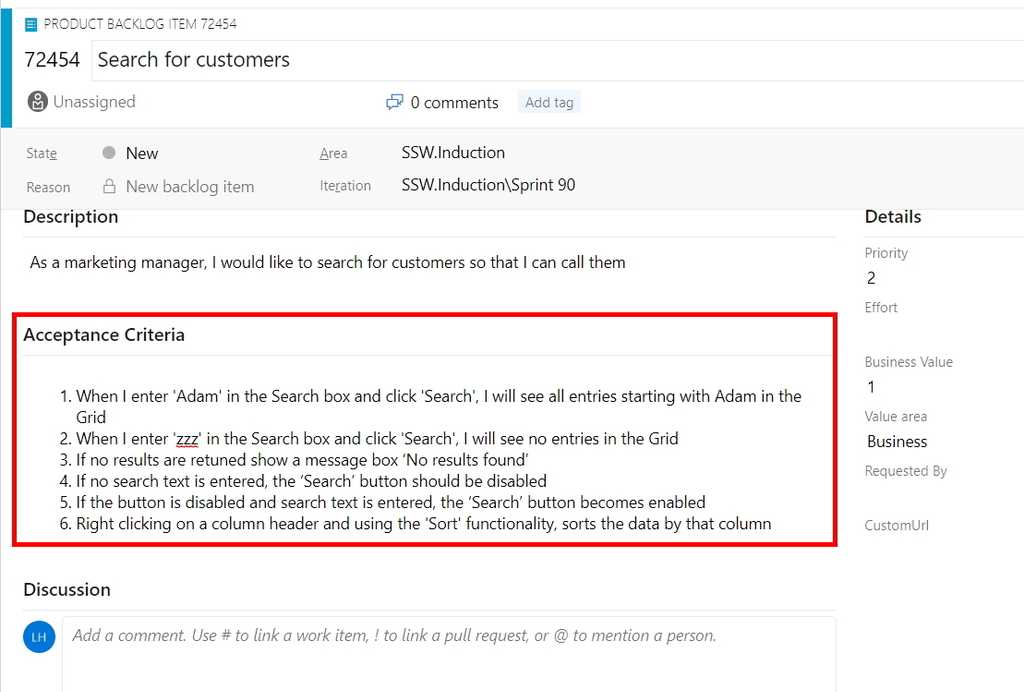
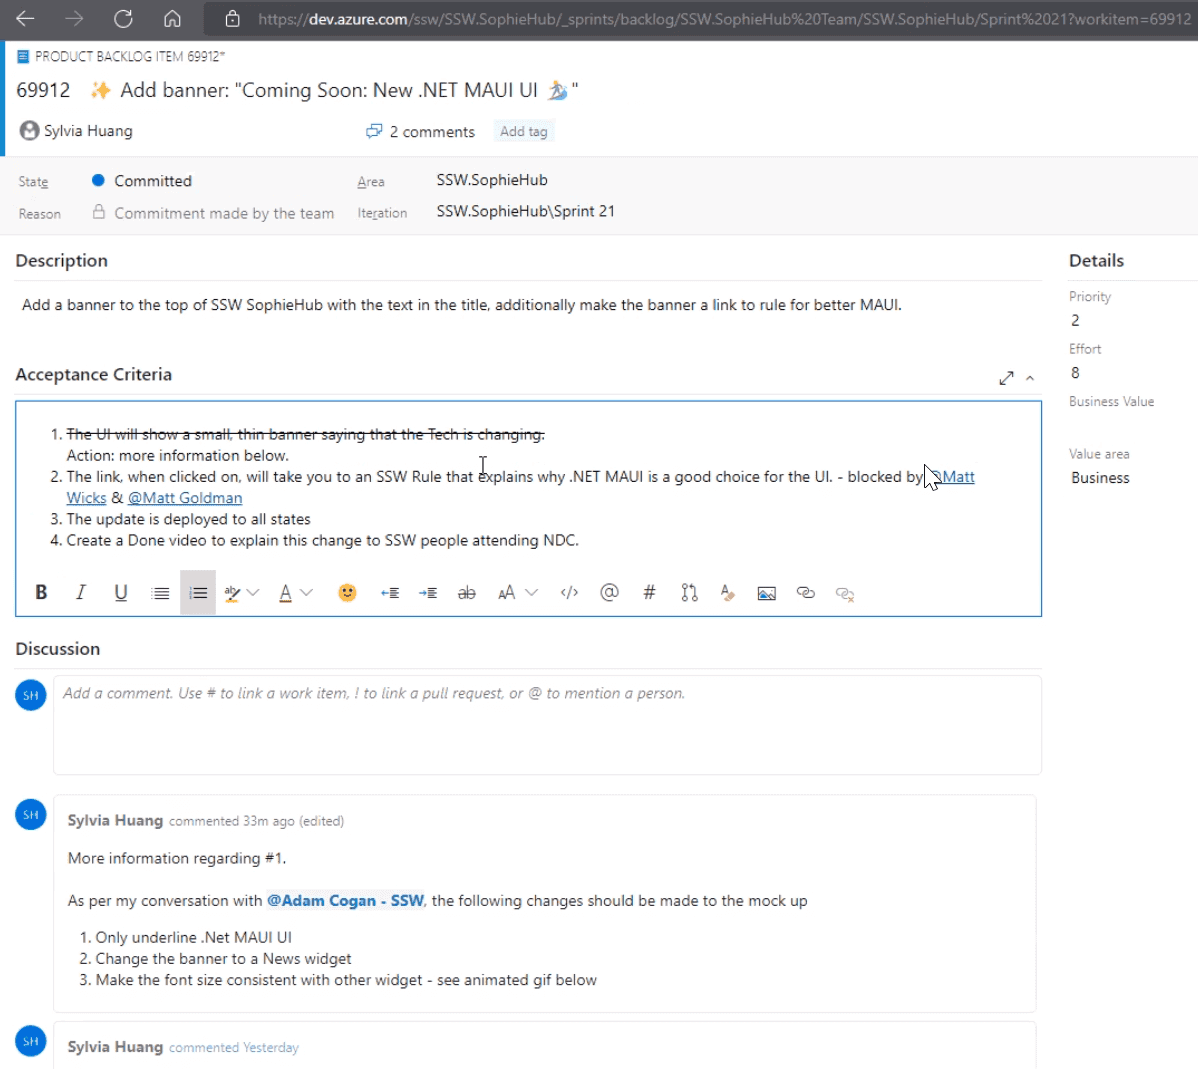
Figure: A PBI with Acceptance Criteria in Azure DevOps When I enter ‘Adam’ in the search box and click 'Search' I will see all entries starting with 'Adam' in the grid
Figure: Bad example of Acceptance Criteria - Incomplete
- When I enter ‘Adam’ in the Search box and click ‘Search’ I will see all entries starting with Adam in the Grid
- When I enter ‘zzz’ in the Search box and click ‘Search’ I will see no entries in the Grid
Figure: OK example of Acceptance Criteria - However the Product Owner probably hasn't included all of their requirements
- When I enter ‘Adam’ in the Search box and click ‘Search’ I will see all entries starting with Adam in the Grid
- When I enter ‘zzz’ in the Search box and click ‘Search’ I will see no entries in the Grid
- If no results are returned, show a message box ‘No results found’
- If no search text is entered, the ‘Search’ button should be disabled
- Right-clicking on a column header should provide ‘Sort’ functionality
- If a large set of results is returned, display pagination with page numbers and ‘Prev’, ‘Next’ links
Figure: Good example of Acceptance Criteria
Note: For tiny PBI, you can omit Acceptance Criteria. Sometimes you just need a screenshot or, even better, a video.
Be mindful that such small PBIs are the exception and not the rule when it comes to the need for Acceptance Criteria.Negotiating "gold plating"
Any requirements that the Product Owner considers "nice to have" - as opposed to being mandatory for the PBI to be considered complete - should be negotiated with development as early as possible. Developers can spend significant time working to meet acceptance criteria that the Product Owner is actually willing to sacrifice in the interests of quicker delivery.
Tip: Work closely with the Product Owner to identify potential "gold plating" in the PBI. Suggest creating a separate PBI for the functionality that is nice to have but has lower priority. Doing so allows developers to focus on building the most important functionality for the PBI first and prevents valuable time being wasted on gold plating.
Technical Acceptance Criteria
Sometimes, the team may discuss including technical requirements in Acceptance Criteria. Typically, technical Acceptance Criteria should be avoided. However, there are some situations where it makes sense, such as when:
- The team is trying out something new
- The team has been misaligned in the past, and the future direction needs to be clear
- The approach to take is complex or confusing
- An abnormal approach is being taken to avoid a specific issue (e.g. reducing readability to improve performance for a particularly critical query)
- When the PBI is an Enabler (backlog items that extend the architectural runway of the solution under development or improve the performance of the development value stream)
If technical requirements are added, it should be a discussion between all of the developers in the team. If the Product Owner is technical, they are welcome to join the conversation, but they should not be the primary decision maker in this case.
Additionally, when adding technical requirements try to prefix with "Technical - " so their purpose is clear to everyone (e.g. "Technical - New CQRS Query made to get all employees")
Acceptance Tests
Since Acceptance Criteria will be used to determine whether the work for the PBI is done or not, each of them needs to verified using an Acceptance Test.
It is good practice to make sure that each of the Acceptance Criteria is testable (e.g. Tests can be written to definitively determine whether the criteria has been met or not). This can help to reduce vagueness in the way Acceptance Criteria are defined.
Note: When all of the acceptance tests pass, the PBI might be acceptable - but deeper testing would be required to be more certain. When any of the acceptance tests fail, though, we know for sure that the PBI isn’t acceptable. It can be helpful to think of "Acceptance Tests" instead as "Rejection Tests".
What's the difference between "Acceptance Criteria" and "Definition of Done"?
Acceptance Criteria help to answer the question "How will I know when I'm done with this PBI?". The Acceptance Criteria are different for each PBI, provided by the Product Owner and used as a way to communicate to all involved that the requirements for a particular PBI have been met.
The Definition of Done is a structured list of items, each one used to validate a PBI, which exists to ensure that the team agrees about the quality of work they’re producing. It is defined by the team and serves as a checklist that is used to check each PBI for completeness. The definition of "Done" is intended to be applicable to all items in the Product Backlog, not just a single PBI.
Examples of items in a Definition of Done that would not be part of Acceptance Criteria include:
- Code review completed
- Unit tests passed
- Code deployed to production
The term "Definition of Done" is defined in the Scrum Guide, while "Acceptance Criteria" is not.
Capture changes to the PBI from discussions
The Acceptance Criteria are the source of truth for what functionality needs to be implemented for the PBI to be considered complete, so it's important to capture any changes to the PBI and the Acceptance Criteria (e.g. adding or removing "nice to have" aspects of the PBI).
Any discussion that changes the PBI and/or the Acceptance Criteria should be noted in the Discussion section of the PBI for reference.
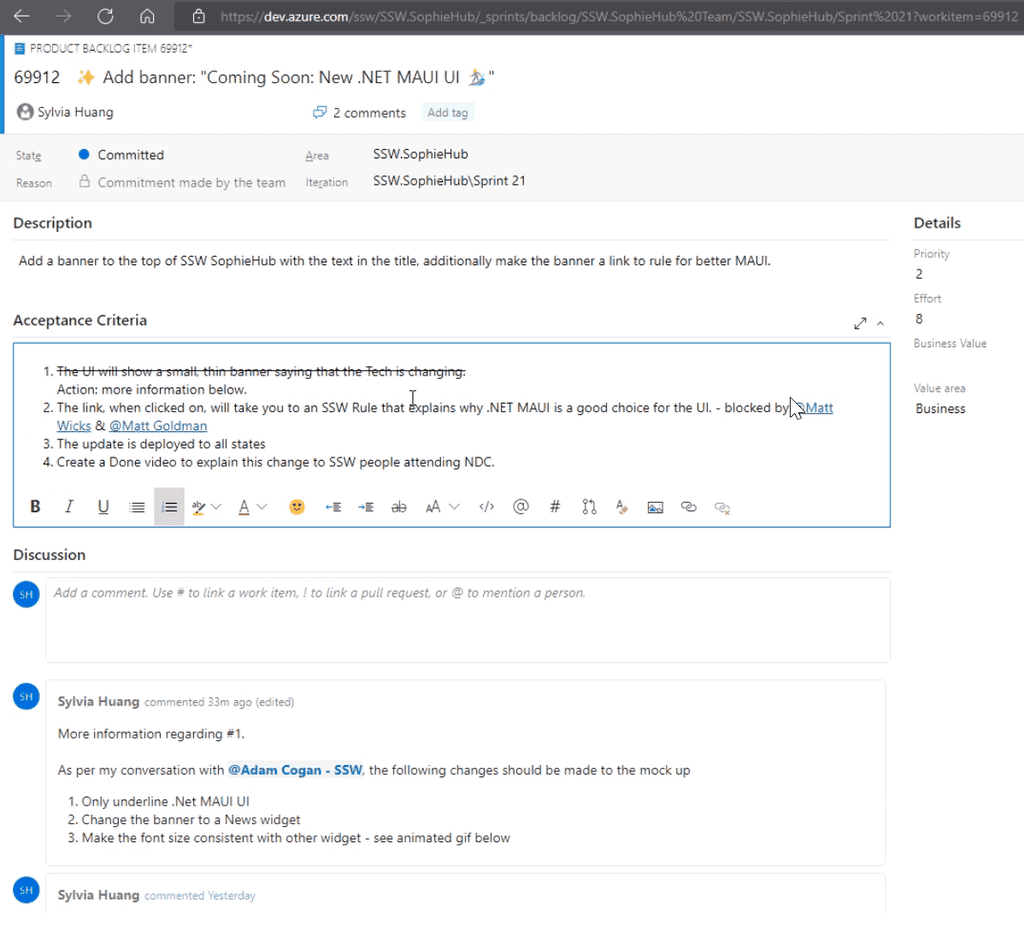
Figure: Good example - Discussion about changes to the Description and Acceptance Criteria captured in the PBI When you use Microsoft Azure Test Plans to create test plans and test suites for your project, there are several approaches that you can take.
You could create 1 test plan that you use for all milestones and add test suites and tests as you progress. This is not a good approach because you then do not have historical data for your test pass rates for previous milestones.
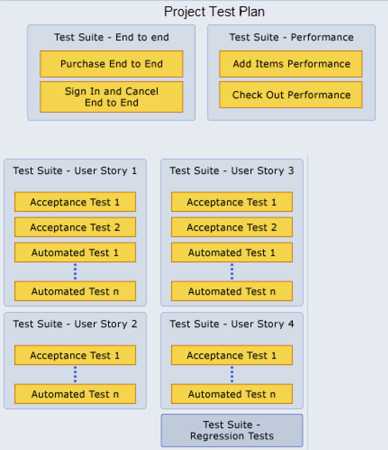
Figure: Bad Example – no historical data for your test pass rates for previous milestones By creating test plans for each Sprint, you can see when a Sprint is complete, based on your testing goals. You can also prepare the test plan for the next Sprint while you complete your testing for the current Sprint.
By using this approach, you can track your testing progress for each of your test plans to help you understand whether the quality of your application is improving.
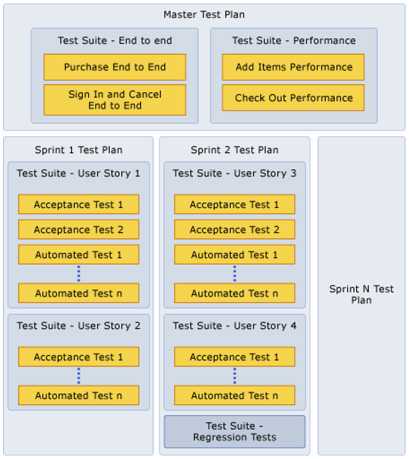
Figure: Good Example - Create test plans based on your testing goals for a specific Sprint Tip: If you add both manual (scripted or exploratory) and automated tests to your test suites, you can view the overall testing status based on both of these types of tests for your test suites and test plans.
Reference: Create test plans and suites
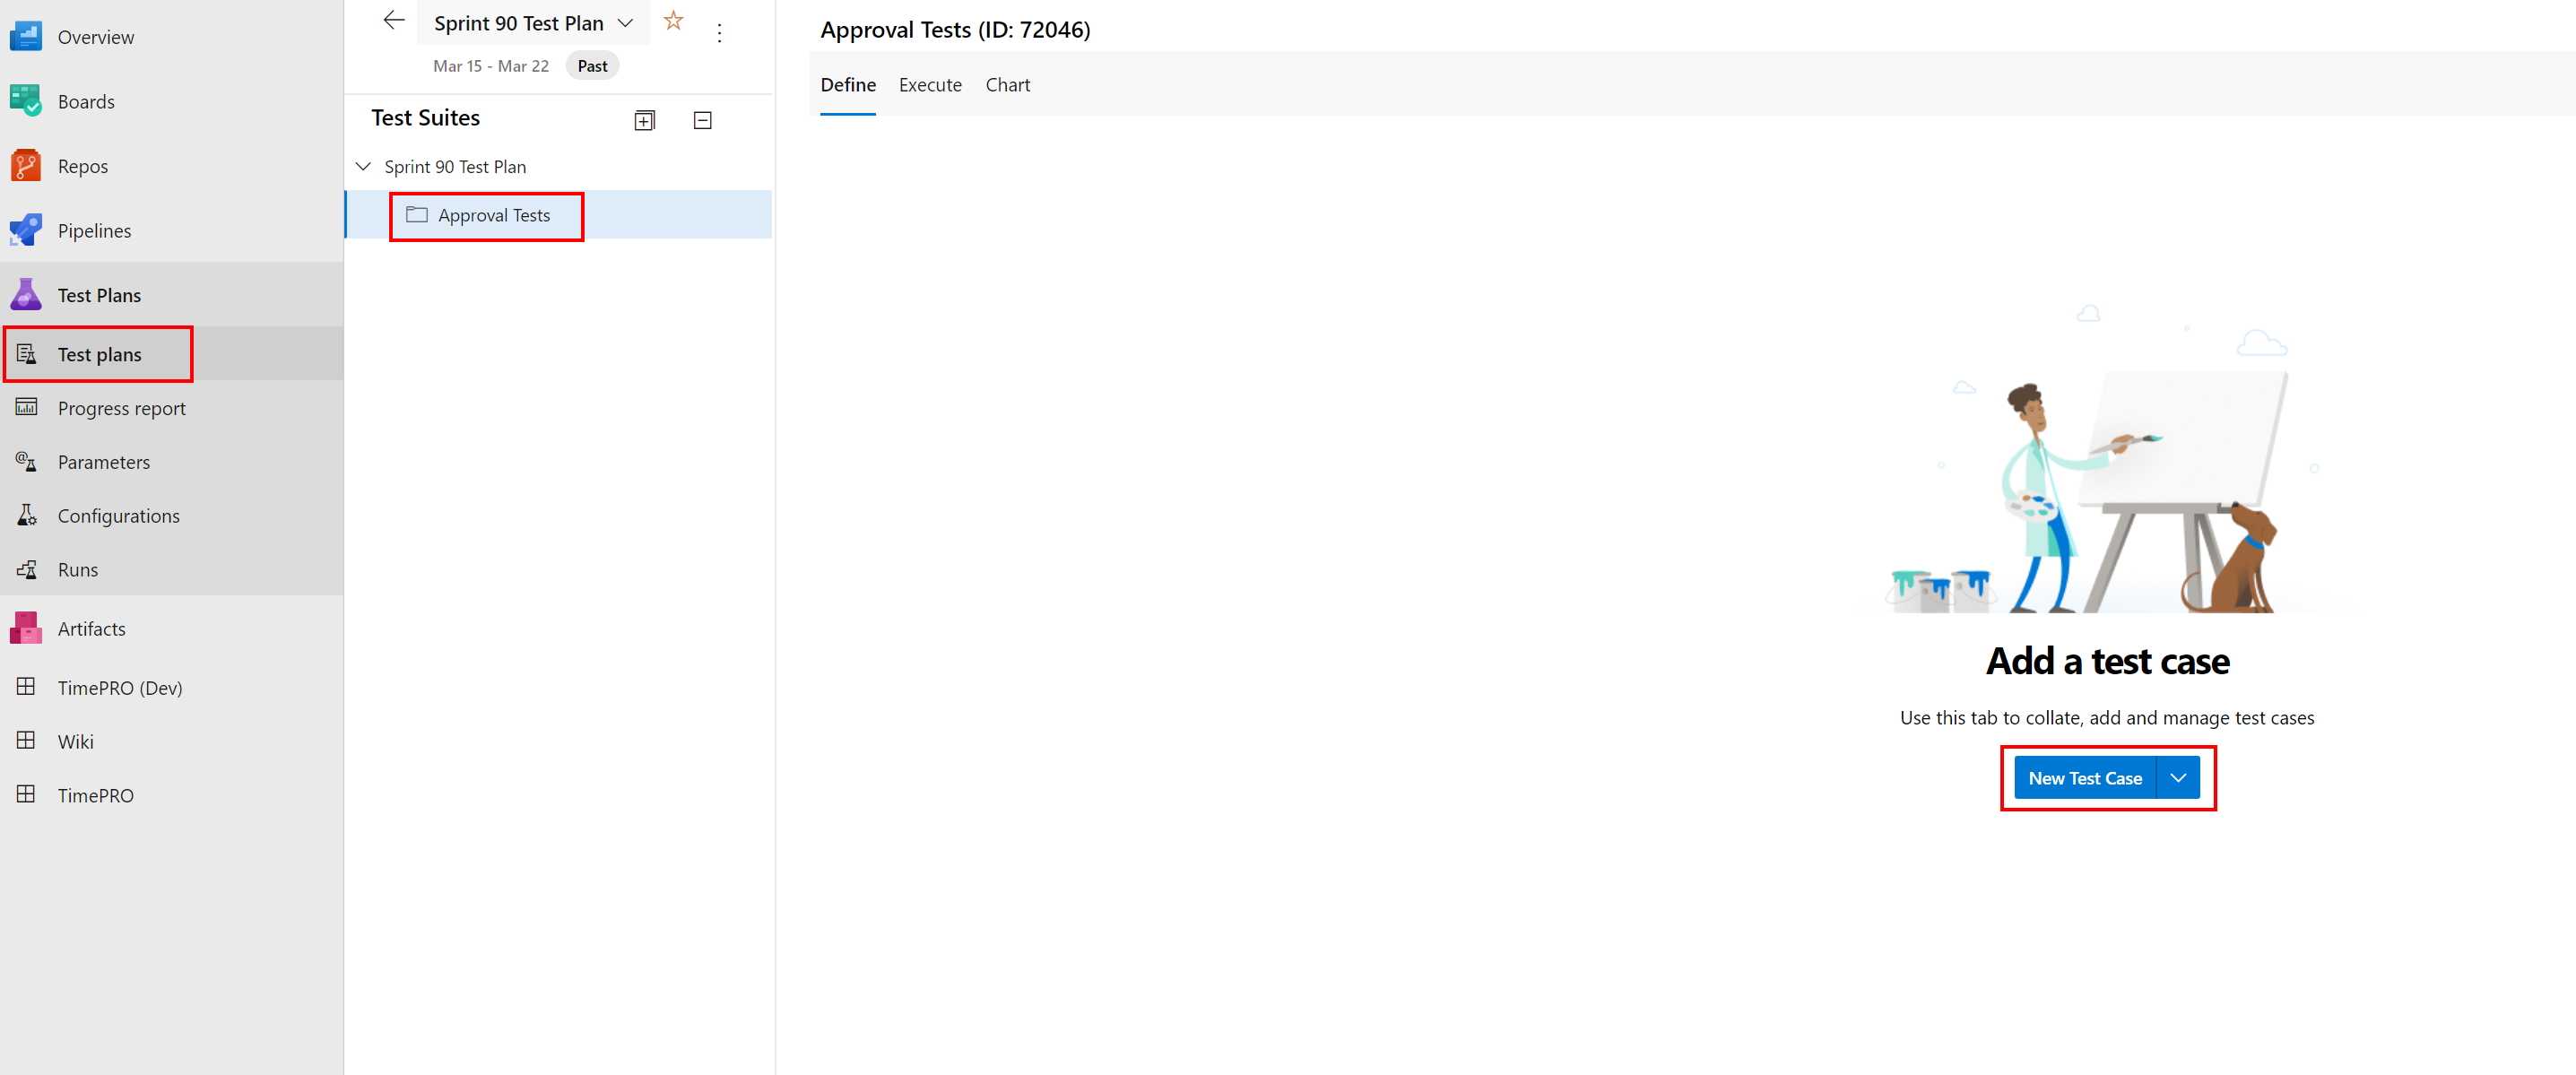
You can create a test case in Azure Test Plans directly from a Work Item (e.g. a Product Backlog Item or Bug) and also from a Test Plan or Test Suite.
Creating a test case from a Work Item
You can create a new test case from any list of work items (e.g. a Sprint Backlog).
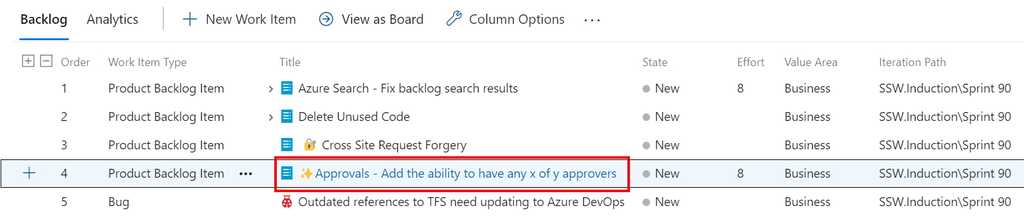
Figure: Double click the Work Item that you want to create a Test Case for to open it 
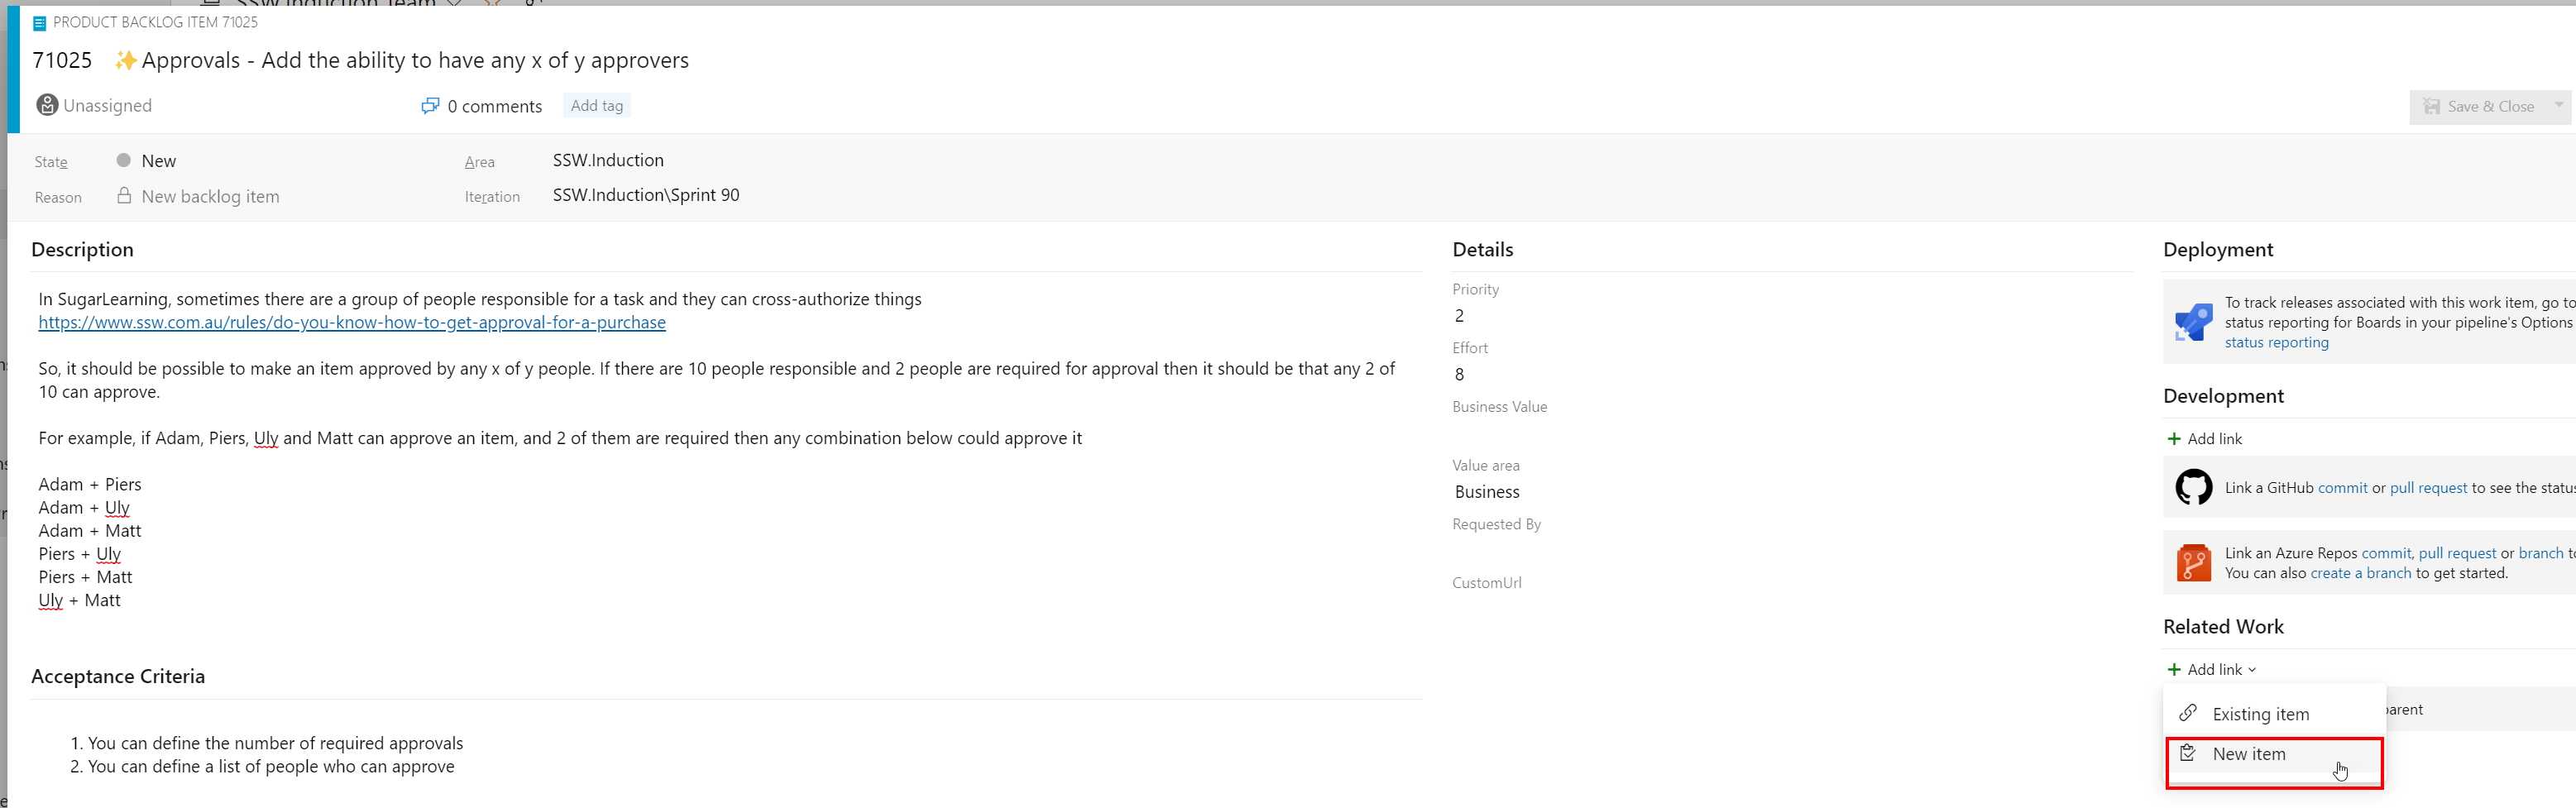
Figure: Under "Related Work", choose Add Link and select New Item 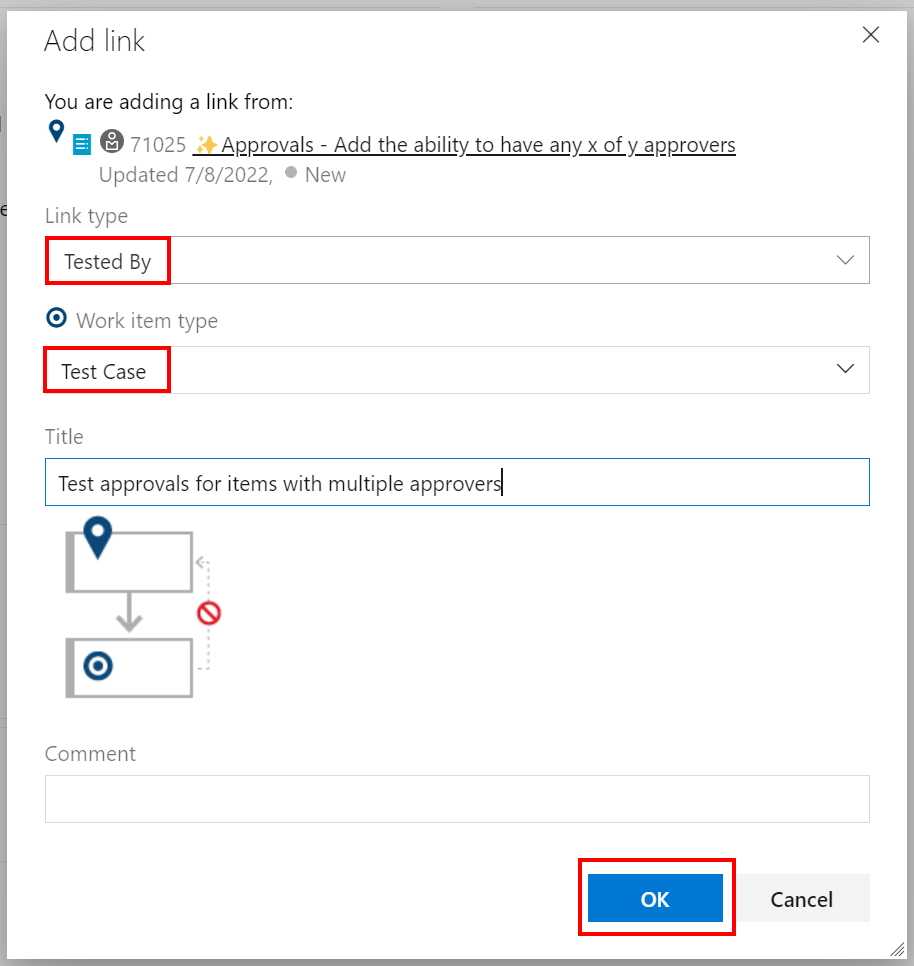
Figure: Ensure that the link type is 'Tested By', that the work item type is 'Test Case' and enter a title for the Test Case. Click OK 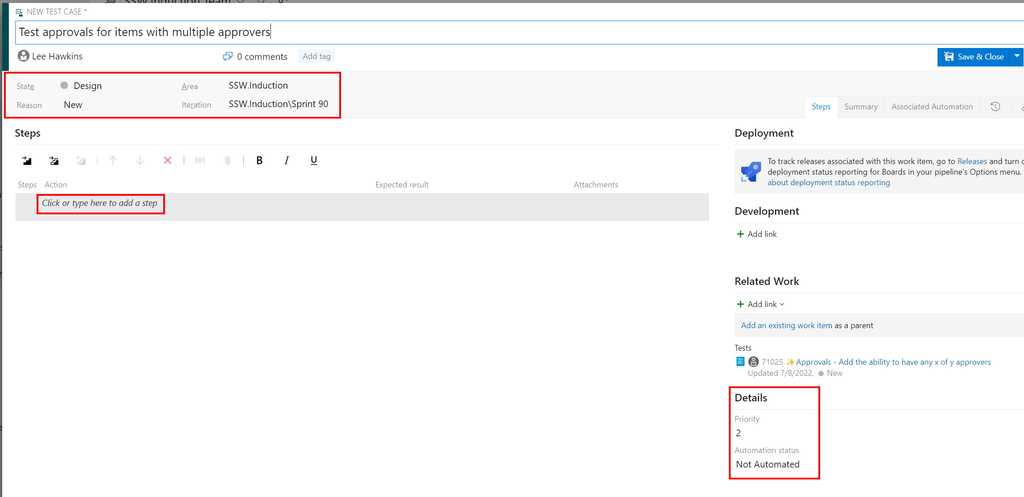
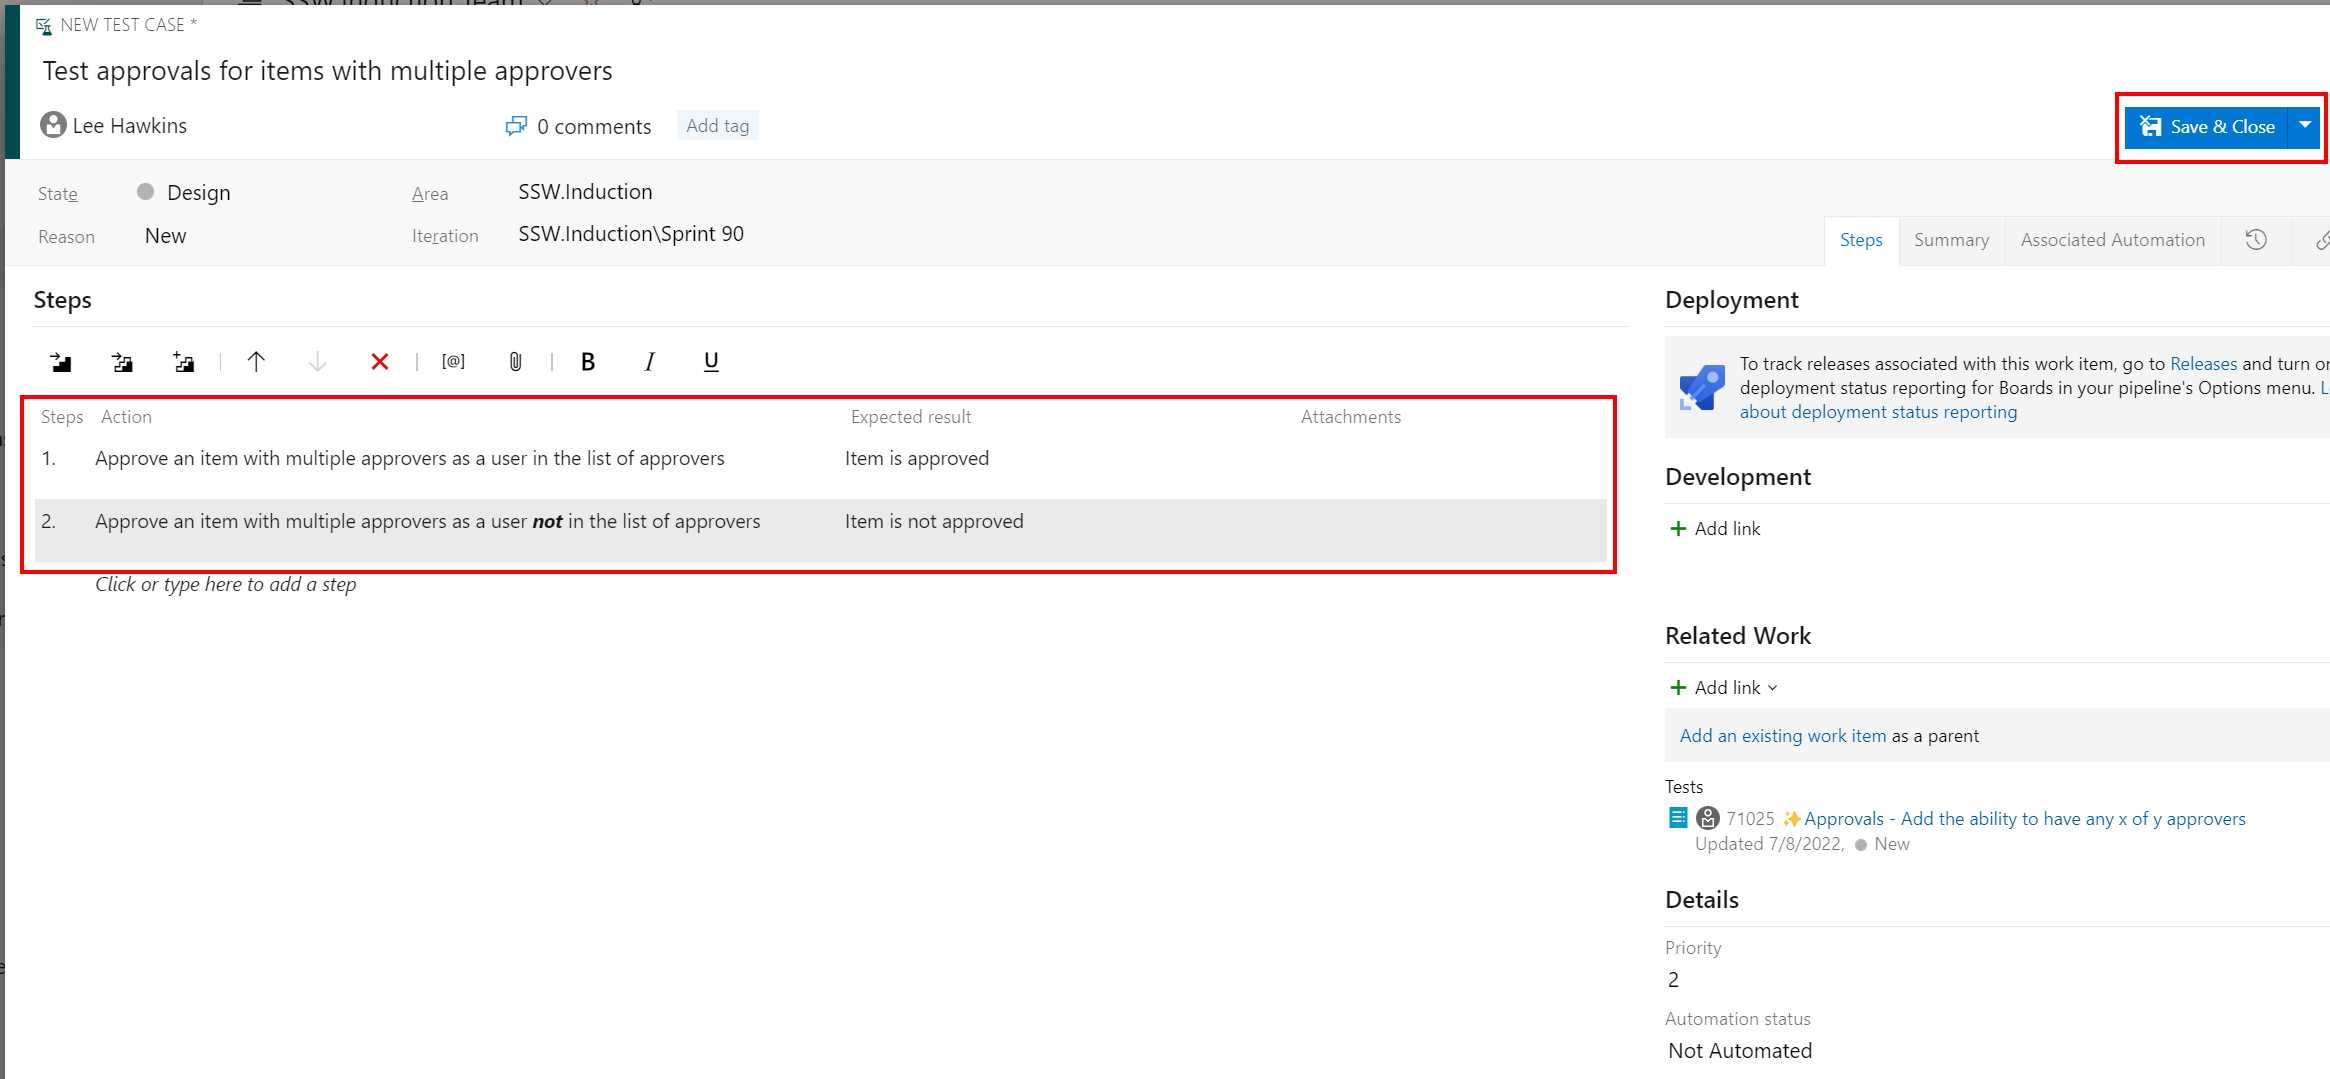
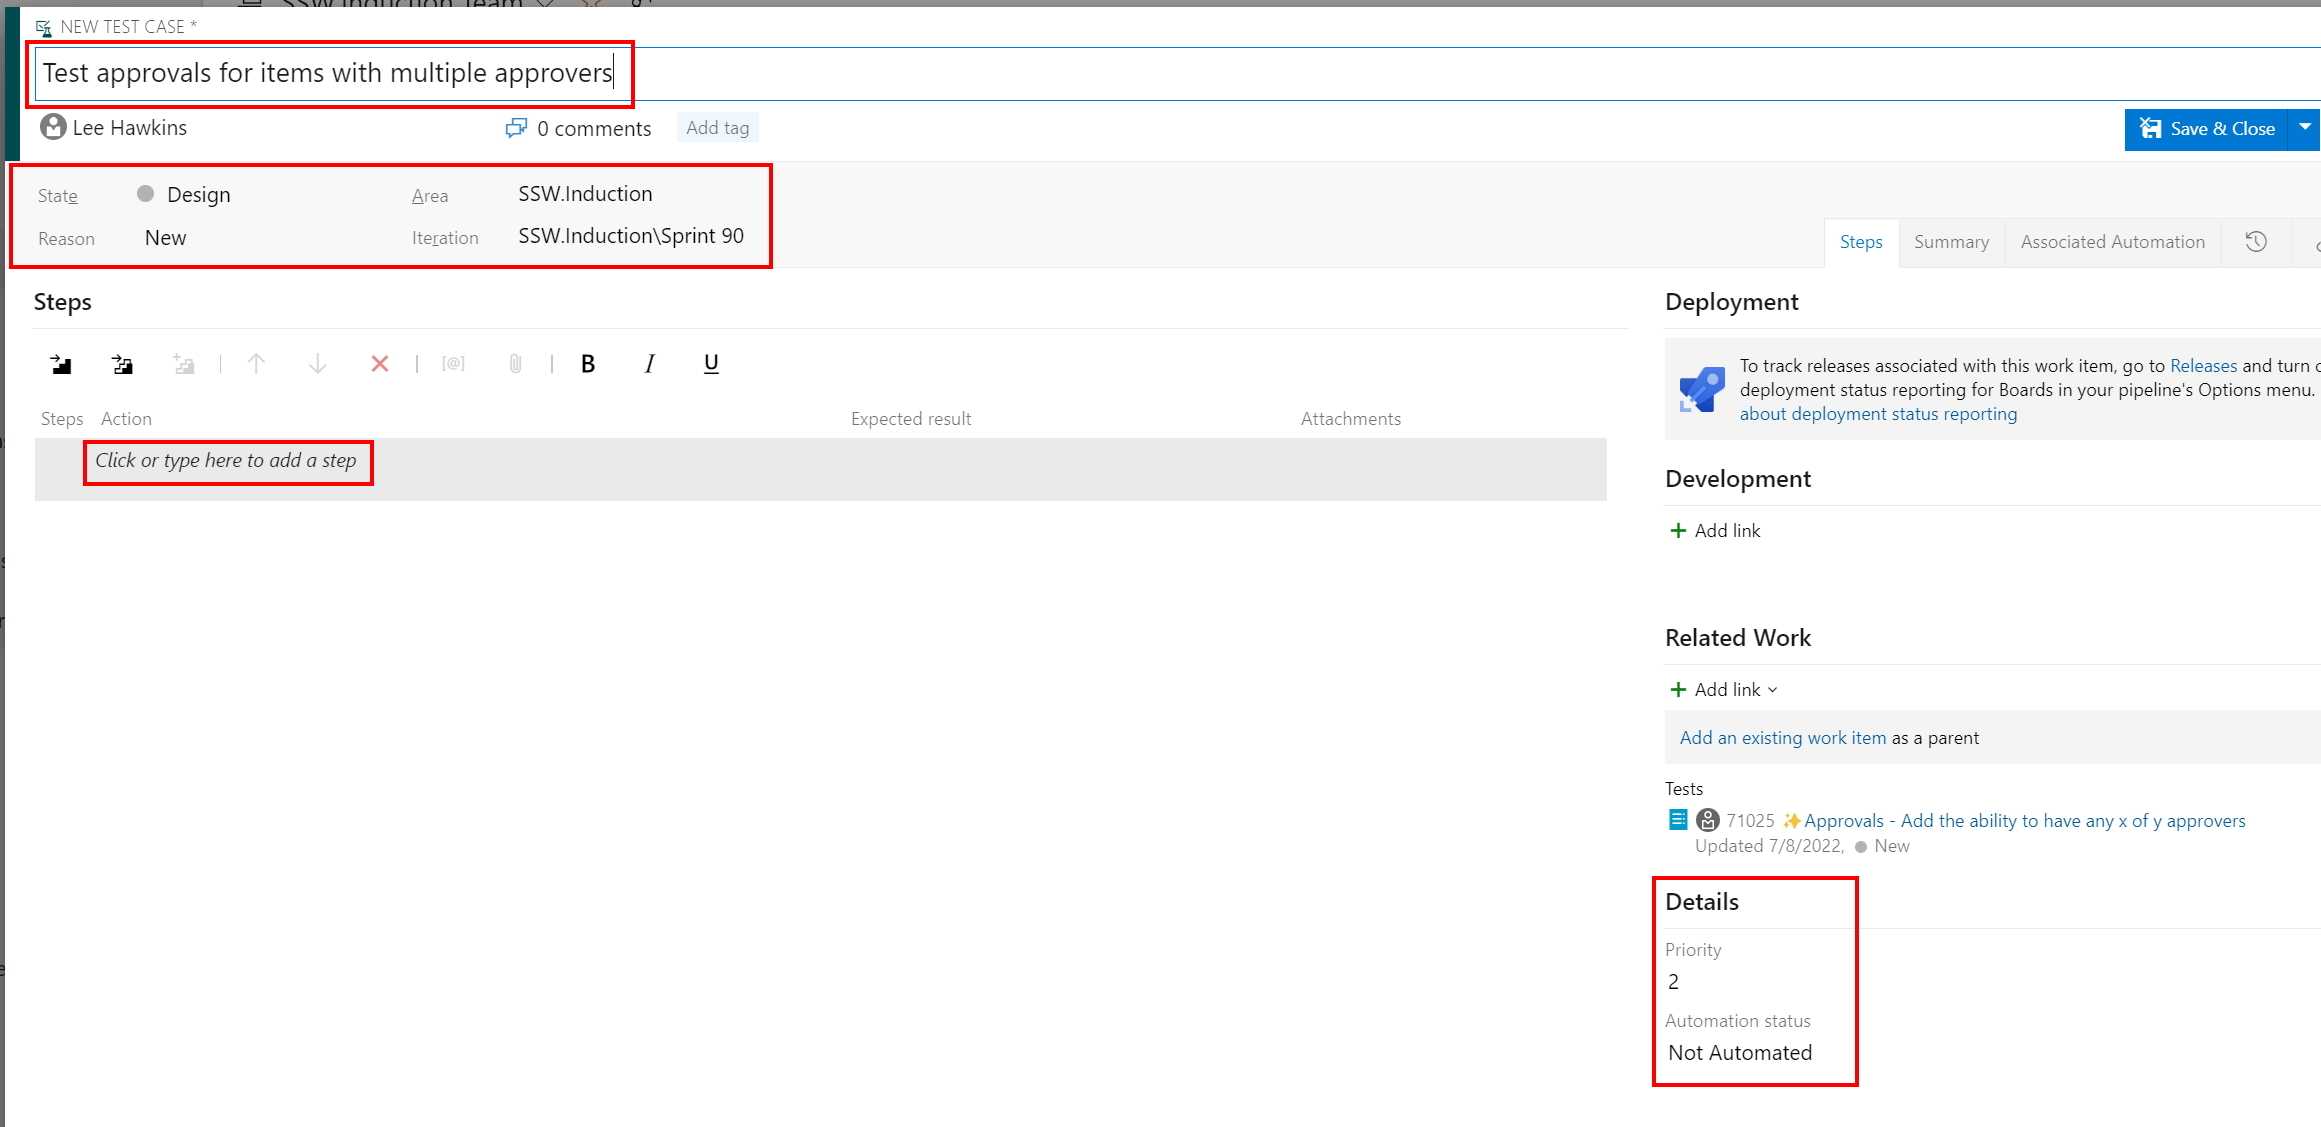
Figure: Update the State and Details sections (making sure to select the correct iteration) and click on 'Click or type here to add a step' and proceed to add the steps required to test the Work Item 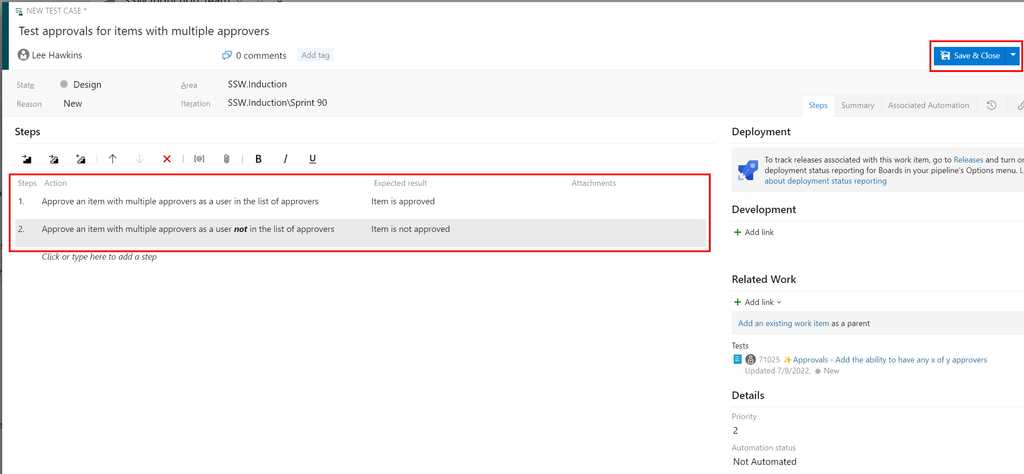
Figure: After entering each action and its expected result, click Save and Close to create the new test case Creating a test case from a Test Plan or Test Suite
You can also create a new test case from a Test Plan or Test Suite.
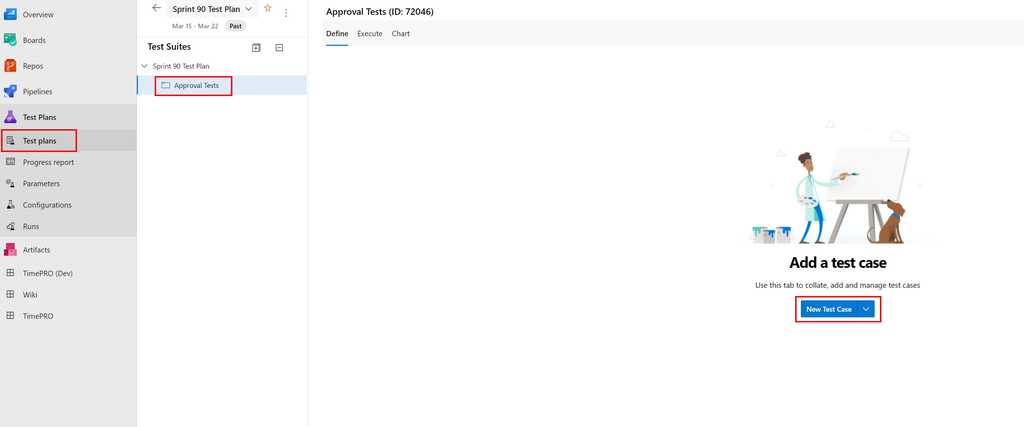
Figure: Select the Test Plans menu and the appropriate Test Plan or Test Suite, then click New Test Case 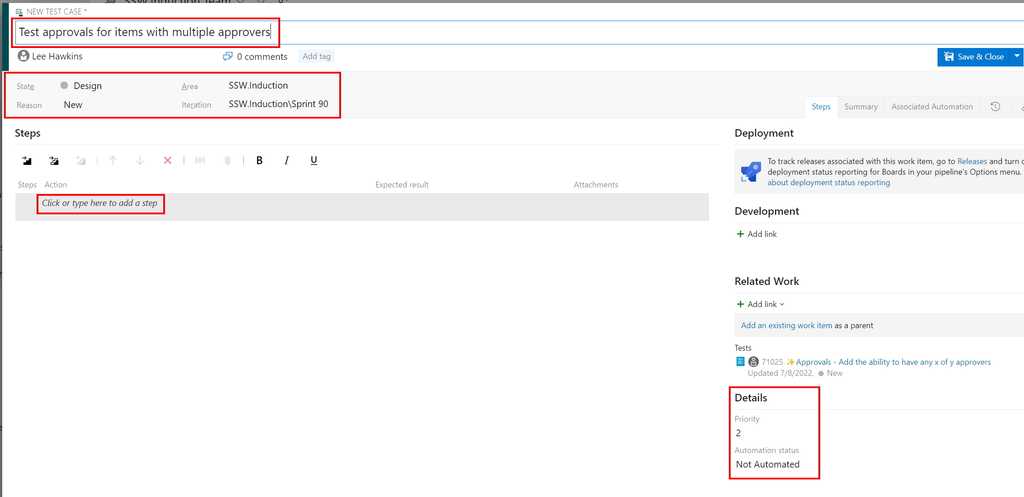
Figure: Update the State and Details sections (making sure to select the correct iteration) and click on 'Click or type here to add a step' and proceed to add the steps required for this test case
Figure: After entering each action and its expected result, click Save and Close to create the new test case In Azure Test Plans, you can assign test cases for different configurations to be run by different testers.
To assign a tester to run a test case for a configuration, select the Test Plan and go to the Execute tab, then assign the tester as shown below:
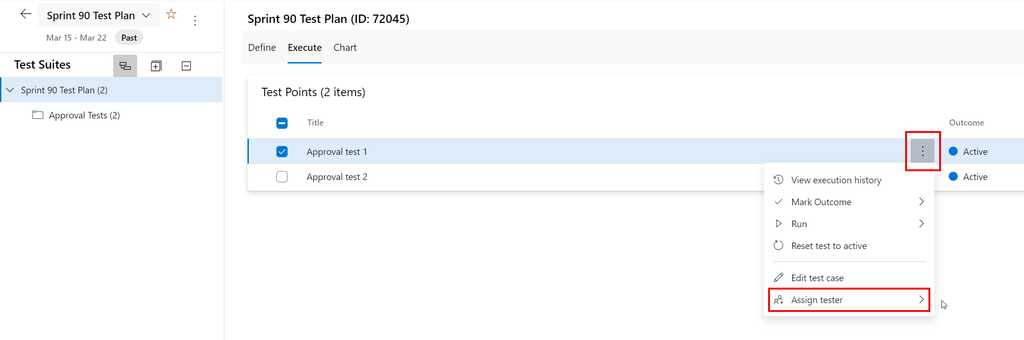
Figure: Assign a tester to a test case & configuration Tip: To assign a number of test cases to the same tester, multi-select the test cases (using the checkboxes) and then use the same steps as above.
In Azure Test Plans, each test case has configurations defined against it and these can be used to define which environments to use for a test.
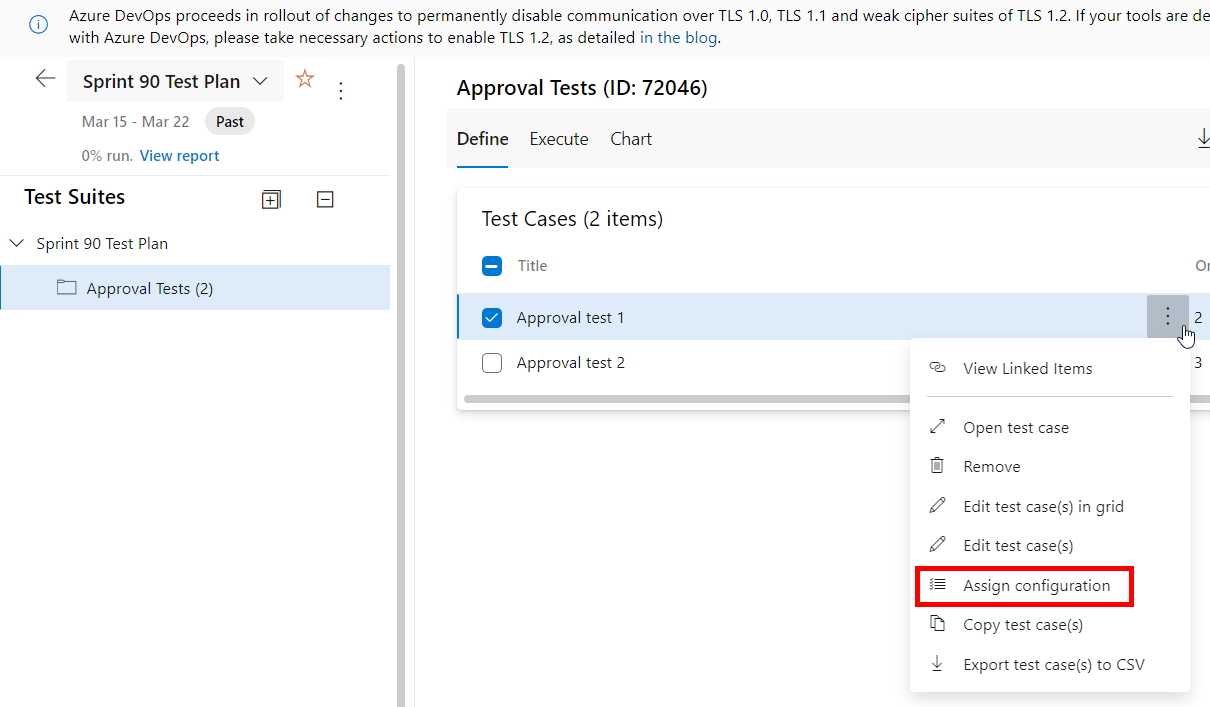
To define the configuration for a test case, select the Test Plan and go to the Define tab, then choose the "Assign Configuration" option from the appropriate test case:
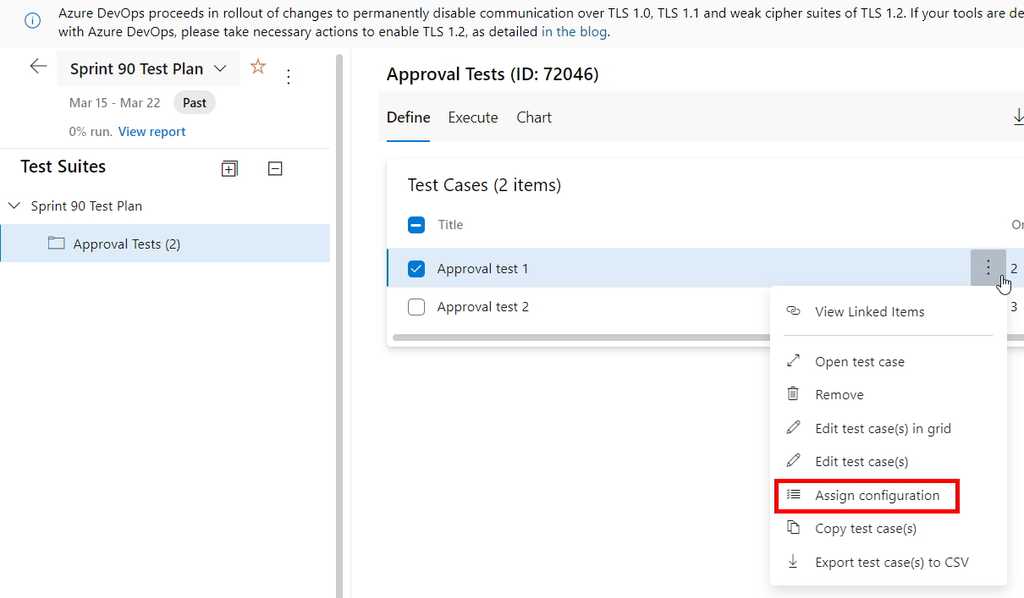
Figure: Click on "Assign Configuration" from the appropriate test case Select the required configurations for this test case and click "Save":

Figure: Choose from the available configurations, then click the "Save" button Developers sometimes think they're done when they finish coding and check in.
It's easy to forget about testing, but this will often result in rework or bug fixes for the developers - in other words, more work!
Keeping an eye on the results of acceptance testing can help you understand where things are really at in the Sprint.
Azure Test Plans provides two different ways to see testing status, a built-in Progress Report and customizable Test Status charts.
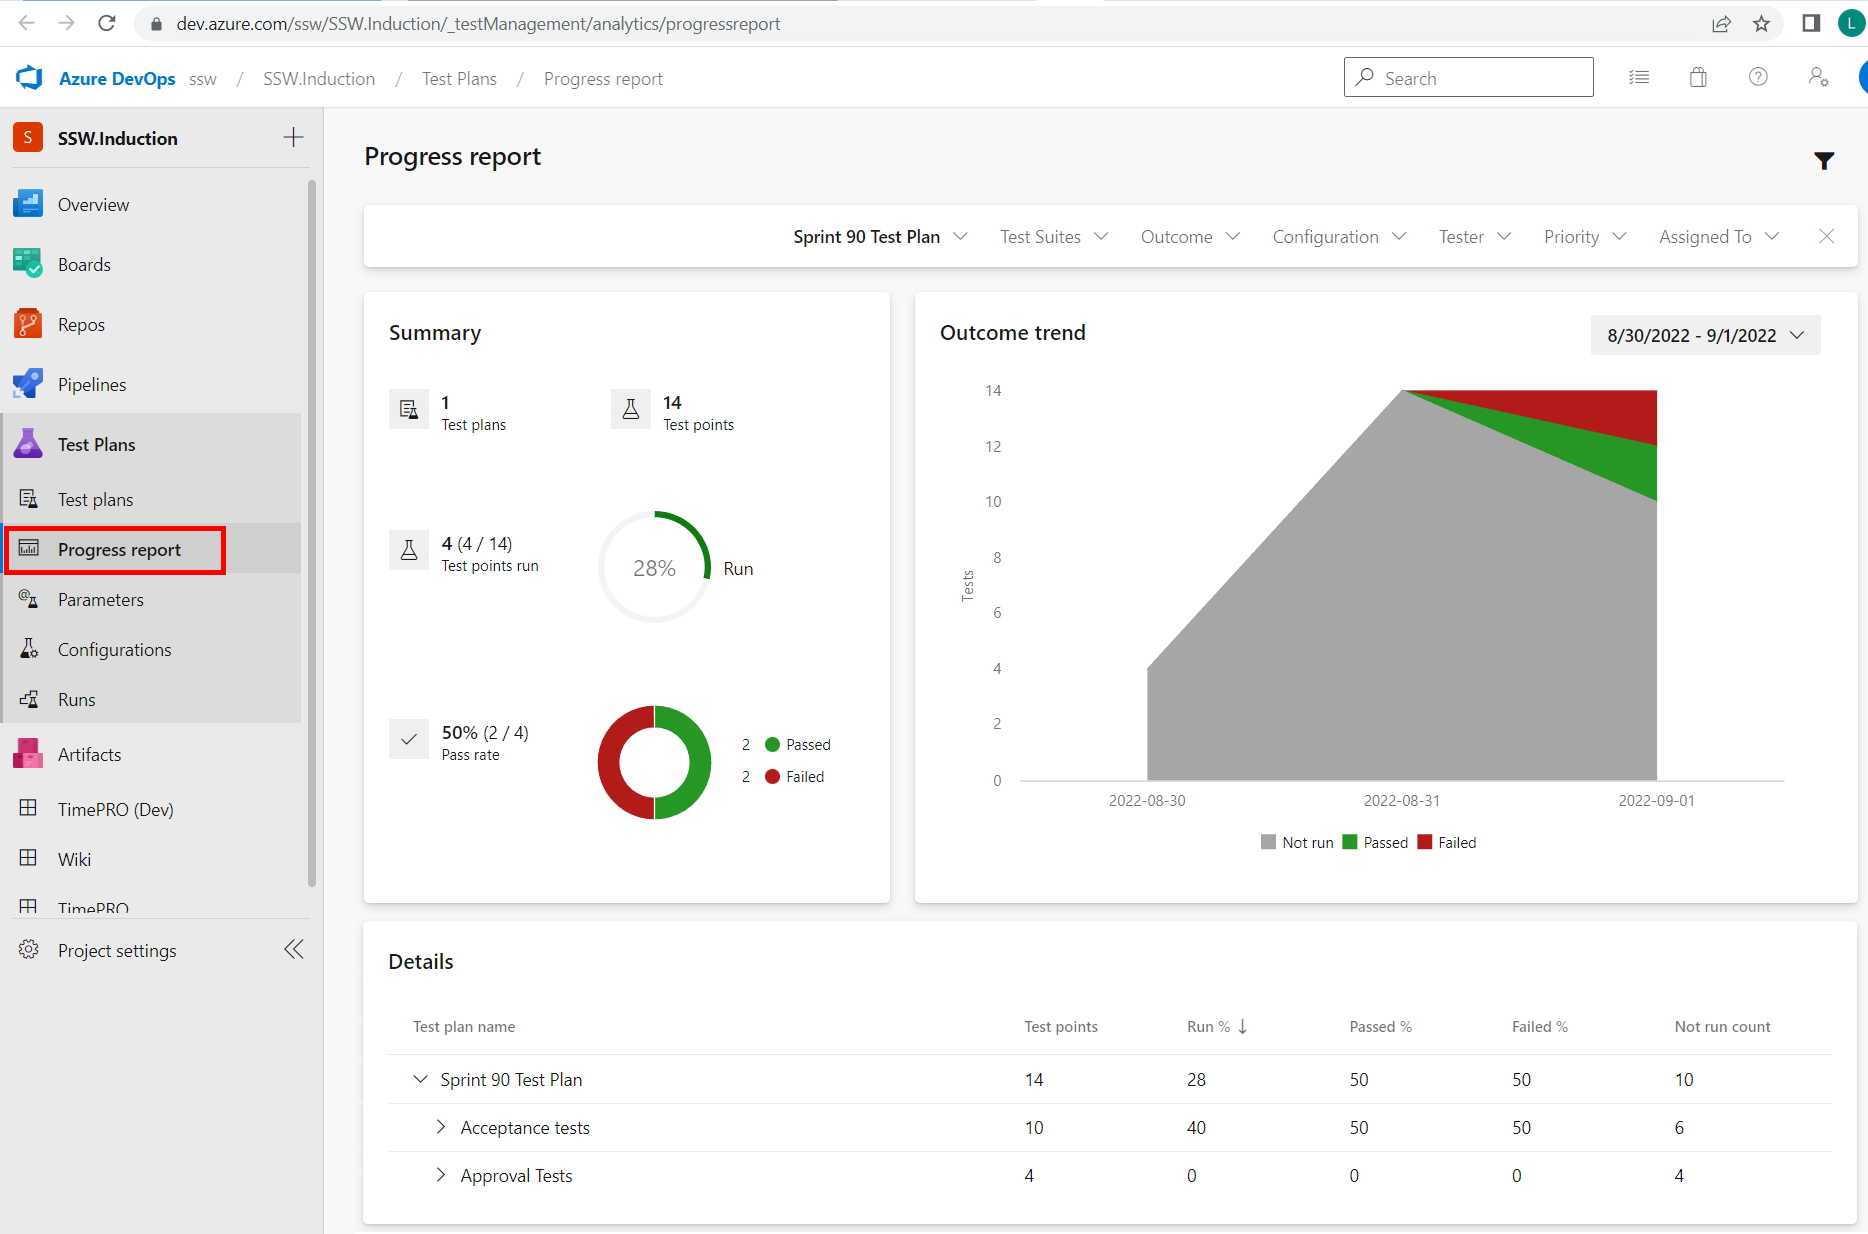
Progress report
Select the "Progress Report" item in the Azure Test Plans sidebar:
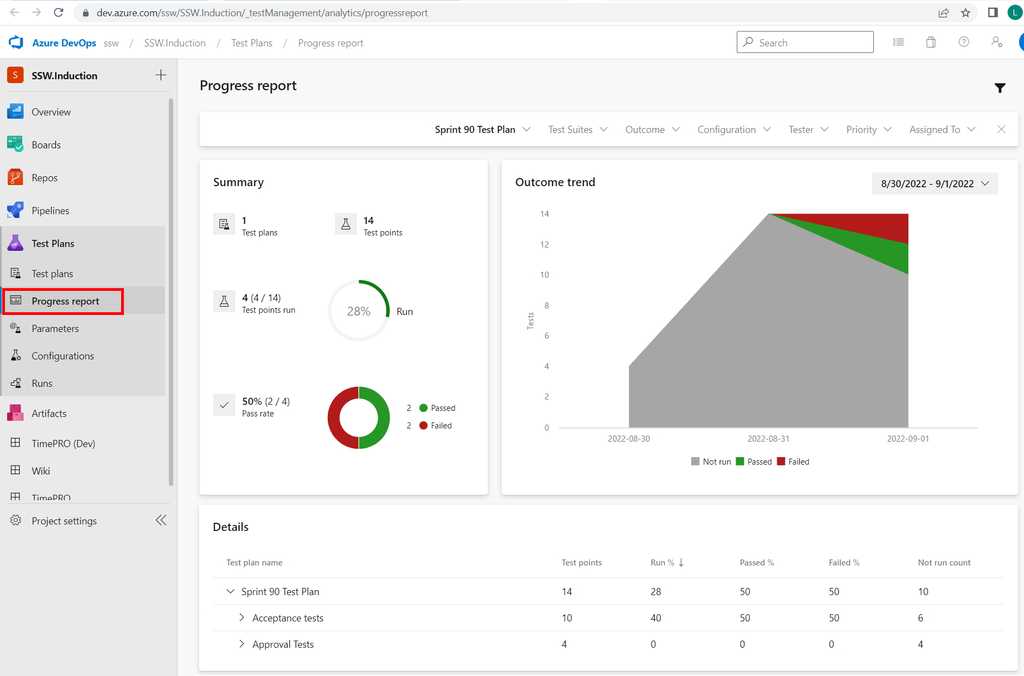
Figure: Progress Report showing that this Sprint currently has 2 'Failed' tests (red) and 2 'Passed' tests (green) Test Status charts
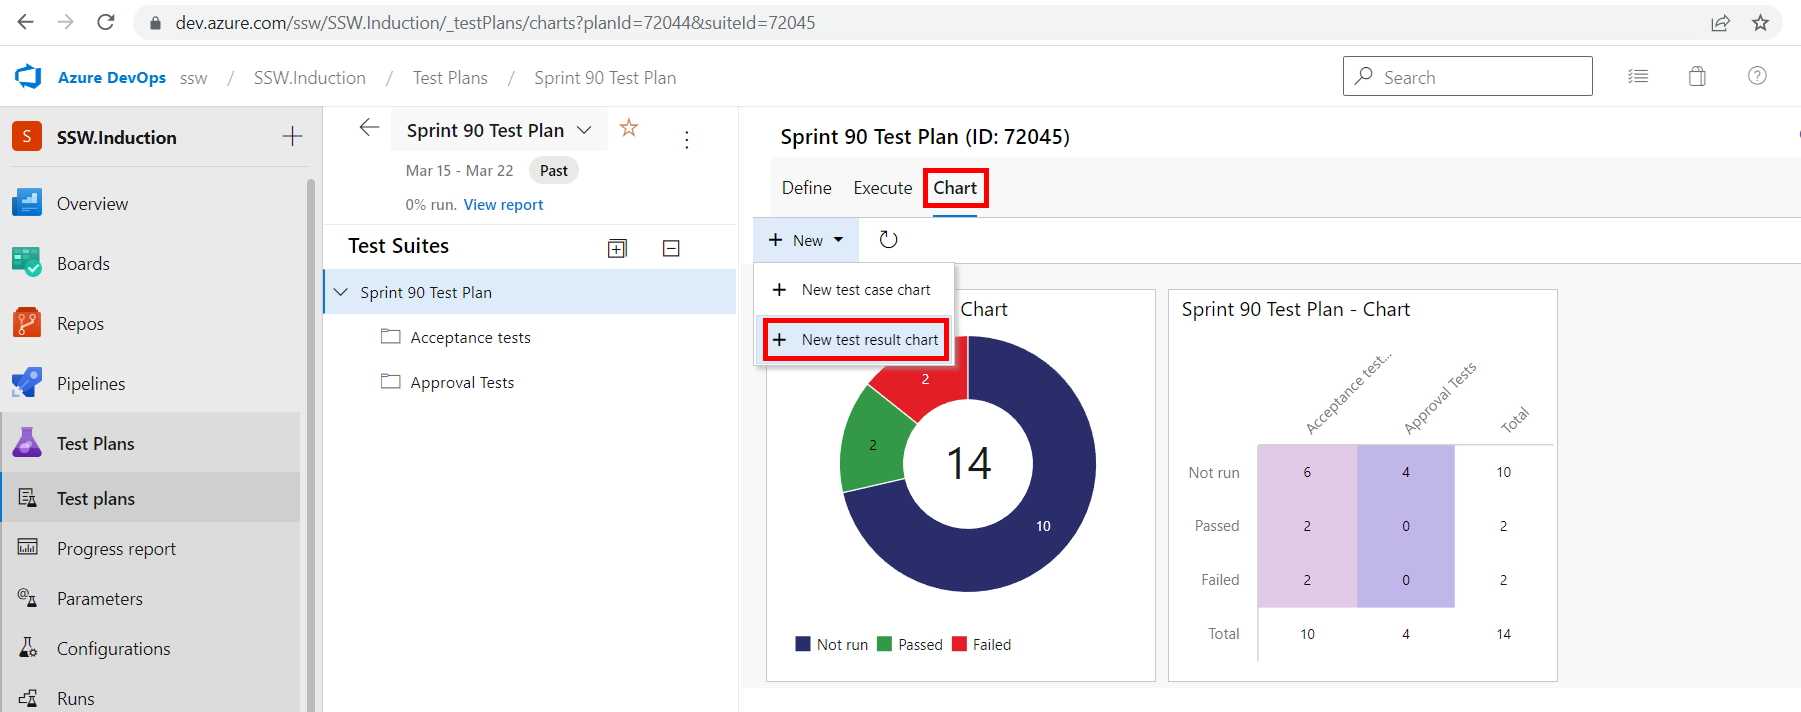
You can visualise the status of testing for a Sprint in various ways, using different test result charts.
From the appropriate Test Plan for the Sprint, select "Chart" and then "New test result chart" to add charts to the dashboard:
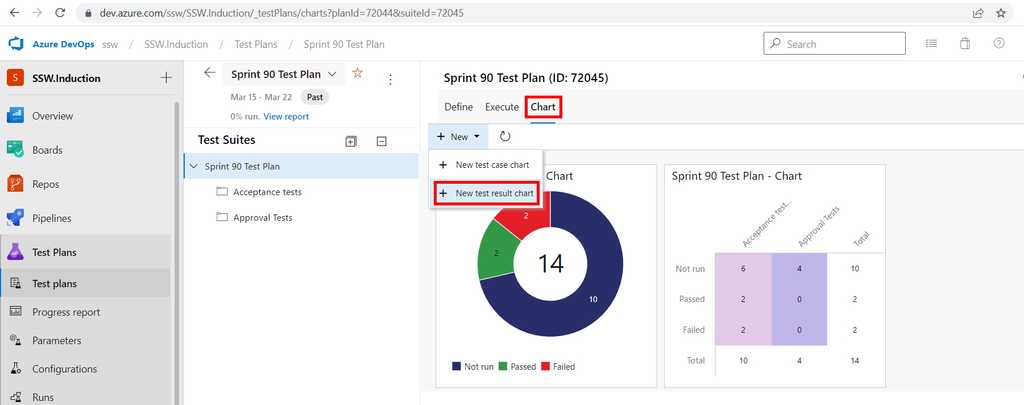
Figure: Adding a test result chart to visualise test status in Azure Test Plans 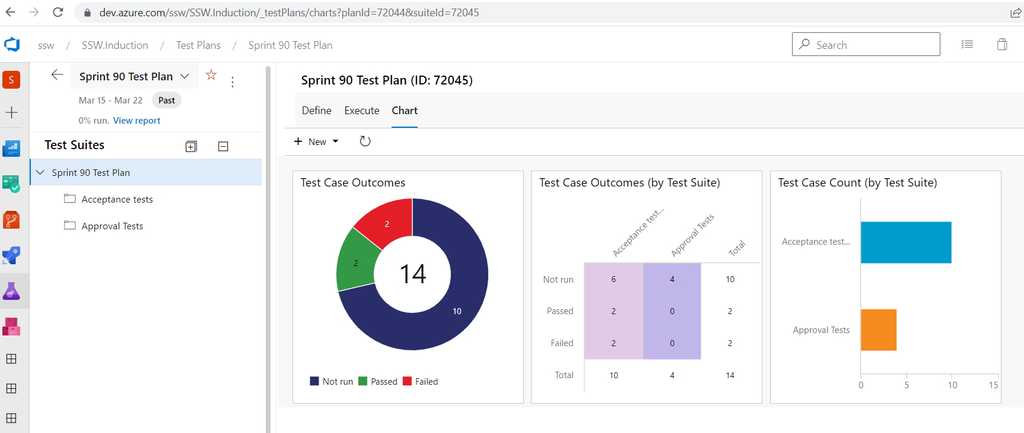
Figure: Good example - Different charts visualise test status in different ways Tip: Think of the red (representing failed tests) as work remaining for the developers and the blue (representing unfinished tests) as working remaining for the testers.
Acceptance Tests check that the Acceptance Criteria on a User Story are met.
Test cases that define these acceptance tests should be written during story development and managed in the same system as the code (e.g. Azure DevOps). This allows for easier traceability between the code and the tests related to that code.
A combination of human and automated tests is likely to be required to complete the acceptance tests for a User Story.
Suppose we have a user story to implement searching on customers with the following acceptance criteria on the User Story:
- When I enter ‘Adam’ in the Search box and click ‘Search’ I will see all entries starting with Adam in the Grid
- When I enter ‘zzz’ in the Search box and click ‘Search’ I will see no entries in the Grid
- If no results are returned show a message box ‘No results found’
- If no search text is entered, the ‘Search’ button should be disabled
- If the button is disabled and search text is entered, the ‘Search’ button becomes enabled
- Right-clicking on a column header and using the ‘Sort’ functionality, sorts the data by that column
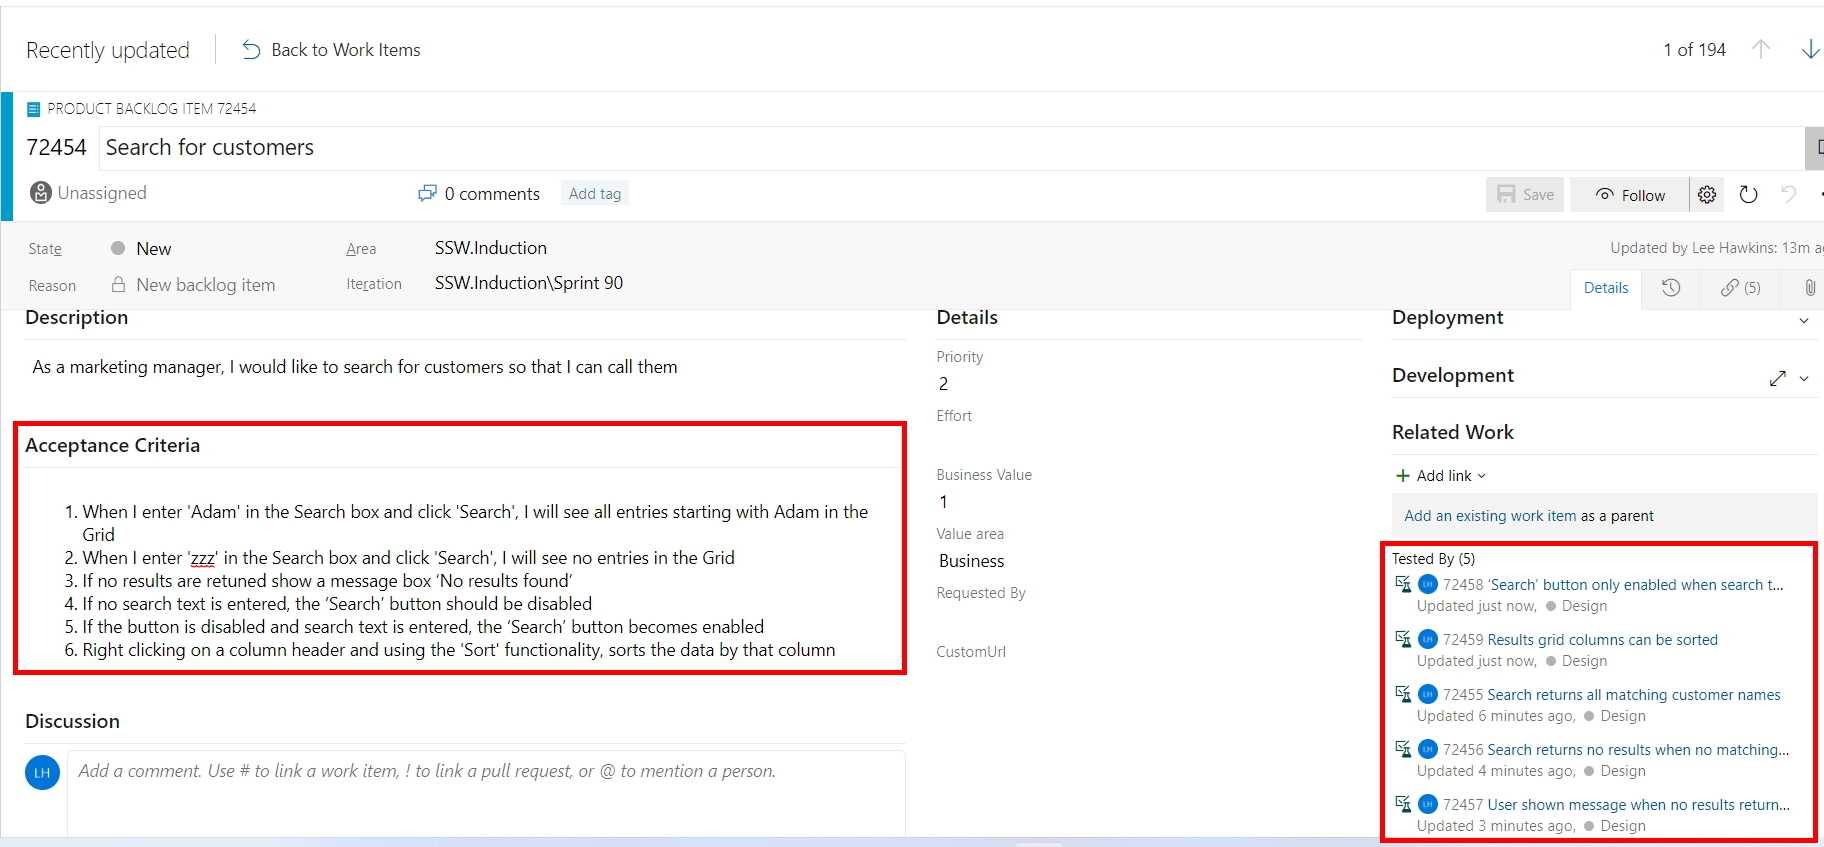
The PBI for this User Story in Azure DevOps would look like this, with the Acceptance Criteria clearly defined and the Acceptance Test cases linked to the PBI:
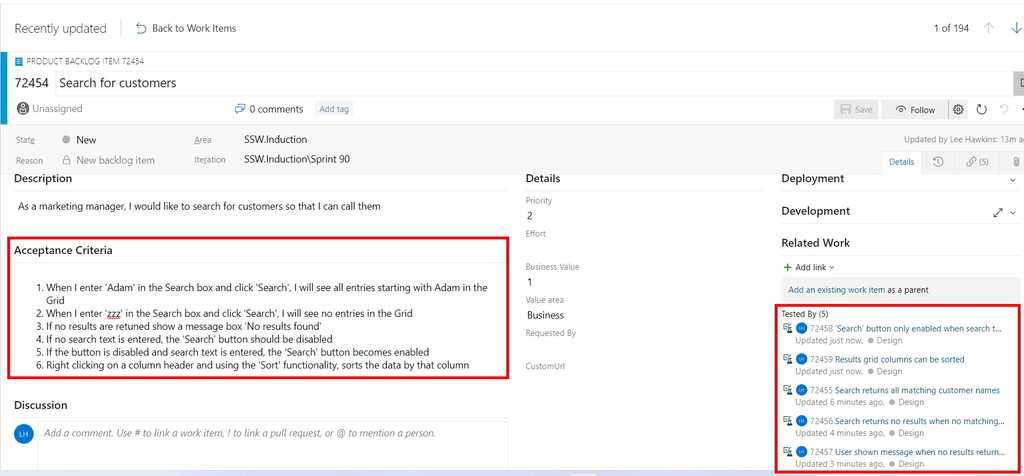
Figure: Acceptance test cases on a PBI (in Azure DevOps) Note: The acceptance test cases need to be linked to the PBI with the link type Tested By.
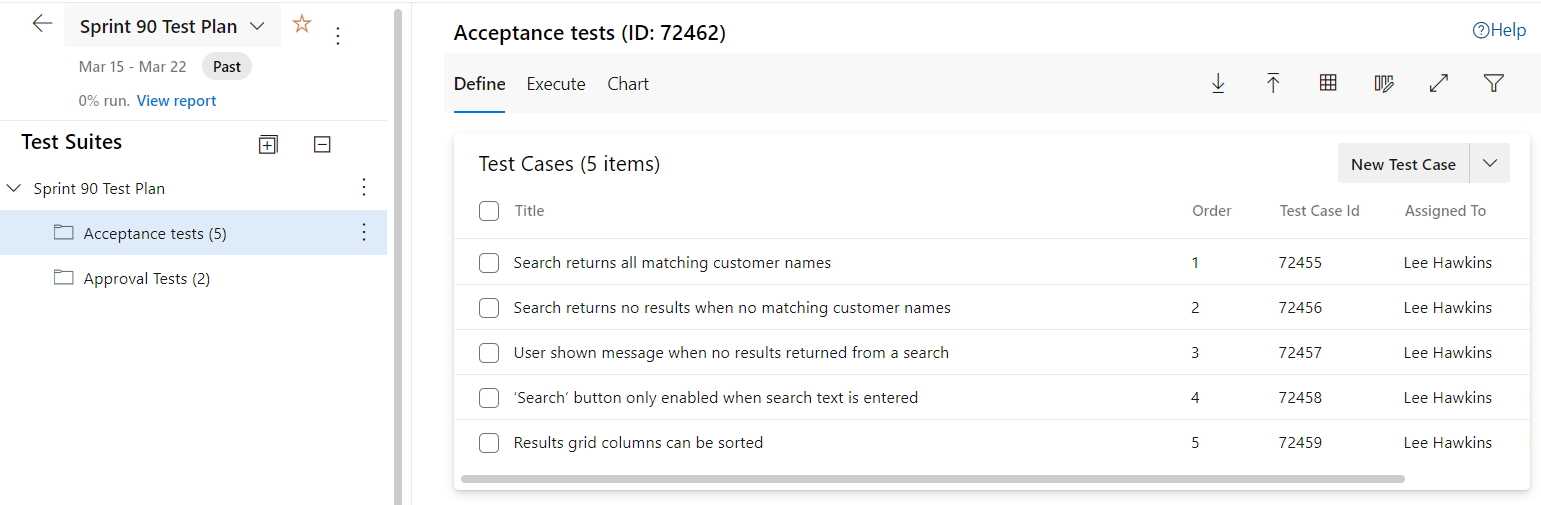
The Acceptance Test cases can be seen in Azure Test Plans for the appropriate Sprint:
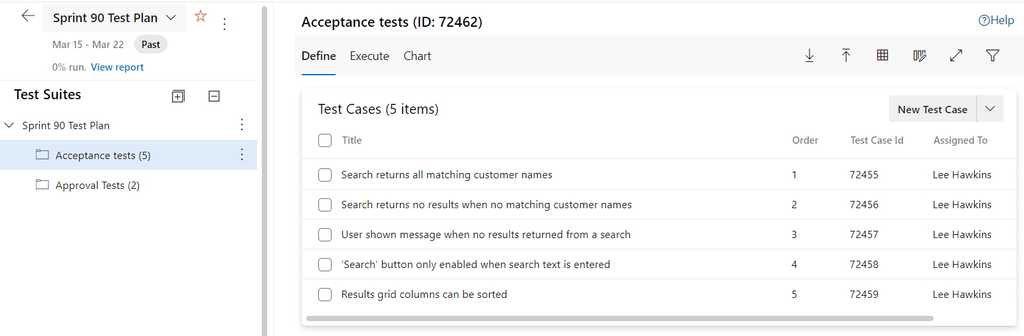
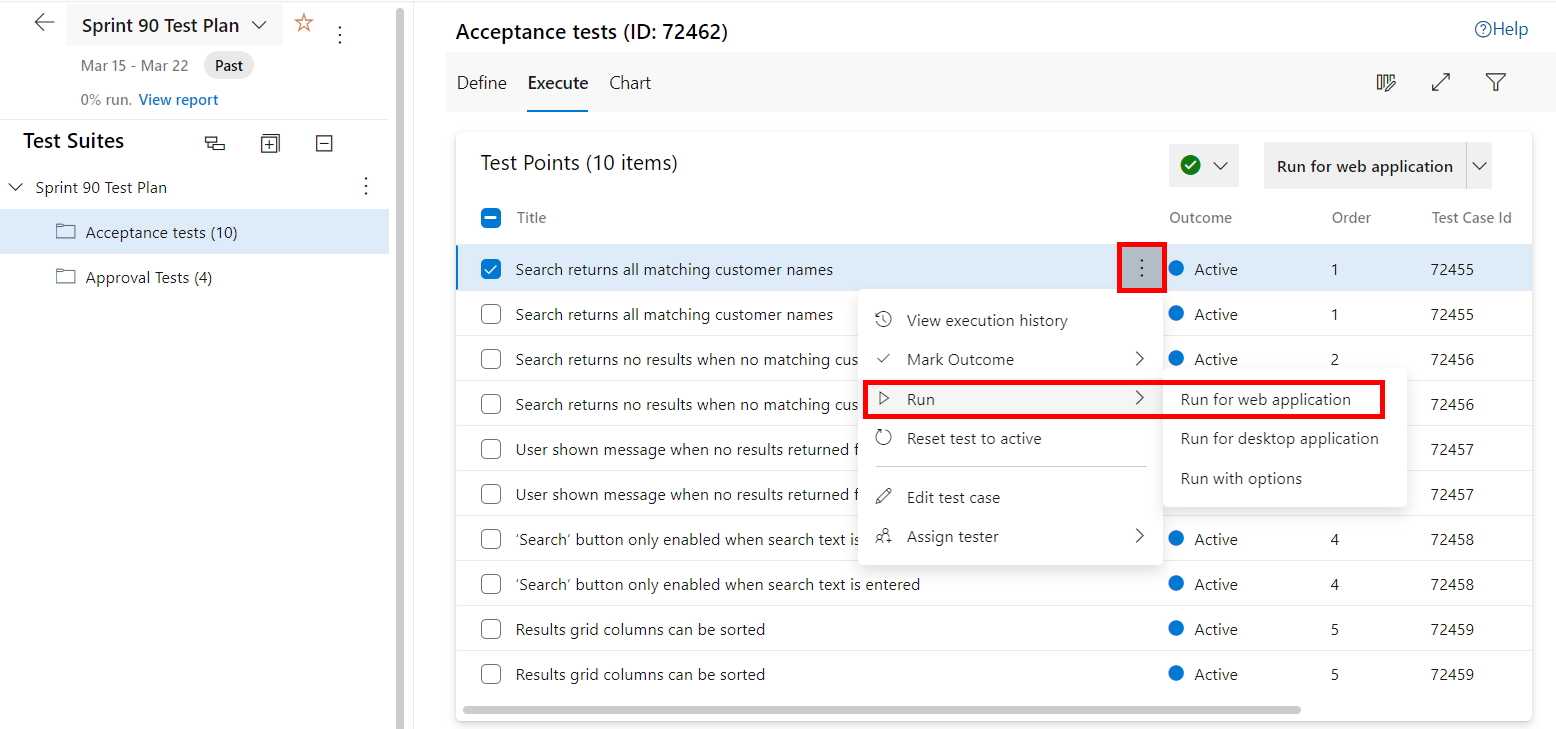
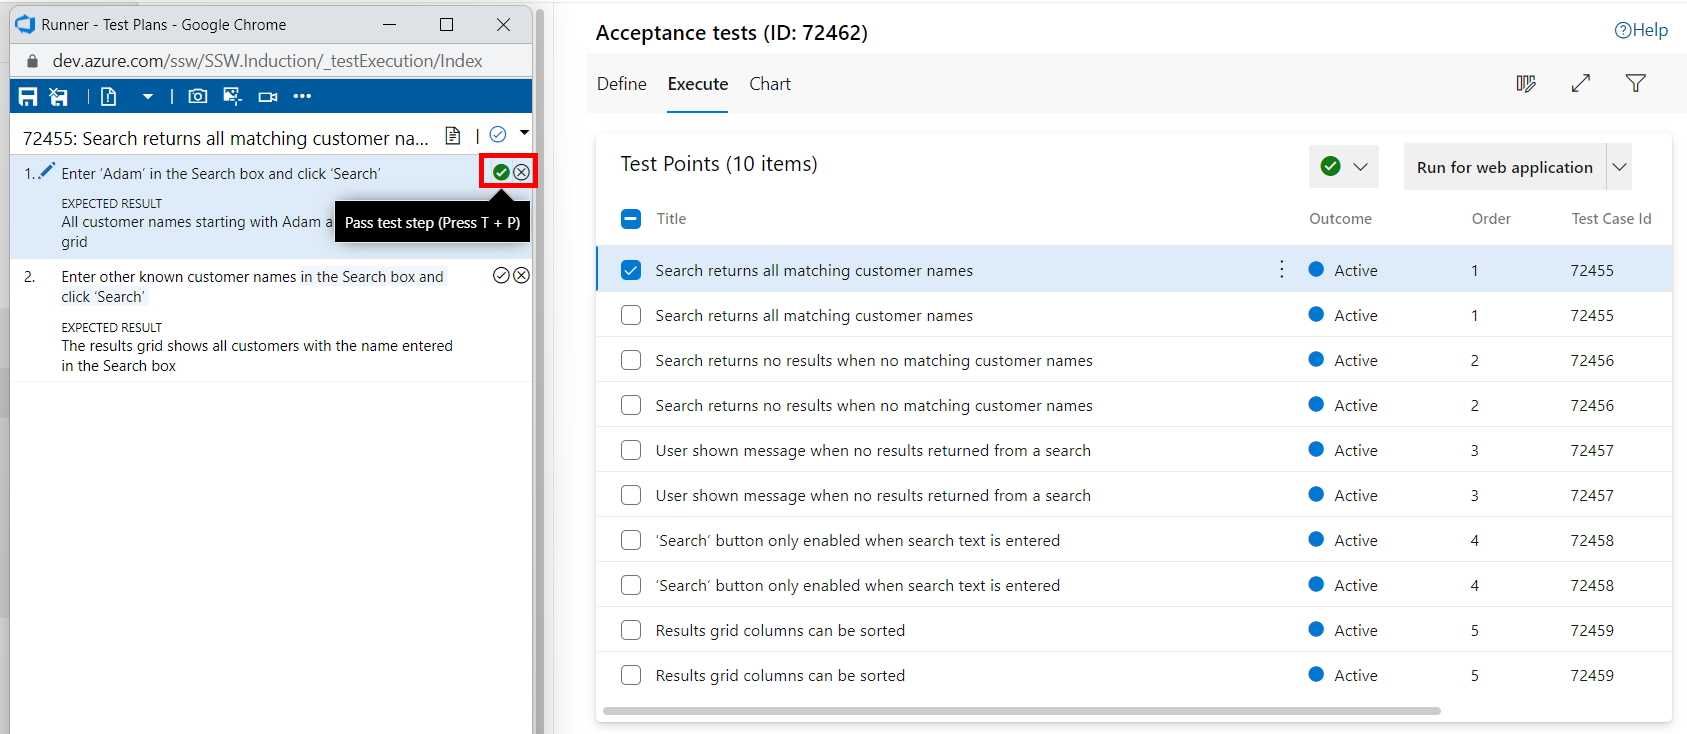
Figure: The tester sees the acceptance test cases in Azure Test Plans The tester then runs each Acceptance Test case:
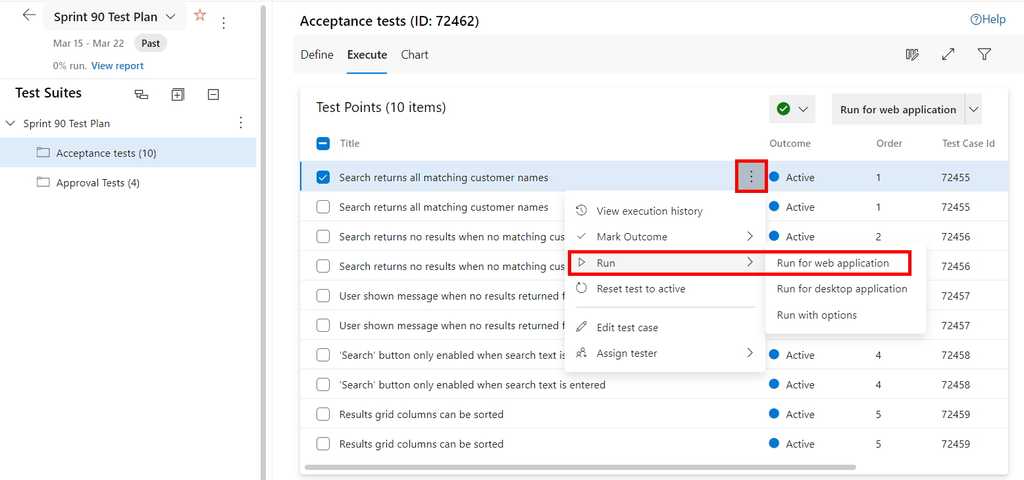
Figure: Open the Test Runner using the "Run" menu item from test case(s) 
Figure: In the Test Runner, the tester follows each of the test steps and passes or fails them as appropriate (using the tick or cross button) Use Microsoft's Test & Feedback extension to perform exploratory tests on web apps directly from the browser.
Capture screenshots (and even videos), annotate them and submit bugs into Azure DevOps as you explore your web app - all directly from the Chrome browser (Edge and Firefox are also supported).
Test on any platform (Windows, Mac or Linux) on different devices - without the need for pre-defined test cases or test steps.
Video: Ravi walks Adam through the exploratory testing extension - You can also watch on SSW TV Video: Ravi Shanker and Adam Cogan talk about the test improvements in Azure DevOps and the Chrome Test & Feedback extension - You can also watch on SSW TV-
Go to Visual Studio Marketplace and install "Test & Feedback":
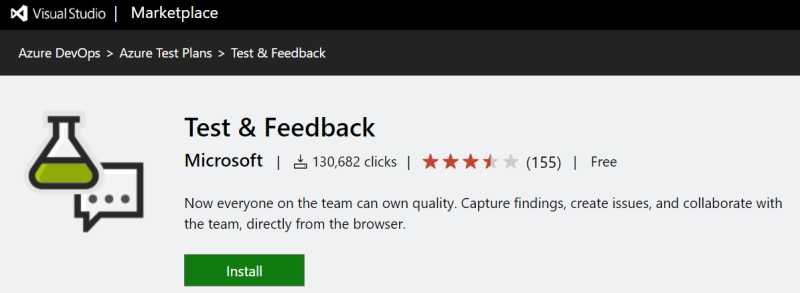
Figure: Microsoft Test & Feedback (was Exploratory Testing) extension -
Click "Add to Chrome" to add the extension to the browser on your computer:
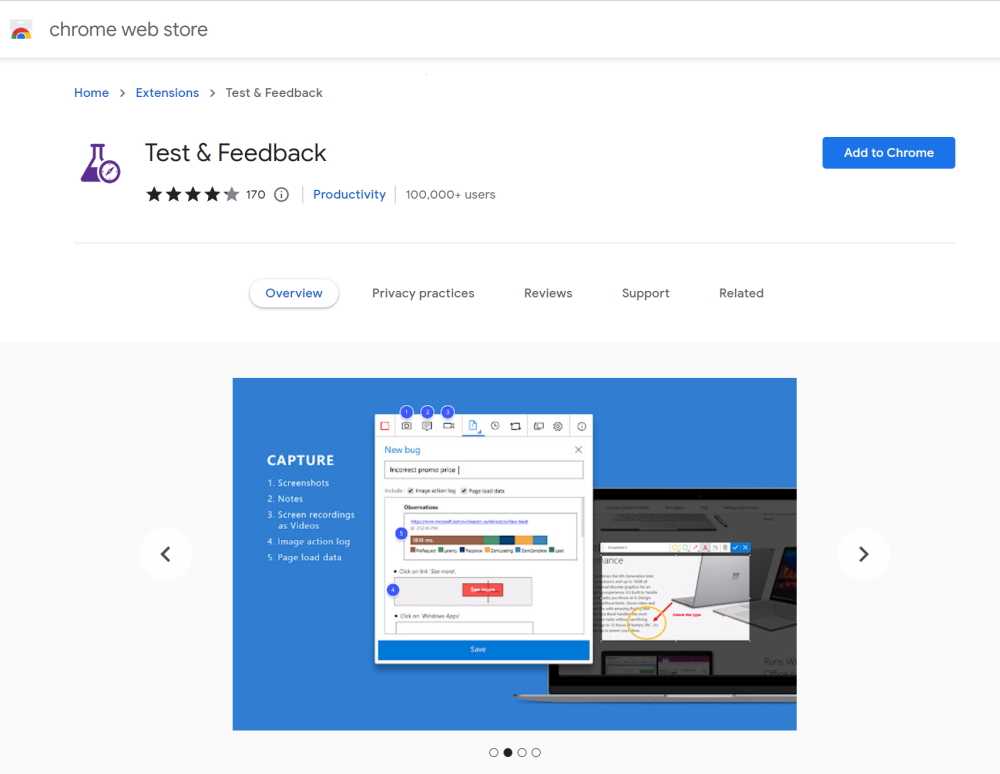
Figure: Chrome Web Store page for Test & Feedback extension - Go to Chrome.
- Start a session by clicking on the Chrome extension and then click start a session:
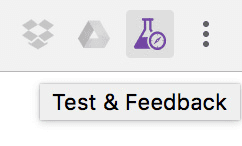
Figure: Chrome extension icon 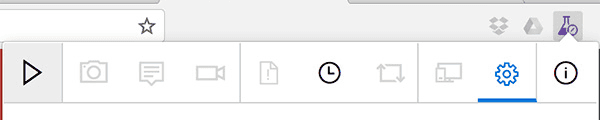
Figure: Test & Feedback "Start session" button
Note: See Azure DevOps - Explore work items with the Test & Feedback extension for detailed information about the use of this extension alongside Azure DevOps.
-
Organize your Test Cases by adding them to a Test Plan or Test Suite.One Test Plan per Sprint is recommended.
A Test Plan consists of a number of Test Suites and/or Test Cases.
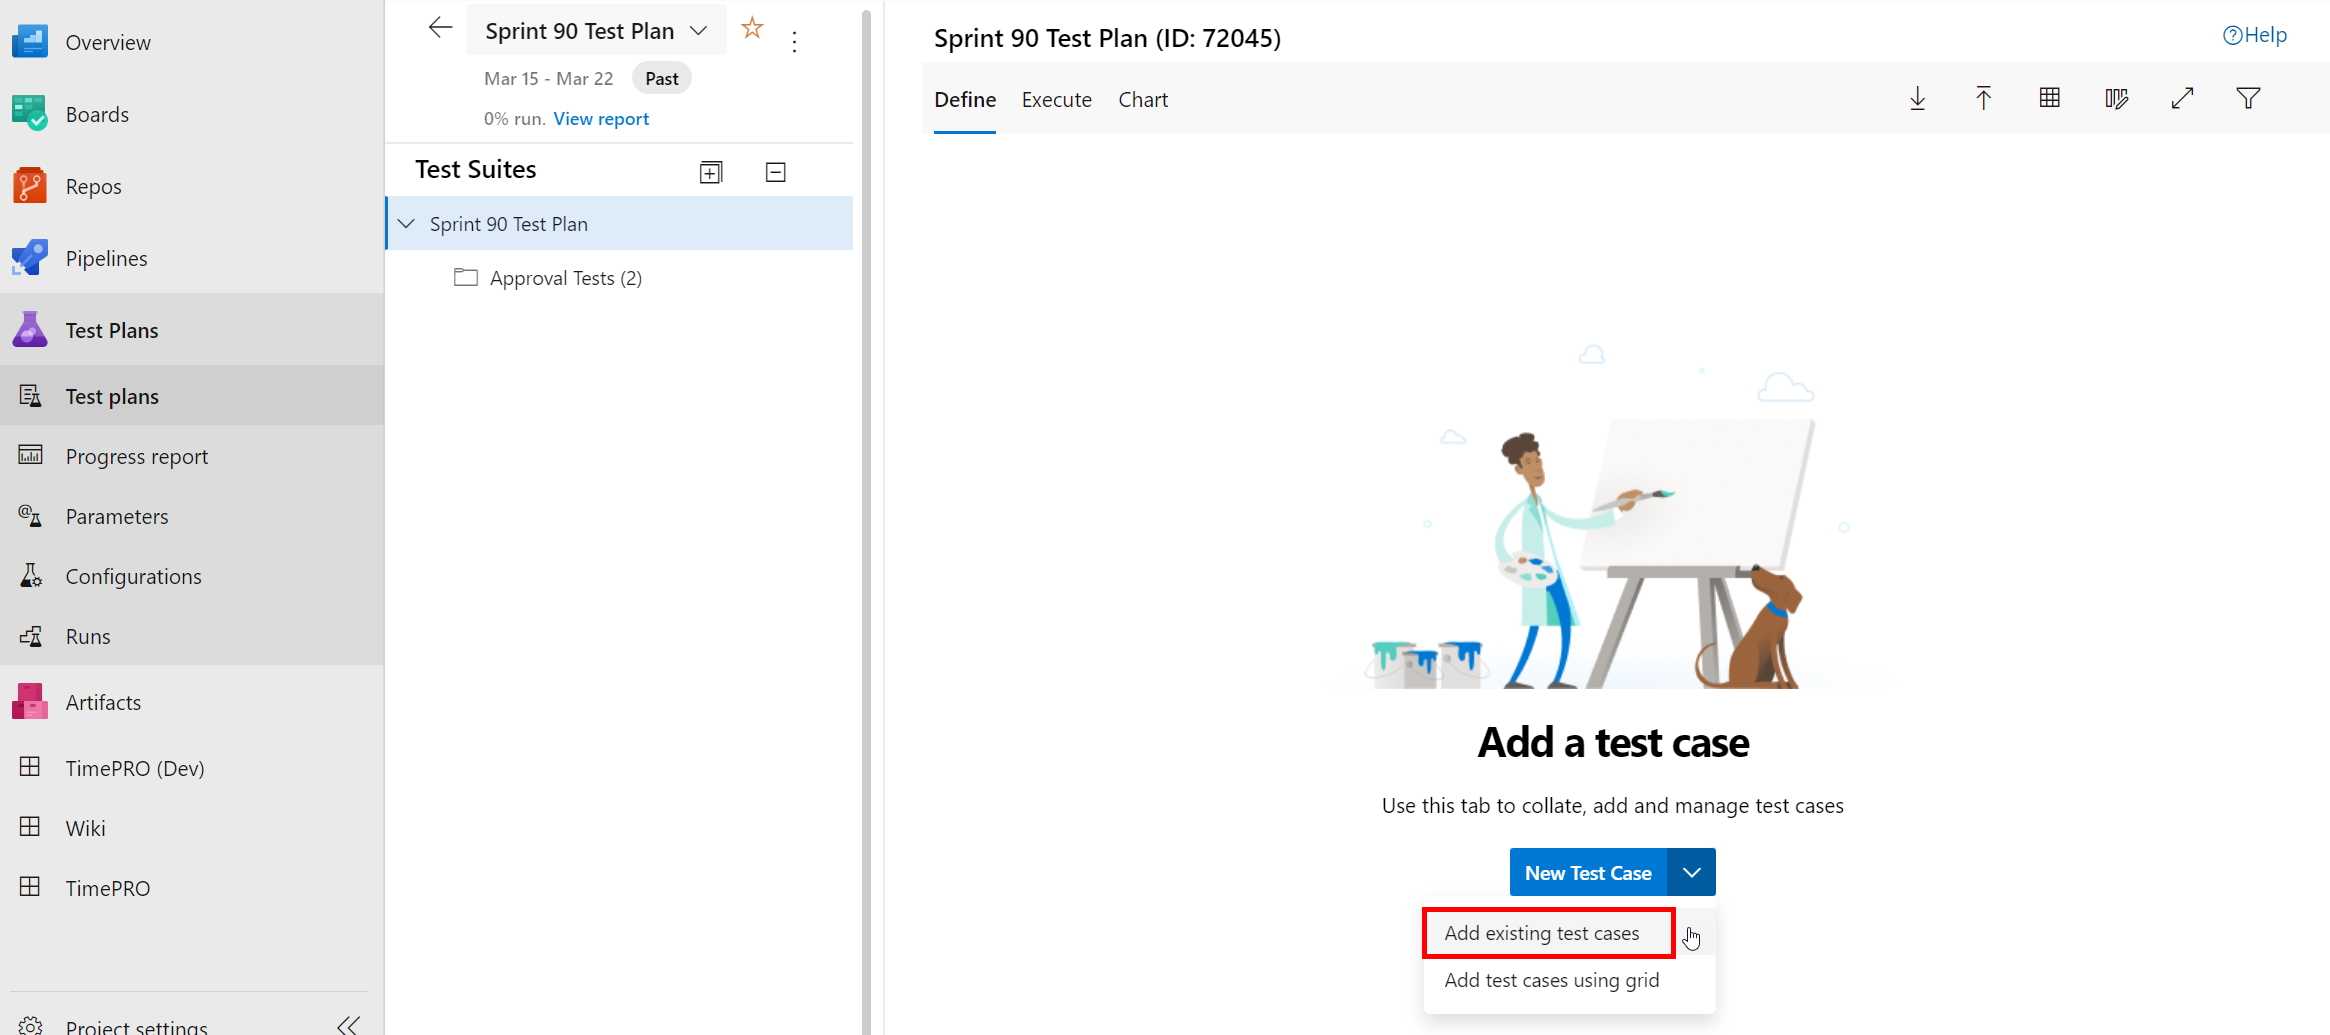
To add Test Cases to a Test Plan, select the required Test Plan and then click on the down arrow against "New Test Case" and "Add existing test cases":
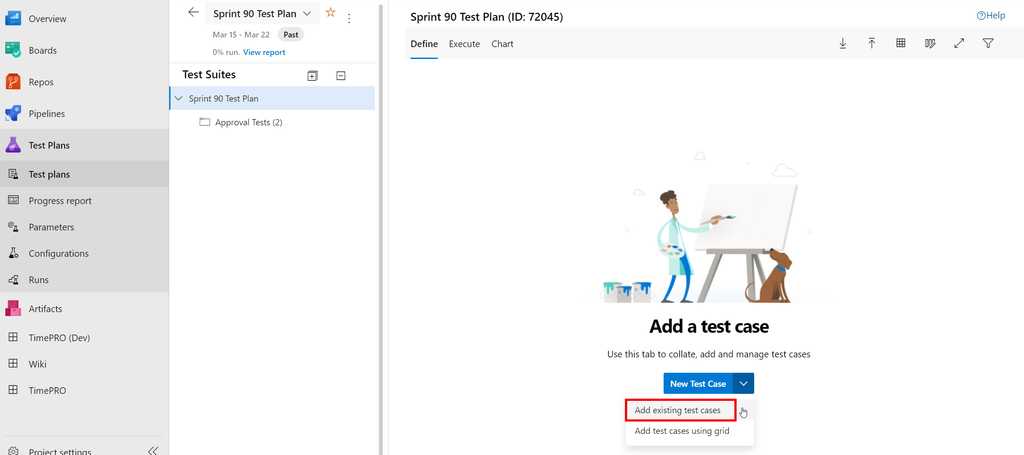
Figure: Adding test cases to an empty Test Plan in Azure Test Plans To add Test Cases to a Test Suite within a Test Plan, click on the down arrow against "New Test Case" and "Add existing test cases":
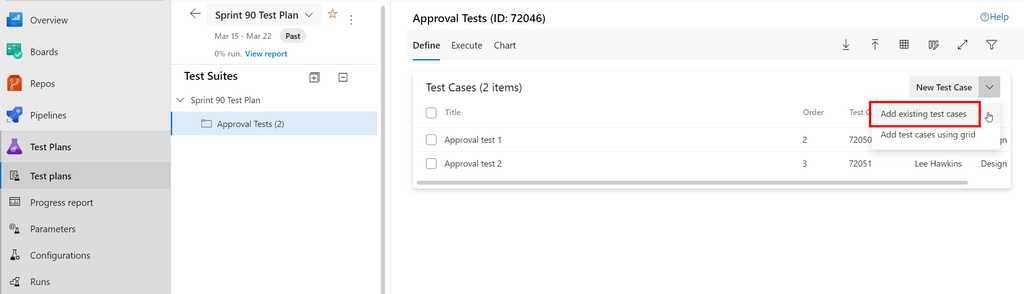
Figure: Adding test cases to a Test Suite in Azure Test Plans Recording your screen is a great way to demo a change for a client, show how reproduce a bug or sharing something cool you've been working on.
There are many ways to record your screen. Here are some popular options:
Remote recordings
- Zoom
-
- Perfect if you are alreay on a call see
- StreamYard (advanced - good for live streaming)
Simple recordings
- Loom (only 25 videos free)
- Snagit
-
Clipchamp Recommended - Used at SSW, great start for "Done Videos"
- Direct upload to Clipchamp
Advanced recordings
Tip #1: If you are recording the steps to reproduce a bug, it might be better to use Chrome Recorder instead.
Tip #2: Zoom, and Microsoft Teams are cloud-based services, so consider whether an option such as Snagit, Loom or Clipchamp that records locally is more appropriate. If you record with Zoom, post-production editing will be required
Tip #3: Sometimes, all you need is a GIF to demonstrate something. For this, you can record one with a tool like Gifox (MacOS only).
Tip #4: If you're on a call with someone and you want their audio to come into the video as well, make sure you "share system audio".
In the old days, reading and understanding test cases was something only developers could do. Behavior-Driven Development (BDD) starts to solve this problem by enabling organizations to define their use cases in plain language and integrate these aspects with testing frameworks.
Using Gherkin syntax and a BDD framework like SpecFlow you can write test scenarios in plain language using a few key words (Given, When, Then). Plain language makes the test scenarios easy to understand, even for non-technical team members.
First think about the different scenarios that you want to test, then write them out in plain language using gherkin syntax.
Feature: Greeting Message Participant sees a greeting message
Scenario: Participant sees a greeting message Given I visit the website When I navigate to the greeting screen Then I see the greeting message
Figure: Good example - Gherkin syntax scenarios (Given, When, Then)
Once you have your scenarios lined up, you should begin to write the test steps for each scenario.
[Given(@"I visit the website")]
public async Task VisitTheWebsite()
{
    await HomePage.NavigateAsync();
}

[When(@"I navigate to the greeting screen")]
public async Task NavigateToWelcome()
{
    await HomePage.NavigateToGreeting();
}


[Then(@"I see the greeting message")]
public async Task ThenISeeTheGreetingMessage()
{
    var message = await HomePage.GetGreetingMessage();
    Assert.IsTrue(message == GreetingMessage);
}
Figure: Good example - Test steps to run, matching the Gherkin Syntax
Automated UI testing is a valuable component of a test strategy, to check interacting with the software in a similar way to end users.
Benefits
As part of an overall test strategy that blends human testing with automation, automating at the UI level can be helpful to check that key user workflows keep working as we expect.
Lower level automated tests (e.g. unit tests) are small in scope and are unlikely to catch problems with more sophisticated usage patterns of the software. Higher level tests via the user interface are much larger in scope and have the potential to mitigate the risk of important user workflows becoming broken in production.
Tooling
There are numerous tools available for facilitating automated UI testing through the browser. These include tools like Telerik Test Studio, Cypress, or Puppeteer, to name a few.
Selenium was the gold standard in this area for many years, but Microsoft's Playwright is now recommended.
Playwright
Playwright allows you to write tests in many popular languages including .NET, Java, Python and JavaScript/TypeScript.
Playwright has a few advantages over Selenium:
- Actionability
- Performance
- Stability
- Switching browser contexts for parallel testing
- and more...
//Store the ID of the original window
const originalWindow = await driver.getWindowHandle();

//Check we don't have other windows open already
assert((await driver.getAllWindowHandles()).length === 1);

//Click the link which opens in a new window
await driver.findElement(By.linkText('new window')).click();

//Wait for the new window or tab
await driver.wait(
    async () => (await driver.getAllWindowHandles()).length === 2,
    10000
  );

//Loop through until we find a new window handle
const windows = await driver.getAllWindowHandles();
windows.forEach(async handle => {
  if (handle !== originalWindow) {
    await driver.switchTo().window(handle);
  }
});

//Wait for the new tab to finish loading content
await driver.wait(until.titleIs('Selenium documentation'), 10000);
Figure: Bad example - Selenium only lets you have one window focused at a time meaning you can't do parallel testing easily
const { chromium } = require('playwright');

// Create a Chromium browser instance
const browser = await chromium.launch();

// Create two isolated browser contexts
const userContext = await browser.newContext();
const adminContext = await browser.newContext();

// Create pages and interact with contexts independently
Figure: Good example - Playwright makes it easy to spin up independent browser contexts for parallel testing
Playwright codegen
Playwright offers a cool feature that lets developers record actions in the browser to automatically generate the code for tests.
Note: While this feature is useful for learning the syntax and structure of Playwright tests, it should not be used to generate production-quality test code.
Example of using Playwright
Watch Matt Goldman and Andreas Lengkeek from SSW demonstrate the use of Playwright to create a simple UI test in this YouTube video:
Caution
It's important not to rely too heavily on automated UI tests.
Due to their broad scope, they are slow to run and prone to high maintenance (since they will often need to be updated when the UI is changed). Other levels of automated tests should be considered first (see What are the different types of test you can have?) and only add automated UI tests for important workflows in the product.
The use of "record & playback"/Low Code/No Code approaches to creating automated UI tests is fraught with danger. These approaches demo very well and can appear to give quick wins, but they generate code that is generally sub-optimal and may be hard to maintain. Building reliable and maintainable automated UI tests requires coding skills and forethought in terms of what really makes sense to automate at this high level.