As a part of Branding within SSW, all the product installations should
have a standard layout. There is no point having one installation that
has the SSW Logo and the web site if none of the others follow suit.
The idea is that each product when the first installation is created
should have several items filled out by the programmer working on the
product. Below is a list of the current items that are required in the
product installations.
-
Installation directories
To setup template for the Wise Installer for Windows:
-
Copy SSWWindowsApplications.msi
from
www.ssw.com.au/ssw/Standards/WiseSetup/WiseScript/SSW.msi
to you application's "Setup" folder.
This template will be used in conjunction with the Visual Build
Pro script which will be used to build release packages.
-
Now we can create new setup with the standard template
Right-click the SSW.msi and choose "Edit in Wise editor".

Figure: Open file using the Wise editor.
-
Go to the "File" Menu and "Save As...", then choose "Installer
Projects (*.wsi)" from the type combo as shown below, then name
the file after your solution file's name.
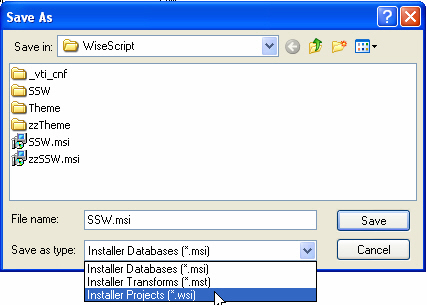
Figure: Save file as a wsi file.
This will prevent developers from keeping a template on their
local drive rather than always getting the latest template.
-
Copy the Product Code Across
This is very important if you are creating a new package for an
existing product. You also need to check the codes in the package
that you get from Source Safe to ensure that they're the same as
the previous released version.
If you do not copy the Product Code across from the old WSI file,
your new package will not be able to detect versions created with
old Wise packages and will not uninstall these older versions.
Copying the Product Code:
- Open the old WSI file.
- Select the Setup Editor.
- Click the Product Tab.
- Select Properties from the tree view.
- Copy the Product Code value.
- Paste the Product Code into your new WSI file.
- Repeat the process for the UpgradeCode.
-
Repeat the process for the PackageCode (which is found in the
Summary section).
-
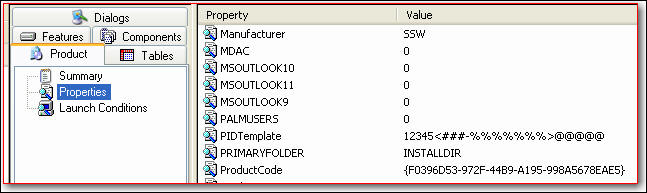
- Figure: The Product Code
-
Include all the files needed
Select "Files" on the left hand side and browse through to the
folder containing your release. Select the files you would like to
add, and click 'Add File'.
Make sure the directory structure in the bottom left is correct as
needed on the client computer.
The icon of the project should be set in the Application's exe.
-
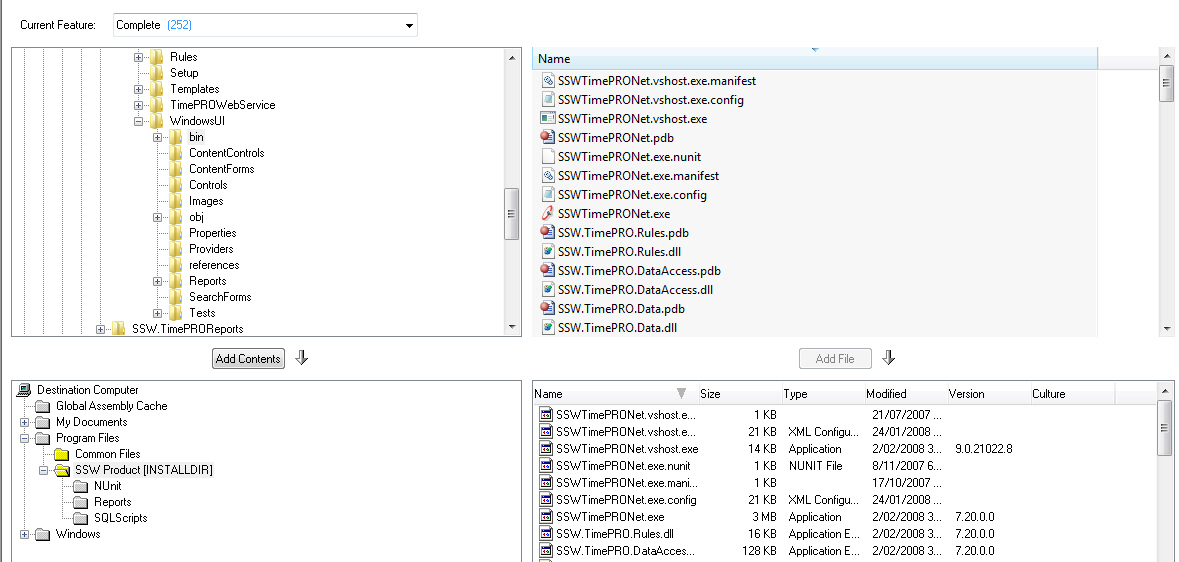
- Figure: Adding files to the package
The following files should
NOT
be included:
- *.scc;*.vspscc - Source Safe Files
- *.pdb - Debug Files
- *.user - User settings for Visual Studio .NET IDE
You can enforce these by adding those extensions to the Exclude
Wildcard. Make sure that the wildcards are similar to those in the
application's old msi.
-
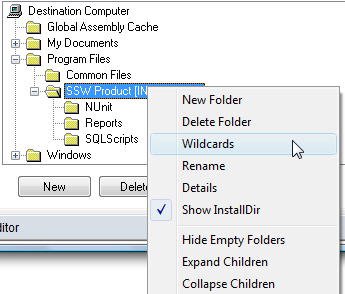
- Figure: Using Wildcards
-

- Figure: Exclude wildcards
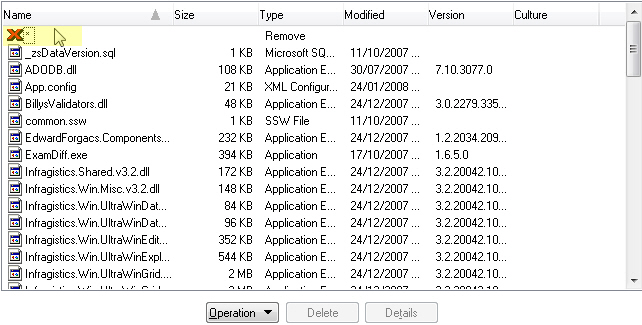
These files will automatically be removed on uninstall because
Wise keeps a link to each file that has been added above. However,
if there are files that have been added to the directory
after
the installation process, Wise will not have the list of these
files to remove. Therefore the RemoveFile operation needs to be
added to the list as shown below:
-
In the Destination Files list, select the "Remove file" option
from the "Operation" button.
-
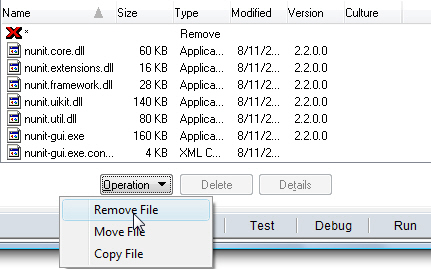
- Figure: Specifying the "Remove File" Operation.
-
In the dialog box, check the "All Files" checkbox and select
"Uninstall" in the "Remove During:" drop down list.
-
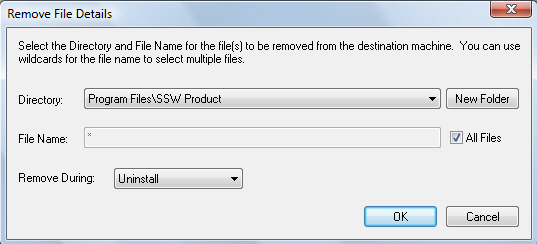
- Figure: "Remove all files during uninstall".
-
Click OK.
-
-
Figure: The "RemoveFile" operation is added to the file
list.
-
Change the Default Directory
Once the files have been added, the directory will be available in
the Directory combo boxes throughout the wise installer.
-
Go to the "Project Details" section from the left hand menu.
-
Click the "Change" button and select the appropriate Program
Files folder that the product will be installed under.
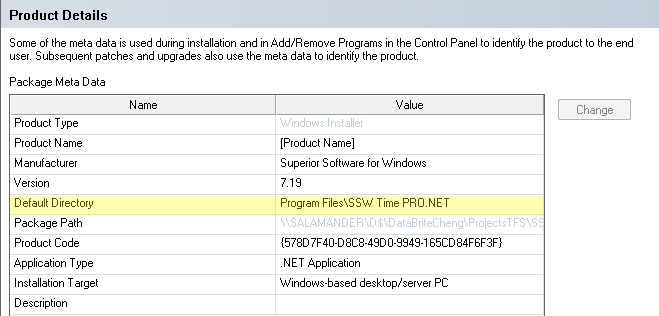
Figure: Select the correct Default Directory
The merge module directory must now also be set if you want to use
the components than can't be packaged automatically.
-
Go to the "Merge Module" section from the left hand menu, click
"Add" button to add modules
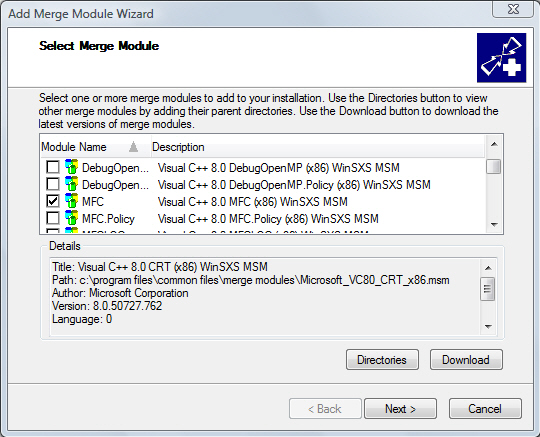
Figure: Add MFC component
-
Set the destination directory of the component to install.
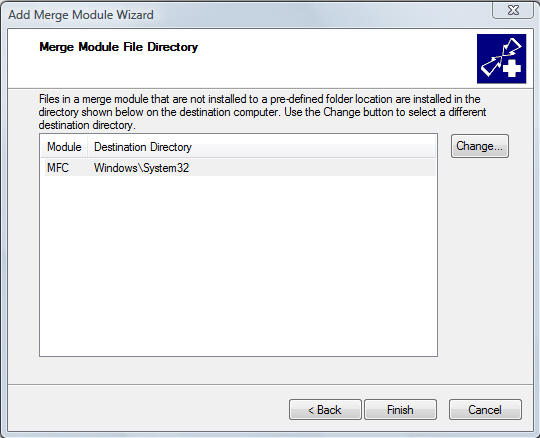
Figure: Install MFC component to System32 folder.
-
The module is added. You can double click the module to edit its
properties.
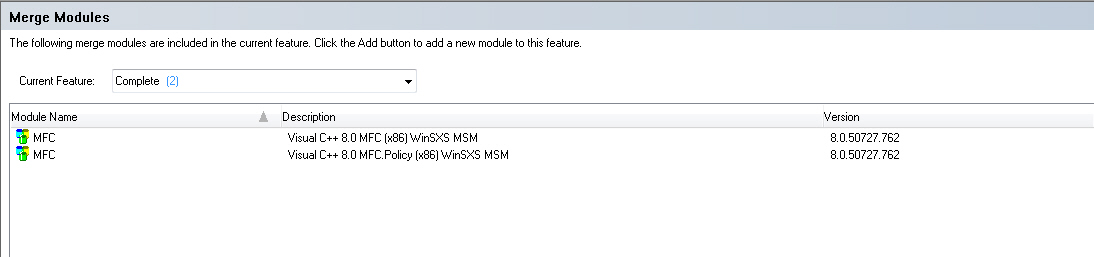
Figure: The MFC module is added to the installer.
-
Enter Add/Remove Program Information
Select "Add/Remove Programs" on the left hand side and enter
information that will show up in the Add/Remove Program Control
Panel for Windows 2000/XP:
-
Select the icon that will appear in the Add/Remove Program list.
There should be an ssw.ico for SSW products.
Note: You will need to add the files first before accessing the
executable through the 'browse..' button.
-
Check "Hide modify button" if the product does not have multiple
installation features.
-
Contact Person should be the current head developer for the
application.
-
Help URL should reference product's Online User Guide
Example:
/ssw/CodeAuditor/UserGuide.aspx
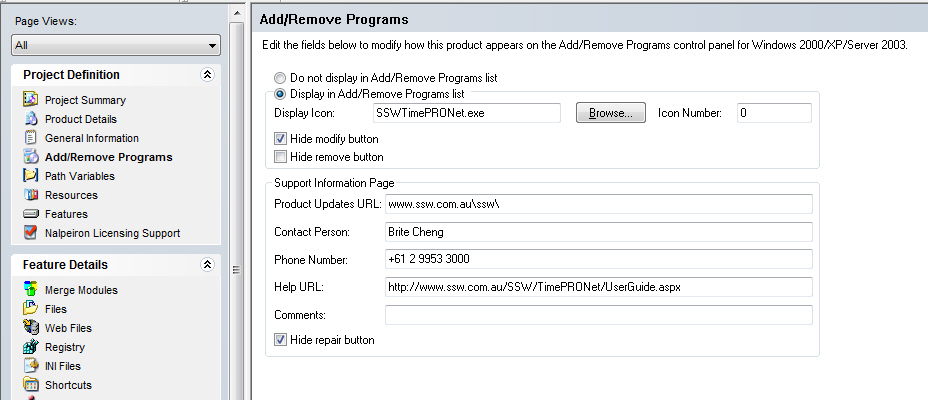
Figure: Add/Remove Program entry page
Figure: What it will look like in Add/Remove Control Panel
-
Add Shortcuts
Enter Shortcut setting that will appear in the Start | Program
Menu
-
Destination Directory will be suffixed with version so product
version can be checked at a glance without executing the
application. This will be handled by Visual Build PRO.
-
Prefix Name of each item with a number so sorting can be
controlled. Main executable should start with 1 so it will
appear at the top.
- Click 'Add'.
- Click 'Next'.
-
Select the main executable to be put in your installation
package.
- Click 'Next'
-
Expand the 'Programs' node and select the '[ProductName]'
folder, then click Ok
- Change the name of the Shortcut as shown in Figure1.
- Select the icon.
-
Look at the disabled "Icon Number" and remember the icon
number value.
-
Uncheck "Advertised" checkbox and enter the icon number
value in the "Icon Number" textbox.
-
Click OK.
Note: If you remove the file from the wise package that is
associated with the shortcut, the shortcut will also be
removed.
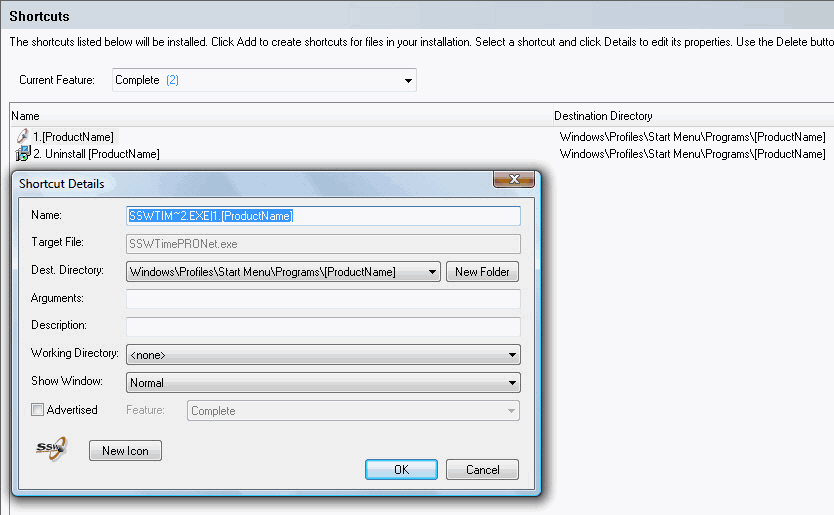
Figure 1: Make sure the shortcut name is "1. [ProductName]"
and select the icon by clicking "New Icon" button.
-
Change the component reference in the Shortcut Tables.
- Select "Setup Editor" on the bottom left panel
- Select "Tables" tab on the top left panel
-
Select the "Shortcuts" table on the left panel list (as
shown in Figure 2)
-
Change all the "Components_" column to be the same as the
Executable. (as shown in Figure 3)

Figure 2: The default way in which the "Shortcuts" table has
different references to the "Component_" key. This will not
allow the _Update and _Uninstall shortcut to be removed from
the start menu on uninstall.

Figure 3: A better way of allowing shortcuts to be removed
on uninstall is to have the component references the same as
the shortcut of the executable file.
-
Technical Note: (this step is not required) Destination
Directory are stored in the Directory Table. This should
generally be left as it is since Visual Build PRO will update
the DefaultProgramMenu directory name.
If there is an exception to changing it from the standard naming
system (which I doubt will be the case, then refer to Figure 4
to access the Directory Table):
- Select Setup Editor on the bottom left panel
- Select Tables tab on the left panel
- Select Directory on the left panel list
- Select Row with DefaultProgramMenu on the main panel
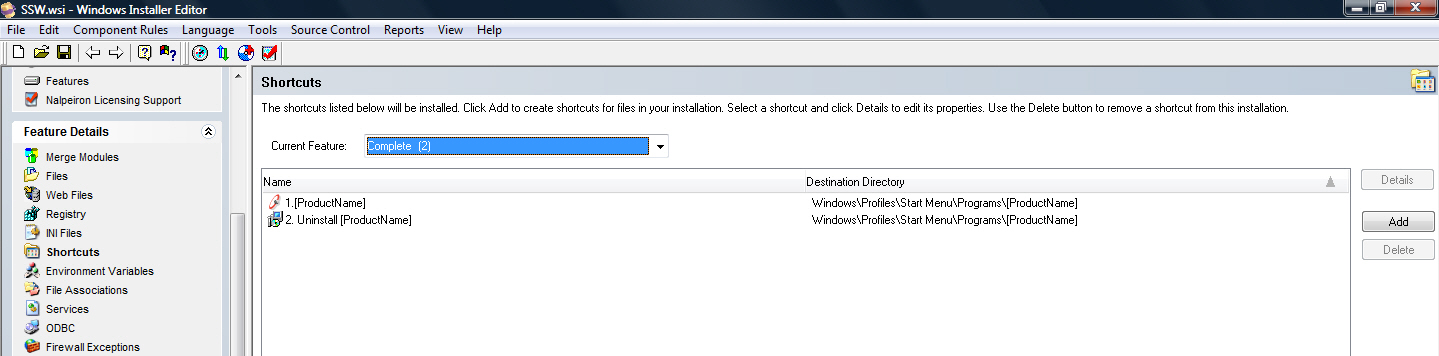
Figure 4: Add Shortcuts that appears in Start Menu

Figure 5: Modify DefaultProgramMenu to change Shortcuts
destination
Figure 6: This is how it should look in Start Menu
-
Remove Unnecessary System Searches
The Wise Template includes all the possible system searches for
all SSW's products. This makes it easier to remove the registry
key searches that specific applications do not need, rather than
adding them individually and having to spend those extra few
minutes to find the registry keys required per application.
If the system searches are not removed, the first dialog of the
wizard takes a long time to load.
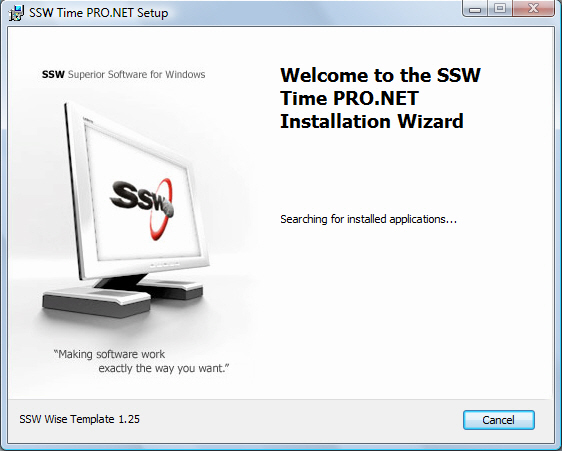
Figure: Wise dialog taking a long time to finish searching the
system.
In the wise file that has been copied over to the specific Setup
folder, remove all the system searches you do not need.
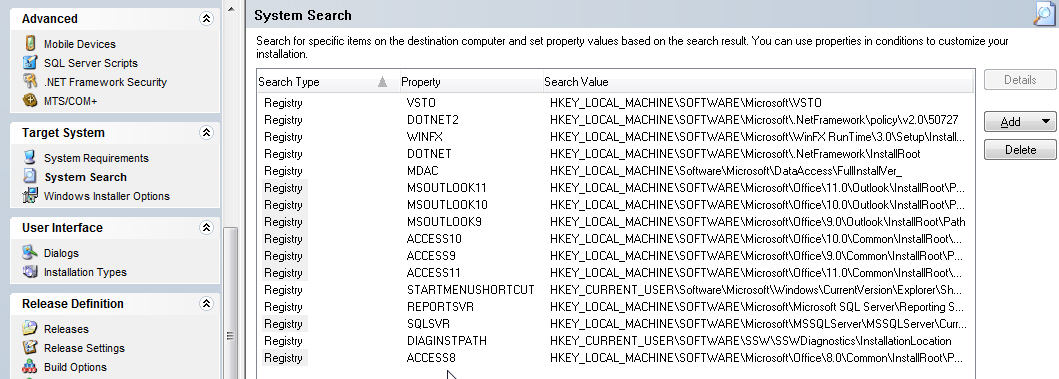
Figure: Select unneeded system searches and click "Delete"
-
Remove Assembly Dependency Check
Make sure the Wise File does not scan for dependencies.
This makes sure that the Build Script does not include the
dependencies (especially moving dll's into the GAC of the
destination machine), which was not initially specified.
The reason why we turn the scanning for dependencies off is for
the following:
-
Usually the assemblies that wise wants to add, are the ones that
the developer doesn't want to add. When you tell it no it asks
for every subsequent build.
-
The additional scanning takes time, and sometimes a lot of time.
-
Not being able to build wise and just walk away and come back
later the dialog demands user interference.
eg. In Smart Salary, because the job was an upsize job there was
a lot of interop libraries that WISE insisted that we must have.
Clicking through 10+ screens to ignore the add-reference dialog
got really tedious.
-
The build script will automatically add them when running in
silent mode.
Trade off:
-
Obviously, if WISE doesn't scan for dependencies, then when you
add new components, you may forget to add them to your setup
project. However, if you forgot to add a component to setup,
this is usually very quickly caught in testing the application,
and the fix is relatively simple as well. This simple trade off
is worth all the hassle of having it on.
Steps to remove Assembly Dependency scanning:
- Goto Tools -> Options.
-
Make sure the "Never Scan Dependencies" is selected in the "Scan
Dependencies" drop down.
-
Make sure the "Rescan assembly dependencies on compile" and
"Rescan assembly attributes on compile" are both unchecked.
-
You can also uncheck the "Rescan for COM interop registry keys
on compile", and select ".Net Application" in the drop down.
-
Click OK.
Figure: Bad
Figure: Removing the assembly dependency checks for every
compile - Good
-
Modify Custom Actions
The SSW Template provides an existing number of custom actions
used for standardizing the installation package. However the
custom actions need to be specified for each application.
There are only two custom actions that need to be modified and can
be done by following the below steps:
-
Click the MSI Script Tab (found in the bottom Tab control of the
Wise environment)
-
Select "All Custom Actions" from the pull down combo box as
shown below.
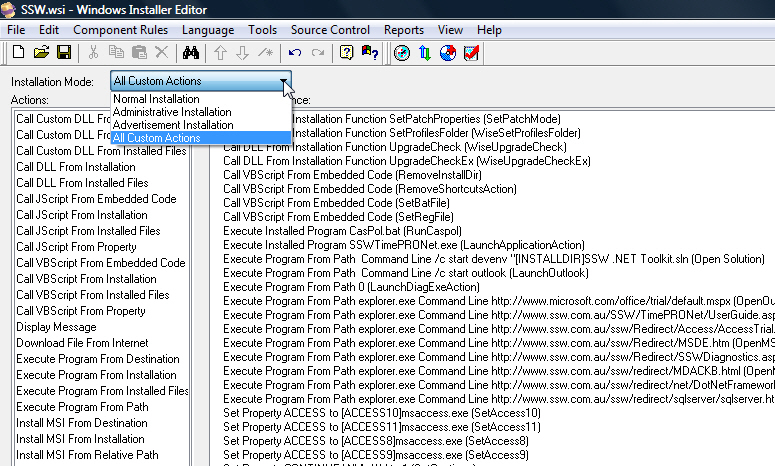
Figure: Select "All Custom Actions"
-
Select the "LaunchApplicationAction" from the list of actions as
shown below.
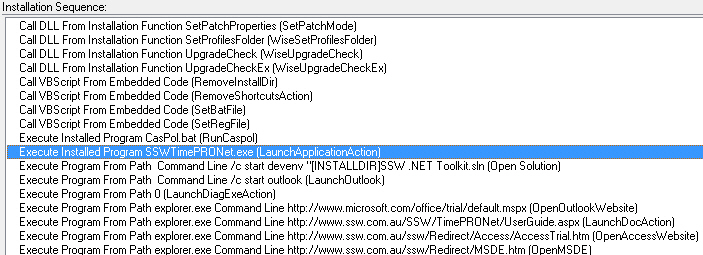
Figure: Select the "LaunchApplicationAction" Custom Action
-
Double click the custom action and modify the exe to be that of
your application's .exe.
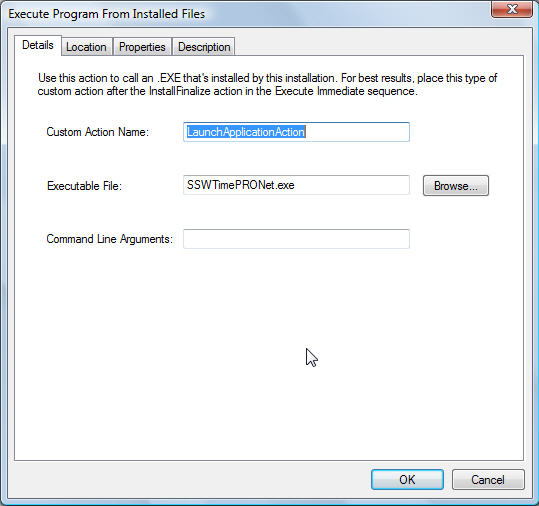
Figure: Modify the 'LaunchApplicationAction' to point to the
application's exe by browsing the destination files.
-
Do the same for the "LaunchDocAction" so that it points to the
specific application's User Guide.
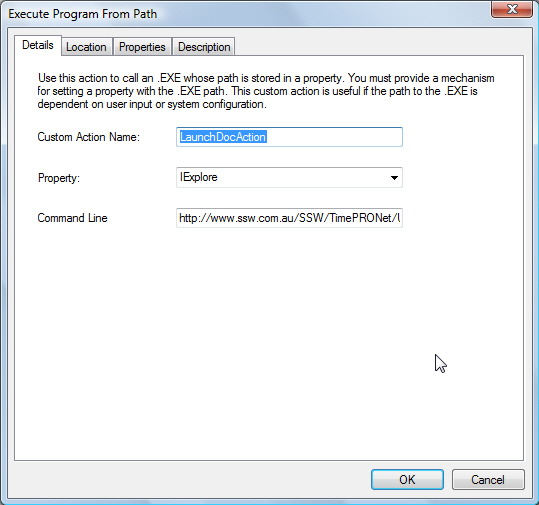
Figure: Modify the 'LaunchDocAction' to point to the
application's UserGuide URL.
- Save the .wsi file
The other steps are optional. After the wise file has been saved
and checked for correctness, the next step would be to get the
Visual Build template from the following link:
Template for Visual Build PRO can be found here.
-
Launch Program and View Documentation options on Exit Dialog
On Exit Dialog, we must include Run Program, Open Online User
Guide and Run SSW Diagnostics.
SSW Diagnostics helps our developer to analyze your problem by
collecting information about your system. This application will
collect that information and then email it to our developers, you
may view the information before you send it if you wish.
Now to configure scripts to provide this capability:
- Select Setup Editor from bottom tab
- Select Dialogs from the side panel tab
- Select Exit Dialog from the side panel
-
Double click each checkbox and check that the property is set
correctly
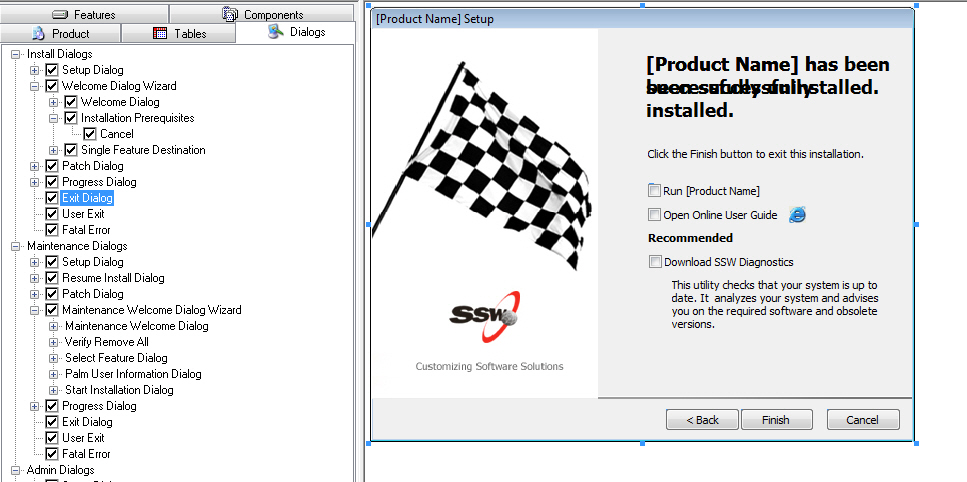
Figure: Configuring Exit Dialog to support Autorun
-
Double click the Finish button and set the Events to run program
after installation.
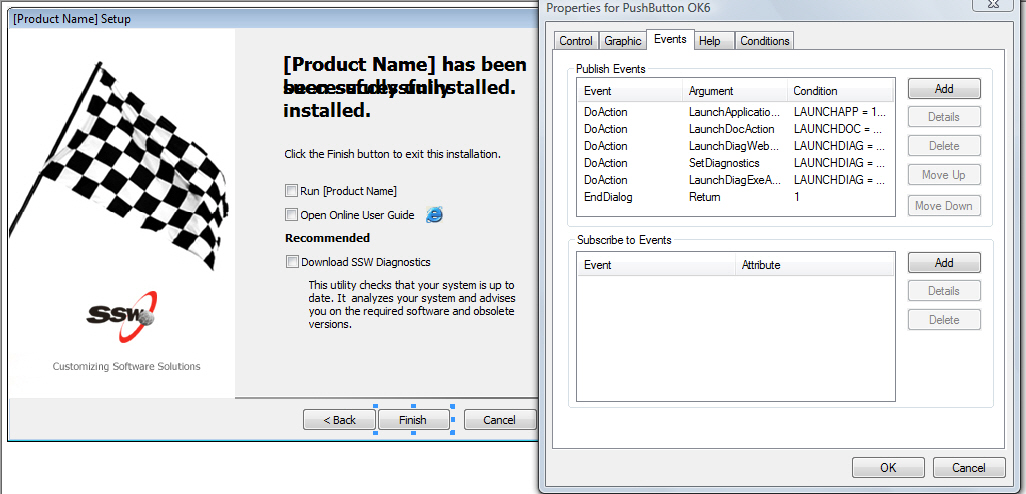
Figure: Configuring Finish button
For more information on Versioning Standards please follow this
link.
-
Register and UnRegister Assemblies (DLL) for Com-Interop Projects
If you are building a setup for a Com-Interop project, some
information needs to be added to the registry so that your DLL
can be called as though they were COM components.
Make sure that the "Application Type" in WISE is configured as
either a .NET Application or MIXED, because otherwise
(obviously enough) WISE will not let you register the
Assembly.

Figure: Make sure the "Application Type" in WISE is
configured to .NET Application or MIXED
To configure WISE to register the Assembly, in the
Installation Expert, under the Feature Details Tab on the left
hand side, select "Files" and double click the DLL that you
want to register.
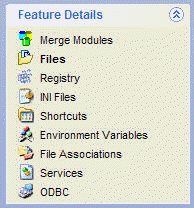
Figure: Double click the assembly file you want to register
In the dialog box that pops up, enter the following details
under the "self-registration" tab

Figure: Configure 'Self-registration' for assembly
Make sure you have "Use order specified below" selected in the
drop down and that you check the "Generate COM interop
registry keys for .NET assembly" at the bottom of the dialog
window.
After doing that, WISE will create all the registry keys that
are required to properly register the DLL for a COM-interop
project. You can verify that by looking at the registry keys
added to the destination computer under WISE
Figure: Wise will generate all necessary registry keys for
register the DLL
Compile and test your project.
When you uninstall the product, WISE will take care of
unregistering the Assembly for you by removing the registry
keys it created during install.
-
Apply theme to installation dialogs
You can change the look of installation dialog boxes with theme.
You can add/edit the images, texts Wise 7 offers some standard
themes in "Dialogs".
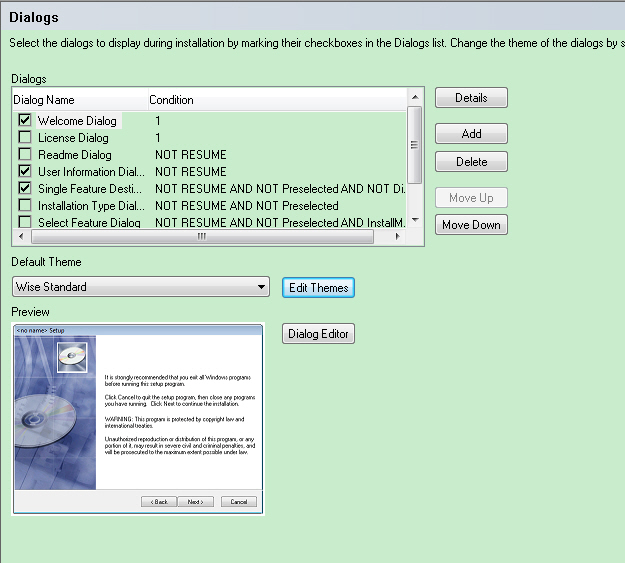
Figure: Select theme.
You can also edit those standard themes.
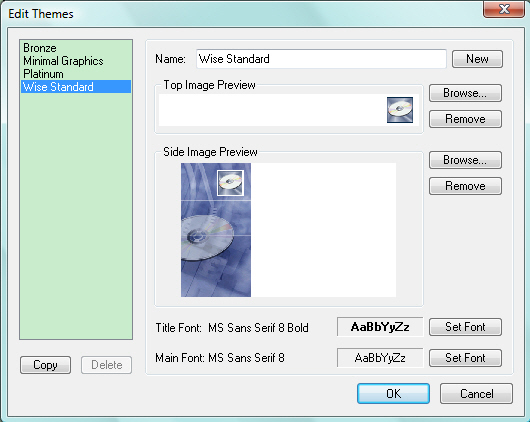
Figure: Edit theme.
We do have our standard for the look of dialogs during
installation. Check
the user guide
.
To customize the dialogs, we need to go to Setup Editor | Dialogs
to edit.
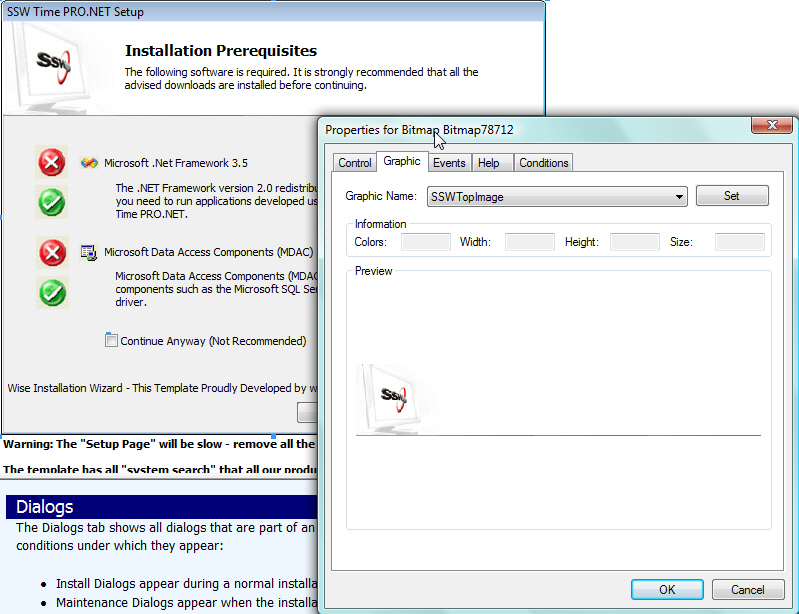
Figure: Customize dialog
Note:
If the installation file is created by previous Wise, like Wise 5,
we will find the "none" option in the default theme. Please make
sure that the default theme is set to be "NONE" if you have ever
created customized dialog. Otherwise, the dialog box customization
will be lost.
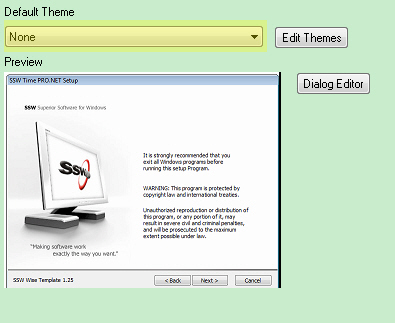
Figure: Set the default theme to "none"
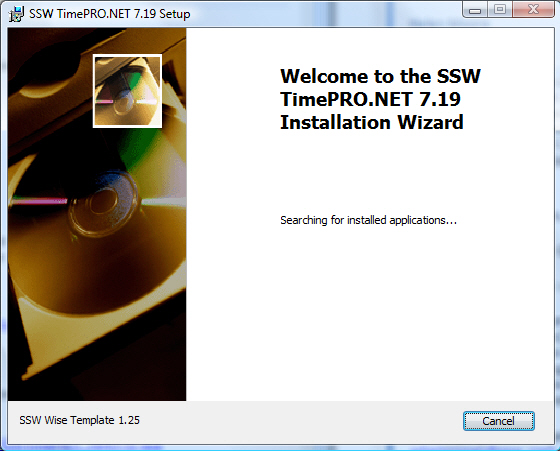
Figure: dialog customization is lost.
-
Generate both EXE and MSI packages from Wise Installer
Nowadays the exe package is more commonly use, for example some of
the famous software download websites, they are hosting files on
voluntary ISP around the world, some of them don't have the MIME
types setup for MSI, however EXE is widely accepted.
EXE provides upgrade feature which will allow user to uninstall
old version automatically, it's very handy for end users. However,
MSI can be opened in WISE studio directly, so it's very handy for
developers to analyze the content. Therefore, they both have pro
and cons and we provide both version.
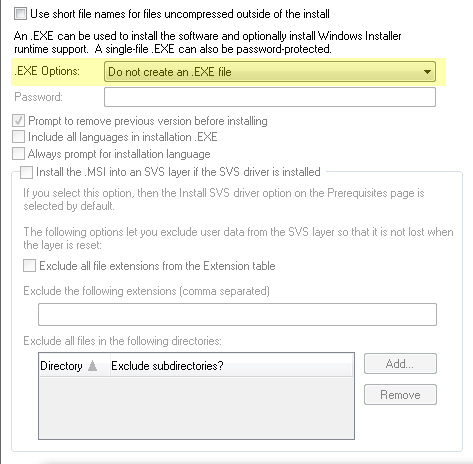
Figure: Generate MSI package only(Bad)
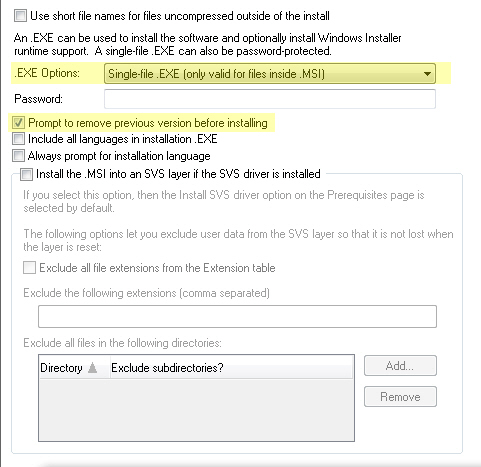
Figure: Generate both EXE and MSI packages and prompt use for
uninstalling old version (Good)
This will ensure WISE generating EXE as well as MSI packages for
your product.
Make sure you tick 'Prompt to remove previous version before
installing' checkbox, and update the prompt message in 'Property'
table. The reason for this is because our Visual Build will
include the product version in our product name, so if you don't
do this, the prompt message will be very confusing.
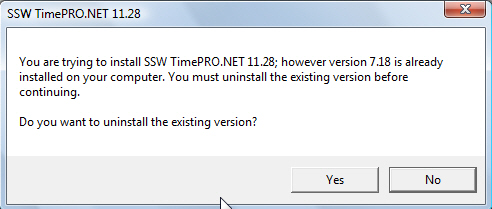
Figure: Default Wise warning message for uninstalling old
version (Bad)
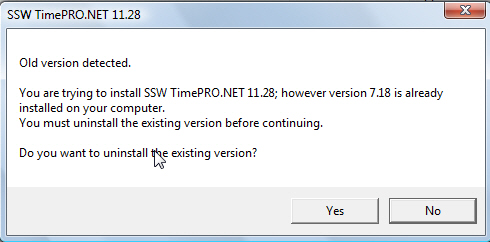
Figure: Modified Wise warning message for uninstalling old
version (Good)
To change this, go to the 'Property' table in wise, and change the
'WiseInitExistError' property's value to
Old version detected.
You are trying to install %s; however version %s is already
installed on your computer.
You must uninstall the existing version before continuing.
Do you want to uninstall the existing version?
|
Tip: To add a line break before the last sentence, you can write
this message in 'Word' first and copy paste into wise.
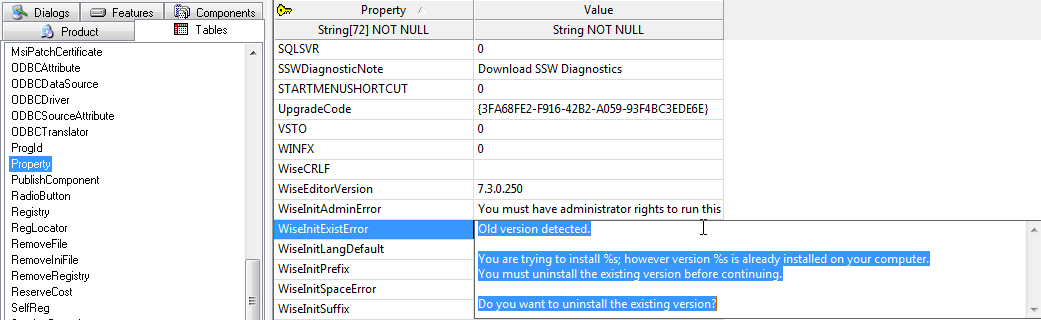
Figure: Update the default warning message in Wise table
When you use Visual Build to build the product and deploy it on
our servers, please make sure you upload both the MSI and EXE.
-
Some special features for Vista
Vista is totally different from other OS of Microsoft. It has
special system folder architecture and security mechanism.
Wise 7 can support Vista very well. There are some special features
designed for Vista. If you want to build the product compliant with
Vista, please take care of the following settings.
-
"AllUsers" is a hidden property in the property table, setup
editor. Its default value is 0 - that means the software will be
installed per user.
This value should be set to 2 - the files (e.g. the shortcuts)
will be installed according to user access level:
for standard user access privileges, the files are stored in
folders under the user's personal profile;
for administrator access privileges, the files are stored in
folders under "All Users" profile. (in Vista, it is
"ProgramData" folder)
-
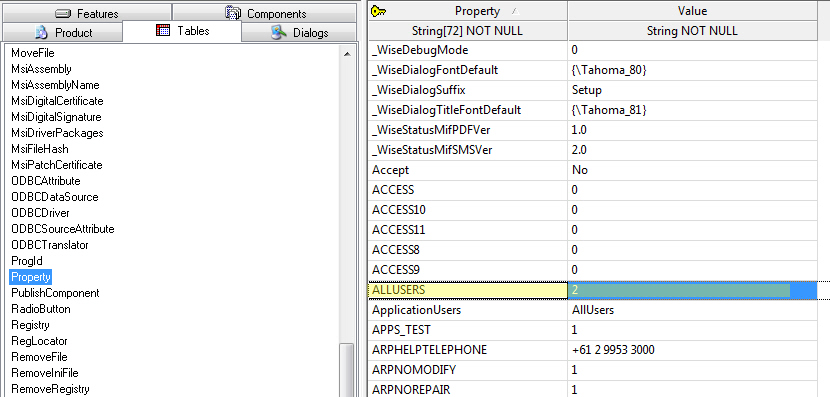
- Figure: Set the "ALLUSERS" property
-
In "Windows Installer Options", you can set to enable/disable
the UAC (User Account Control) during the installation. This
configuration does not mean you can open or close UAC in Vista.
In fact, enable this will make the installer to try to elevate
privilege while it is writing files to protected area.
e.g. When you try to do a per machine installation, you will
need to write files to "ProgramData" folder, or add registry
keys to "HKEY_LOCAL_MACHINE". If you do not enable this, the
installation process will fail because you may not have
administrator privileges to do so.
-
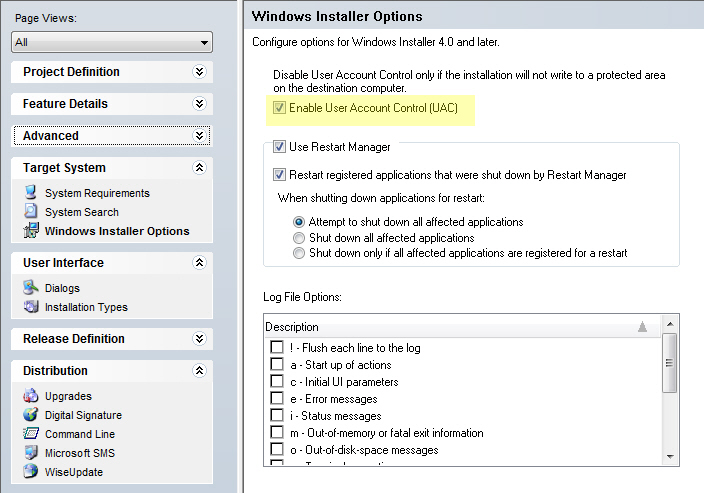
- Figure: Installer Options
-
If you want to create new template by Wise 7, be careful of
"Create a Vista Standard User Installation" checkbox. Enable
this will make the installation only has standard user access
privileges and can't operate on any protected files.
-
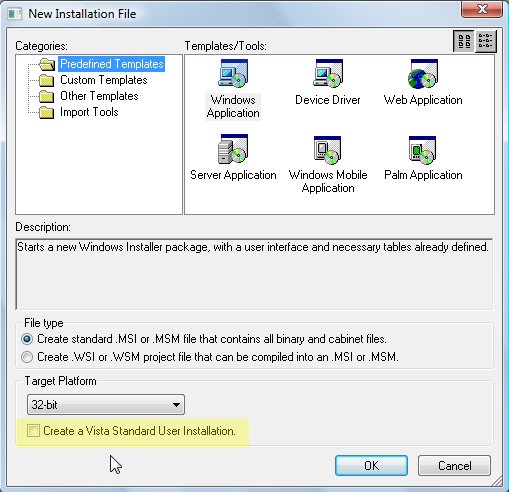
- Figure: Create a new template
-
Run 'SSW Diagnostics' after installation (Recommend)
It's recommend to run 'SSW Diagnostics' after SSW product's
installation, so we include this option in our installation package
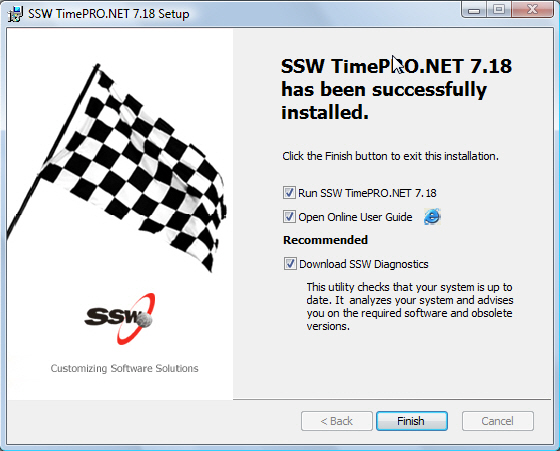
Figure: It's recommended to tick run SSW Diagnostics after the
installation
Make sure you point the link to the correct address, we have 2
redirect files in our redirect folder:
-
Do you have a 'Systems Requirements' screen when installing a
product?
Installing a product should be easy and fuss free! If your product
requires other programs to be installed, for example the Microsoft
.NET Framework, I find it is best to include a 'Systems
Requirements' screen where the user can click the links provided
and install the required programs and then continue with the
installation of your product. If your installation exits
prematurely due to not having the required programs installed, the
user can get frustrated - make life easy for them!
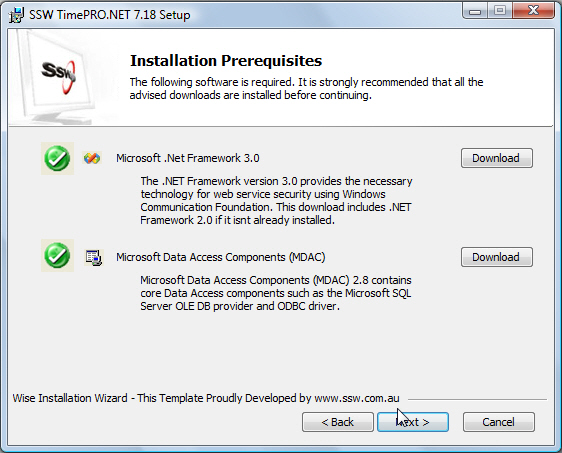
Figure: Installation Prerequisites Screen
However, sometime it's very hard to detect the required software
in user environment, eg. a database server on the network. In such
cases, you should still include the required software on other
screen to warn your user. At least let them know what they are
going to need to run your application.
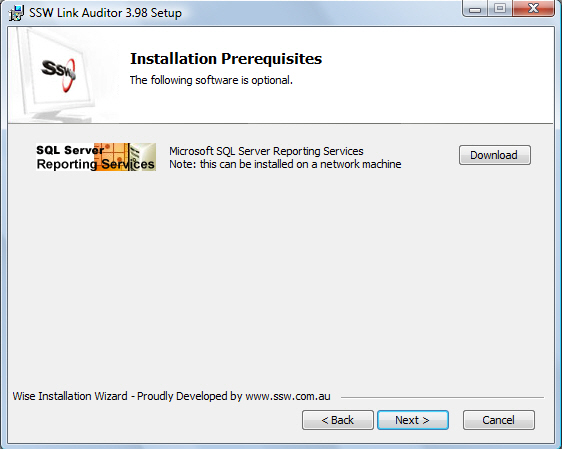
Figure: Installation Prerequisites (Optional) Screen