SSW Foursquare

Rules to Better System Administrators - 31 Rules

System Administrators (SysAdmins) are the lifeblood of any business. They mantain the infrastructure, networks and systems and cloud of businesses. This is why we have developed these standards for better System Administrators.

If you still need help, visit our Network Architecture consulting page and book in a consultant.

  1. Do you have a disaster recovery plan?

    At some point every business will experience a catastrophic incident. At these times it is important to have a plan that explains who to contact, the priority of restore and how to restore services.

    At the time of a disaster, you should have a few objectives established and measure some results - The objectives are RPO (Recovery Point Objective) and RTO (Recovery Time Objective); and the measurements to take are RPA (Recovery Point Actual) and RTA (Recovery Time Actual).

    It's recommended to practice your disaster recovery at least once every 12 months. This way you make sure that you are investing in the minimum amount of required resources, and that your plan actually works.

    So what do these terms mean?

    93c56eff 8d11 4123 a2d6 1305911f07b0
    Figure: RTO's vs RPO's

    RPO

    RPO or Recovery Point Objective, is a measure of the maximum tolerable amount of data that the business can afford to lose during a disaster. It also helps you measure how long it can take between the last data backup and a disaster without seriously damaging your business. RPO is useful for determining how often to perform data backups.

    RTO

    RTO or Recovery Time Objective, is a measure of the amount of time after a disaster in which business operation is retaken, or resources are again available for use. This measurement determines the amount of resources that are required for the recovery to happen within the timeframe required.

    RPA

    RPA or Recovery Point Actual, is the actual measurement of the amount of data lost during a disaster recovery.

    RTA

    RTA or Recovery Time Actual, is the actual measurement of downtime during a disaster recovery.

    Note: these may all be different for different services. For example at a bank you may have a transaction database, this may need to be only ever able to experience a RPA\RTA of a few minutes as even in that few minutes, thousands of transactions could be lost. However the same bank may have a website that they are happy to have an RTA\RPA of several hours as this is much less critical to the banks overall operation.

    How to calculate these values?**

    RTO and RPO are determined via a consultation called BIA (Business Impact Analysis). The organization needs to work out what the maximum amount of data that they are prepared to lose and also the maximum amount of time that they are prepared to be without services. These are both measured in time, and could be seconds, minutes, hours or days depending on the organization's requirements. This is a balancing act as generally the shorter the timeframe required, the more resources the organisation will need in order to achieve the target.

    After this a disaster should be simulated to test that the RTA/RPA values match the RTO/RPO required by the organization.


    Example: Mr Bob Northwind experienced a catastrophic incident. The failure occurred at 8pm local time on a Friday night. Their website and sales transaction software were affected.

    In his Disaster Recovery Plan he had the following objectives:

    ServiceRPORTO
    Northwind Website2 days4 hours
    North Sales4 hours8 hours

    It is important that these objectives are signed off by the Product Owner as per this rule

    After the recovery was complete they then analyzed the downtime which showed the following:

    ServiceRPARTA
    Northwind Website8 hours2 days
    North Sales8 hours8 hours

    After analyzing the data, they discovered a few issues with their Disaster Recovery Plan:

    1. They didn't have any spare hardware on premises which meant that to get the website backed up and running they needed to find a shop on a weekend to buy a server and then start the recovery process. This delayed them by an entire day.
    2. Mr Northwind's IT Manager had mistakenly set the backups to 12-hour backups (at midnight and midday each day). This meant that the most recent backup for both services had occurred at 12pm on Friday and they had 8 hours of missing transactions. The greatest allowable data loss should have only been 4 hours.

    This explains why it is important to practice your disaster recovery plan. A real incident is not the ideal time to realize that your backup/procedures are inadequate.

  2. Outage - Do you have a planned outage process?

    For unplanned outages, see Outage - Do you have an unplanned outage process?

    If your servers are down or have to go down during business hours you should notify the users at least 15 minutes beforehand so you will not get 101 people all asking you if the computer is down.

    For short outages (under 15 minutes) that only affect only a few people (under 5 people), or are outside of business hours, then IM is the best method. If you use Microsoft Teams or Skype, a quick message will do.

    Note: If they are not online on Teams or Skype, then they can't complain that they were not warned.

    For extended or planned outages, or if you have a larger number of users (50+), email is the suggested method.

    Email

    If you send an email it is a good idea to tell the user a way to monitor the network themselves. Eg. Software solutions like SCOM or WhatsUp Gold.

    Include a "To myself". It gives visibility to others who are interested in what needs to be done to fix the problem and makes it easier to remember to send the 'done' email. E.g. "done - CRM is alive again".

    Example:

    Immediately before the scheduled downtime, check for logged in users, file access, and database connections.

    Users

    Open 'Windows Task Manager' (Run > taskmgr) and select the 'Users' tab. Check with users if they have active connections, then have them log off.

    rule outage 3
    Figure: Connected users can be viewed in Task Manager

    Files

    Open 'Computer Management' (Run > compmgmt.msc), then 'System Tools > Shared Folders'. Check 'Session' and 'Open Files' for user connections.

    rule outage 4
    Figure: Computer Management 'Open Files' View

    Database

    Open SQL Server Management Studio on the server. Connect to the local SQL Server. Expand 'Management' and double-click 'Activity Manager'.

    Figure: SQL Management Studio 'Active Connections' View

    Once these have been checked for active users, and users have logged off, maintenance can be carried out.

    Restarts should only be performed during the following time periods

    1. Between 7am and 7:05am
    2. Between 1pm and 1:05pm
    3. Between 7pm and 7:05pm

    If a scheduled shutdown is required, use the PsShutdown utility from Microsoft's Sys Internals page.

    Always reply 'Done' when you finish the task.

  3. Outage - Do you have an unplanned outage process?

    During your course of being a SysAdmin, you will come across many unplanned outages. Some of them will impact BAU (Business as usual) and others will just be minor service outages. Do you know what to do in the event of these outages?

    Below is a process for these types of outages. Some amount of common sense is required here, an outage would be if services that would affect BAU work are disrupted and/or some hardware has failed.

    Hardware Outage:

    • Firewall
    • Switch
    • Blade Servers
    • SAN Storage
    • UPS

    Service Outage:

    • Active Directory Domain Services
    • O365 Services; Teams, SharePoint, Exchange, OneDrive
    • File Servers
    • SQL Servers
    • IIS Servers

    Determining what services are disrupted

    Many services can be used for device monitoring e.g. WhatsUp Gold, Solarwinds, SCOM. You would do the following in any of them:

    1. Login to monitoring service
    2. Check to see what services are down

    First contact

    After you have determined what services have been disrupted it is time to call your SysAdmin team and organize a quick conference call. This will allow you to have a discussion prior to making any changes/fixes that could cause the outage to become worse.

    Key discussion points:

    1. What services have been disrupted?
    2. What is the impact of these services?
    3. Is an email to everyone in your company required?
    4. What are your next steps?

    What if you cannot reach anyone?

    If you cannot reach anyone move on to the Email section.

    Email

    If from the previous discussion you have determined that an email needs to be sent to your entire company, or you have decided this is necessary if you cannot contact anyone above, send an email in the following format:

    A separate email needs to be sent to SysAdmins outlining what was discussed on the call. If no one was contactable, please proceed with what you have determined on your own.

    Next steps did NOT resolve the issue

    If you have completed your tasks but the issue has not resolved, please try to make contact with the SysAdmin team again and send an updated 'To Myself' email.

    Next steps resolved the issue

    If your actions have resolved the issue, please notify ALL of the services being restored and update your 'To Myself' email.

  4. PC - Do you know the right notification for backups?

    For any kind of backups, it is important to log a record on success so you can check for backups that have failed.

    Without some kind of logging e.g. on a SQL database, on a txt file, on a SharePoint list, it is impossible to tell which backups have been completed or not. This applies to backups of any kind e.g. servers, personal computers, emails.

    Some important stats to log:

    1. Date - Date backup has run
    2. Username - If a personal backup, which user was logged in when the backup ran
    3. PC Name - The name of the server (or PC) the backup came from

    Having entries logged in a database is better than having an email sent because entries are easier to see and manage, and emails might get lost in the noise.

    backup notification bad
    Figure: Bad example - an email is sent on completion

    backup notification good
    Figure: Good example - a record is logged on completion

    backups
    Figure: Best example - the latest completion is logged in a SharePoint list

    Now you are able to be aware of missing backups. You can make automatically notifications based on the above table e.g. by SQL Reporting Services data-driven subscription

    It is also important to review the state of your backups at least on a weekly basis, ensuring that backups are not failing and that you are able to restore them when necessary. This is part of a good disaster recovery process.

    To see the best backup tools currently available, check https://www.ssw.com.au/rules/pc-do-you-use-the-best-backup-solution

    If you need any help with your backups or disaster recovery process, check https://www.ssw.com.au/ssw/Consulting/Backup-Recovery.aspx

    goodexamplebackups
    Figure: Good Example - No critical or warnings in your backups

  5. Security - Do you have a strict password security policy?

    The standard is to enforce policies based on reputable regulatory organizations (e.g. NIST, ACSC) latest recommendations.

    adnewpasspolicy
    Figure: Good example - Active Directory settings based on latest security recommendations

    When passwords have to be changed they should meet the following complexity requirements:

    1. Ignore password complexity (numbers, special characters, spaces) but require longer passwords - E.g. Require 16 characters length minimum, without special characters or numbers
    2. Longer passphrases are better than passwords - They are even more difficult to crack than complex passwords
    3. Longer password history remembered - E.g. Cannot use the last 10 passwords you already used
    4. Blocking of common password and words – E.g. Via Azure AD Password Protection
    5. Use of MFA (Multi Factor Authentication) everywhere possible
    6. Use a password manager
    7. Use different passwords for every service
    8. Enforce a lockout policy - E.g. If a user gets their password wrong 5 times, their account will be locked out for 15 minutes

    Important: Requiring users to change their passwords (e.g. every 180 days) does not improve security. If you already have a strong password (as above) and a second factor of authentication (e.g. MFA), changing it does very little to make you more secure. Generally, you should change your password only when you believe it has been compromised.

  6. Security - Do you have MFA (Multi-factor authentication) enabled?

    You should protect your users and administrator accounts with more than one authentication method.

    What is Multi-Factor Authentication (MFA)?

    MFA is another layer of security for your users and administrators, it adds another code or approval that you can receive in a device that you possess - a phone, for example - to make it more difficult for attackers to steal your account. If they guess or brute-force your password, they still need the second code or approval to make it to your account.

    Generally, every time you log in on a service, it will ask for your normal password and an additional code or approval. This can be retrieved through:

    • RECOMMENDED - An authenticator app with passwordless (secure)
    • An authenticator app with password (secure)
    • A hardware token/key (secure)
    • Email, SMS, or phone call (less secure)

    MFA in Microsoft 365

    If you have Microsoft 365 Premium, Azure P1 or higher licensing you should use Conditional Access to set up MFA - read more about conditional access here: Do you use Conditional Access policies?

    Once MFA is set up, you can see which method your users are using - go to Azure AD | Security | Authentication Methods | User registration details.

    • Under Default authentication method, you want to see Microsoft Authenticator app
    • Under Methods Registered, you also want to see Microsoft Passwordless phone sign-in

    azure mfa bad
    Figure: Bad example - No Microsoft Passwordless phone sign-in registered

    azure mfa good
    Figure: Good example - Microsoft Passwordless phone sign-in registered

  7. Security - Do you have Password Writeback enabled?

    Do you have Password Writeback enabled in your Azure AD Connect?

    If you want to let your users reset their own, on-premises passwords directly from the cloud, you need to have Password Writeback enabled in Azure AD Connect!

    You can read more about Password Writeback from the Microsoft Documentation: https://docs.microsoft.com/en-us/azure/active-directory/authentication/howto-sspr-writeback

    When setting up Azure AD Connect, you need to set the "Password Writeback" option:

    enablepasswordwriteback

    Good Example: Setting up Password Writeback in Azure AD Connect

  8. Security - Do you use Azure AD Privileged Identity Management?

    Azure AD PIM (Privileged Identity Management) enables a more secure, manageable and monitorable approach to assigning privileged permissions in your organization.

    PIM enables just-in-time privileged access for users that are eligible for it, reducing the chance of privileged actions being done by malicious (or unaware) actors.

    Things that we can do with PIM (taken from What is Microsoft Entra Privileged Identity Management?):

    • Provide just-in-time privileged access to Azure AD and Azure resources
    • Assign time-bound access to resources using start and end dates
    • Require approval to activate privileged roles
    • Enforce multi-factor authentication to activate any role
    • Use justification to understand why users activate
    • Get notifications when privileged roles are activated
    • Conduct access reviews to ensure users still need roles
    • Download audit history for internal or external audit
    • Prevents removal of the last active Global Administrator and Privileged Role Administrator role assignments

    Adding assignments in PIM

    As best practice, your company should use PIM to give access to new SysAdmins.

    Do the following:

    1. Go to PIM at https://portal.azure.com/#view/Microsoft_Azure_PIMCommon/ResourceMenuBlade/~/MyActions/resourceId//resourceType/tenant/provider/aadroles
    2. Go to Assignments | Add Assignment: ::: good
      pim1
      Figure: Good example - Assigning roles in PIM
      :::
    3. Select Role | Select members | Next
    4. Here, you have 2 options:

      1. Eligible: The member is eligible for activating the permissions, permanently or for a set period of time. Every time they activate, they will have the permissions for up to 8 hours, then they will lose it and will need to activate again. Activating is a manual process of going to PIM and clicking "Activate"
      2. Active: The member has the permissions active, forever or for a set period of time. They don't need to perform any manual steps to activate anything
    5. Select the correct one | Add a justification | Assign:

      pim2
      Figure: Good example - Having the option of Eligible and Active makes PIM flexible

      You are now assigned roles in PIM.

    Activating assignments in PIM

    If you are eligible for assignments, you can activate them by doing the following:

    1. Go to https://portal.azure.com/#view/MicrosoftAzurePIMCommon/ResourceMenuBlade/~/MyActions/resourceId//resourceType/tenant/provider/aadroles
    2. Click on My Roles | Role | Activate: ::: good
      how to activate pim
      Figure: Good example - Activate just-in-time roles only when you need it
      :::
    3. Go through the steps to add a justification and time you need that access for.

    You now have that role active for you, for up to 8 hours.

    Receiving PIM alerts on your email

    PIM has built-in alerts that will send an email when assignments are activated, together with its justification, who activated it, the role activated, and extra information:

    pimalert
    Figure: Good example - PIM emails you when assignments and roles are activated, you can see straight away if something's wrong!

  9. Do you use gMSAs (Group Managed Service Accounts)?

    gMSA (Group Managed Service Accounts) are a secure and practical identity solution from Microsoft where services can be configured to use the gMSA principal and password management is handled by Windows - you don't need to worry about expired passwords anymore.

    gMSAs are the superior option when it comes to security and flexibility. It should always be used, when possible, instead of user accounts, MSAs, security principals, service accounts (with manually managed passwords) and any other on-premises identity types.

    The benefits of gMSAs

    1. Multiple servers - Services and tasks can be set and run across multiple servers, a necessity given the modern state of organizations today
    2. Automated password management - Passwords are automatically generated, rotated and handled by the OS
    3. Passwords are handled by the OS - When applications require a password, they query Active Directory. No human knows the password to that, making it much harder to be compromised
    4. You can delegate management to other administrators - Having the flexibility to delegate management can be incredibly helpful for ensuring there isn't just a single admin responsible for your service account security

    There are some requirements and difficulties for using these kinds of accounts

    • Support - The application/service must support gMSAs
    • AD domain and forest functional level - Windows Server 2012 or newer
    • KDC - Domain controller with Microsoft Key Distribution Service (KdsSvc) enabled
    • PowerShell - To create and manage service AD accounts, you need to install the Active Directory module for Windows PowerShell
    • Supported Windows versions - Windows Server 2012/Windows 8 or newer
    • Services set up without gMSAs - Rebuilding or changing the service account in applications that already set up and running (e.g. Data Protection Manager, Azure AD Sync) might break these applications, so a full re-install might be necessary to use gMSAs instead of a simple user change

    Set up gMSAs

    Create the Key Distribution Service (KDS) Key

    A one-time operation must be performed to create a KDS root key. Do the following:

    1. Login to your DC (Domain Controller) | run the PowerShell command:
      Add-KdsRootKey –EffectiveImmediately
    2. Ensure the key has been created succesfully by running the following PowerShell:
      Get-KdsRootKey

    Create a gMSA

    1. Login to your DC | run the PowerShell command:

      1. New-ADServiceAccount [-Name] <string> -DNSHostName <string> [-KerberosEncryptionType <ADKerberosEncryptionType>] [-ManagedPasswordIntervalInDays <Nullable[Int32]>] [-PrincipalsAllowedToRetrieveManagedPassword <ADPrincipal[]>] [-SamAccountName <string>] [-ServicePrincipalNames <string[]>]

    Here's how you should fill out each of the bracketed parameters:

    1. Name: The name of your account
    2. DNS Host Name: The DNS hostname of the service
    3. Kerberos Encryption Type: The encryption type supported by the host servers
    4. Managed Password Internal In Days: How often you want the password to be changed (by default this is 30 days -- remember, the change is handled by Windows)

      * note: This cannot be changed after the gMSA is created. To change the interval, you'll need to create a new gMSA and set a new interval.

    5. Principals Allowed To Retrieve Managed Password: These can be the accounts of member hosts, or if there is a security group that member hosts are a part of, you would enter them here.
    6. Sam Account Name: This is the NetBIOS name for the service if it's different from the account name.
    7. Service Principal Names: This is a list of the Service Principal Names (SPNs) for the service)

    The final command could look like this:

    New-ADServiceAccount -name gMSAAccount1 -DNSHostName gMSAAccount1.sydney.ssw.com.au -PrincipalsAllowedToRetrieveManagedPassword gMSAAccount1GroupWithComputerAccountsIn –verbose

    Install a gMSA on the target server or workstation

    1. Login to the target server | run the PowerShell command to install the Active Directory PowerShell module:
      Add-WindowsFeature RSAT-AD-PowerShell
    2. Run the PowerShell command to install the gMSA on the server:
      Install-ADServiceAccount -Identity gMSAAccount1
    3. Check if the gMSA is isntalled correctly:
      Test-ADServiceAccount gMSAAccount1

    If the command returns True, everything is configured correctly.

    You can read more about gMSAs here: https://docs.microsoft.com/en-us/windows-server/security/group-managed-service-accounts/group-managed-service-accounts-overview

  10. Do you have a Remote Desktop Manager?

    In an IT industry, there should be a provision to RDP into servers or VMs to access them when needed. Within an organization, it is easier to remotely access laptops or computers connected to the same network.

    To RDP, enable Remote desktop in settings How to enable Remote Desktop. Windows has Microsoft Remote desktop connection application inbuilt to RDP to another computer.

    Drawbacks of using Microsoft Remote Desktop Connection

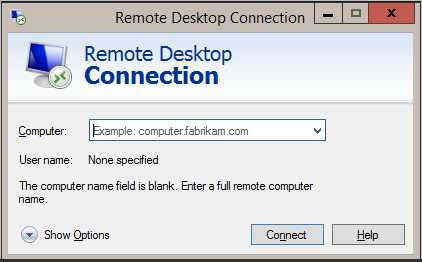
    • Every time you need to RDP, you have to manually type the IP address or computer name
    • List of IPs or device names is not available
    rdp bad
    Figure: Bad example - Default Remote Desktop Connection

    Solution

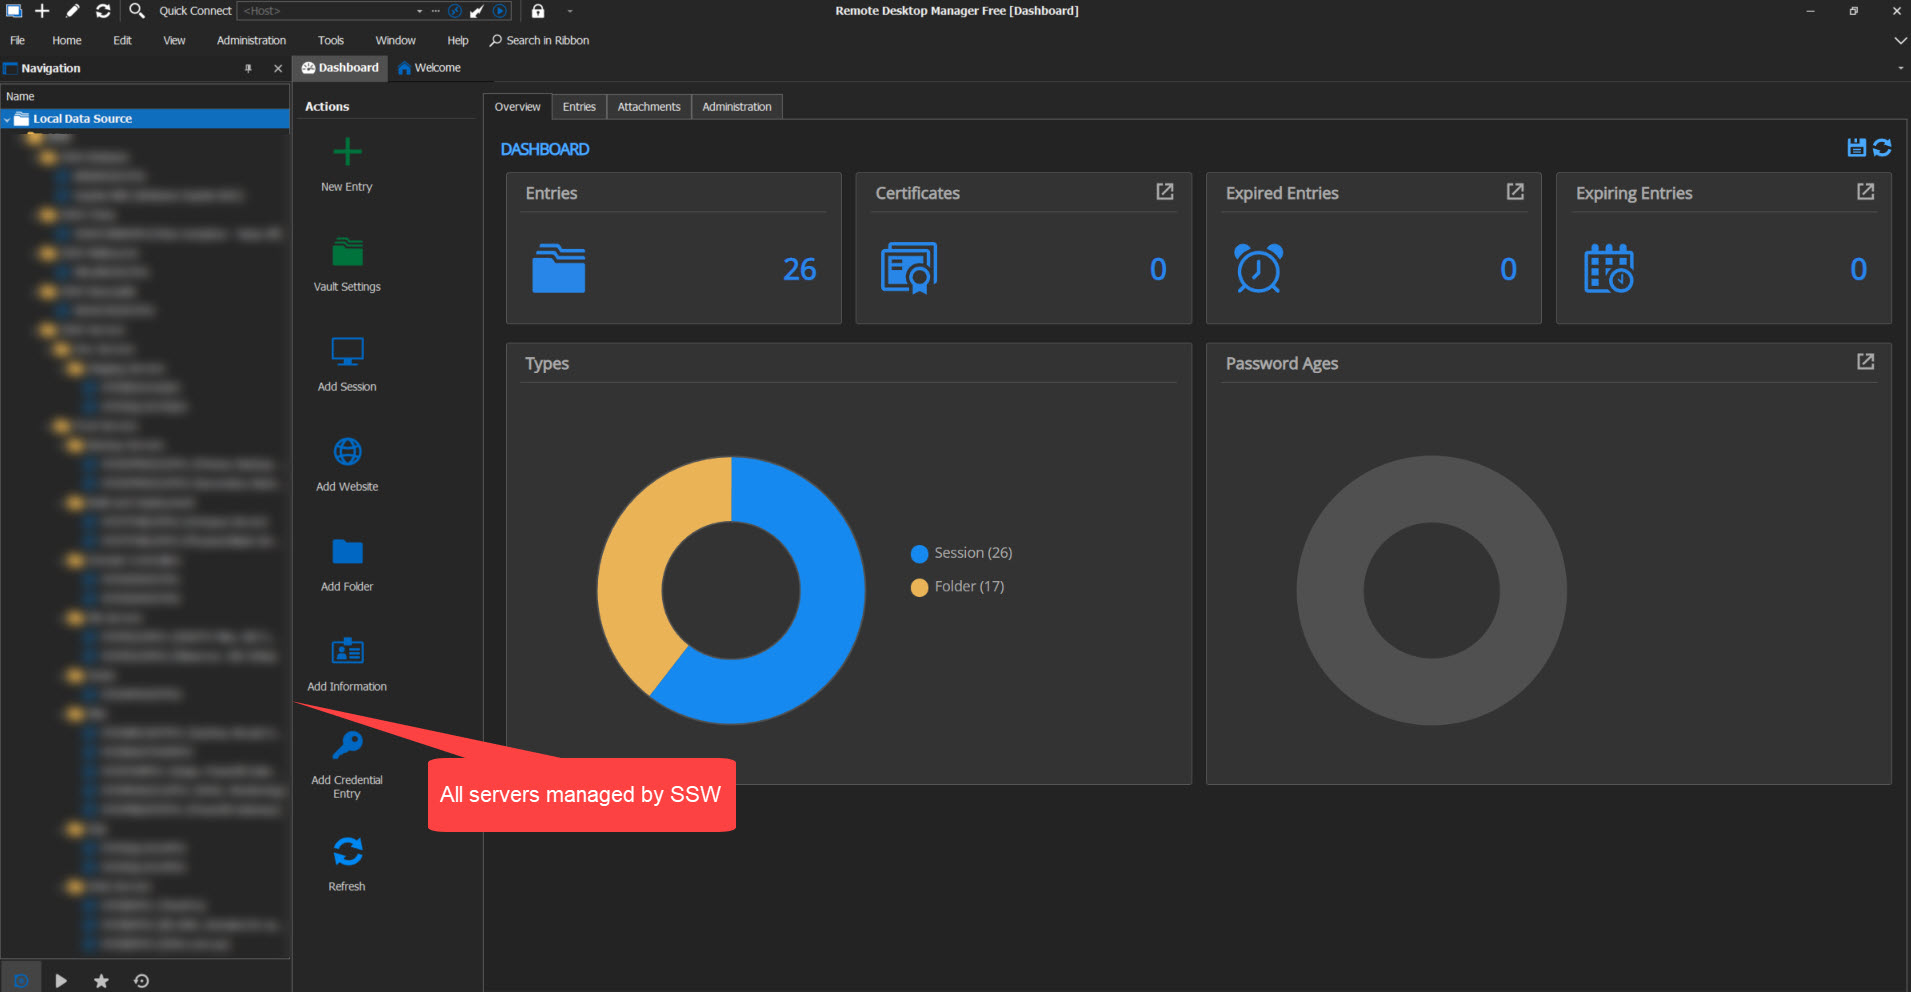
    Devolution is a secure website that offers a free Remote Connection Management called "Remote Desktop Manager", which is built to centralize all remote connections on a single platform that is securely shared between users and across the entire team.

    Multiple computers can be remotely accessed at the same time and have a good GUI interface
    rdp good
    Figure: Good example - Remote Desktop Manager (Devolutions)

    To install the application, check devolutions.net

  11. Do you use Windows Admin Center?

    Managing multiple servers and computers located at different locations can be challenging, which is why remote access is often used as a solution. Remote access allows you to remotely log in to a system, making it easier to manage server maintenance.

    Windows provides an inbuilt remote desktop connection that enables remote access to any computer or server within the network. In addition, there are third-party applications like Remote Desktop Manager, which can be useful for managing remote connections.

    An alternative to RDM is Windows Admin Center (WAC), a web-based management tool designed to provide a centralized management console for multiple Windows Servers and computers. WAC offers a set of management features including performance monitoring, event log viewing, storage management, and PowerShell scripting - without needing to login to the server.

    Unlike RDM, WAC can be installed on a server or client system and accessed remotely through a browser, providing a more user-friendly and secure solution for managing Windows systems. This makes WAC the better choice for organizations looking to simplify their management workflows and improve security.

    2023 02 27 14 34 48
    Figure: Remote Desktop manager – Third party application

    figure 4 1
    Figure: Windows Admin center – All the servers in a web-based management tool

    Some of the key features of Windows Admin Center include:

    1. Server management: Windows Admin Center provides a unified dashboard for managing servers running Windows Server 2012 and later versions. Administrators can use Windows Admin Center to manage server roles and features, such as Active Directory, DNS, DHCP, and Hyper-V.
    2. Remote management: Windows Admin Center allows administrators to remotely manage servers, clusters, and HCI environments using a web browser. It provides a secure and scalable solution for managing servers from any location.
    3. Performance monitoring: Windows Admin Center includes built-in performance monitoring tools for monitoring system resources, such as CPU, memory, and disk usage.
    4. Backup and disaster recovery: Windows Admin Center integrates with Windows Server Backup and Microsoft Azure Backup to provide a centralized backup and disaster recovery solution for Windows servers and clusters.
    5. Security: Windows Admin Center supports role-based access control (RBAC) and multi-factor authentication (MFA) to secure access to servers and clusters. It also provides built-in security features, such as security baselines and security alerts.

    Overall, Windows Admin Center provides a powerful and flexible management tool for Windows servers and clusters that simplifies administration, improves security, and enhances performance monitoring and management.

  12. Do you use Windows Hello?

    Windows Hello allows users to sign into their devices, apps, and online services using their face, fingerprint, or iris recognition, instead of traditional passwords to authenticate users' identities quickly, accurately, and securely.

    Windows Hello for Secure Authentication

    Users have the option to set up a personal PIN or biometric gesture for easy sign-in on their devices. This feature, known as Windows Hello convenience PIN, is specific to the device on which it is configured and may use a password hash based on the user's account type.

    Windows Hello offers several advantages for users who want a secure and convenient way to authenticate to their devices and accounts. Here are some of the benefits of using Windows Hello:

    • Stronger Security: Windows Hello provides strong biometric authentication that is difficult to fake or duplicate, making it more secure than traditional password-based authentication.
    • Convenient Sign-in: With Windows Hello, users can sign in to their devices and accounts with a simple biometric gesture, such as a fingerprint or facial recognition, eliminating the need to remember complex passwords.
    • Faster Access: Using Windows Hello for authentication is faster than typing in a password, enabling users to access their devices and accounts quickly and easily.
    • Wide Compatibility: Windows Hello is compatible with a wide range of devices, including laptops, tablets, and smartphones.
    • Local Storage: Windows Hello stores biometric data securely on the local device, so users can rest assured that their data is safe and not being sent to external devices or servers.

    Windows Hello for Business

    Windows Hello for Business is a passwordless authentication method that allows users to sign in to their devices using biometric authentication, such as facial recognition or fingerprint scanning. This is configured by group policy or mobile device management (MDM) policy, which always uses key-based or certificate-based authentication.

    Before using Windows Hello for Business, you must ensure that the following requirements are met:

    • The device must be running Windows 10 version 1607 or later.
    • The device must have a compatible camera or fingerprint reader.
    • The device must support the Windows Hello for Business feature.
    • The user must have an Azure AD account and be registered for Windows Hello for Business.

    win10 login user details hidden
    Figure: Bad example - Type in the Password to Login

    windowshello
    Figure: Good example - Windows Hello for Bussiness setup

  13. Do you always install latest updates when you fix someone else's PC?

    When you fix someone else's PC (locally or remotely), one of the best practices is always make sure it has the latest updates.

    • To achieve this, we run Windows Update and install all latest updates.

    2021 04 20 11 50 38
    Here are some updates that need to be applied

    Windows updates settings
    All updates have been applied

    Warning: Of course if you are fixing a bug on someone’s PC, you should only update one piece of software at a time, so you know if an update fixes the problem. After that (if the company allows it), update all software to the latest version. If they get a new problem, then rollback.

  14. Servers - Do you monitor the uptimes of all your servers daily?

    It is important that the system administrator can easily find out how reliable his servers are. This can be achieved using tools like What's Up Gold (WUG) https://www.whatsupgold.com to monitor many statistics e.g.:

    • Uptime - Ping, Interface monitor
    • Performance - RAM usage, CPU usage
    • Network - Bandwidth, Interface throughput
    • Storage - Disk usage, health

    For example, here is a report in WhatsUp Gold you can use to monitor servers on a daily basis.

    WuGReport
    Figure: Good example - WhatsUp Gold - Green indicates servers are healthy

    Another option is to use WUG's built-in email alerts, which can be formatted in HTML or plain text. You can also add variables that change based on the current state of devices and other stats.

    wugemail
    Figure: OK Example - Editing WUG's email action is simple, but HTML skills are necessary to make a good looking report

    The best option is to use SQL Reporting Services to create a custom report that can be emailed via a data-driven subscription, which sends a nicely formatted email when there's a problem.

    unhealthy
    Figure: Good example - Email - Nicely branded email, red indicates servers are not healthy

  15. Domain - Do you know the pros and cons of joining the domain?

    Do you know if your computer should be joined to the domain or not?

    Joining your company's domain is a trade-off:

    Option #1: If you join the domain, the company is the one responsible for managing your device, so all company rules and policies will be applied to it (Windows Update frequency, users, password resets, etc) and you will need to go through your SysAdmins if you have troubles with it.

    Option #2: If you choose to not join the domain, the PC management is all yours, giving you more freedom, but any automatic scripts would need to be done manually.

    Below are the pros and cons of joining the domain:

    AreaPros (+)Cons (-)
    PC ManagementClient management through GPOs (Group Policy Objects)Lack of freedom/autonomy
    Resource AccessDirect access to resources (e.g. fileserver)Needs to sign in first, or be attached to a VPN or the network to access resources
    Automatic ScriptsGPOs apply automatic scripts like the Login Script and Backup ScriptsNeed to run Login and Backup scripts manually
    Support LevelMore support available from your SysAdmins, you have someone to rely on for any troubleshooting on all computer applicationsLess support available from SysAdmins, you can run any obscure application on your computer that may not be supported by your company
  16. Domain - Do you use the Distributed File System for your file shares?

    Occasionally, one server and its drives will not have sufficient space to store all related files in a network share. For example, you may have a "SetupFiles" directory that stores all Setup executables on your network e.g. \bee\SetupFiles. There are problems with this approach.

    1. You will run out of space - which means you will have to copy or move old (but still used) setup files around to other drives (\bee\d$\SetupOld\ ) or other machines e.g. \tuna\SetupFiles. This fragmentation of your setup files can cause confusion for your users.
    2. When you retire or rename the old server, links to the old server location will not work

    So how do you get around this problem? The answer is in the Distributed File System (DFS). Instead of having several server-specific file share locations, you can have a domain-wide setup location that offers a seamless experience to your users. DFS will even track a history of when and where file locations were moved.

    Figure: The Distributed File System consolidates many separate file shares into one convenient location for your users

  17. Certificate - Do you know how to manage certificates?

    At SSW we have moved away from paid certificates for our websites and web apps. We now use Let's Encrypt managed by Certify The Web.

    Previously the way we managed our certificates was using a SharePoint list as well as calendar reminders to inform us when they were going to expire. The issue with using this system is the SharePoint list as well as ensuring the certificates remained up to date was a manual process. This left a lot of room for human error especially when managing hundreds of certificates. There are of course commercial solutions to manage certificates but these haven't been econmical for our environment.

    With Certify the Web and Let's Encrypt, we remove this human error and manual handling, ensuring that our certificates never expire.

    You should use Certify the Web.

    manage certificates bad
    Figure: Bad example - Keeping a database is unnecessary

    manage certificates good
    Figure: Good example - Using Certify The Web

  18. Certificate - Do you use free or paid SSL certificates?

    What is the best option for your business when it comes to securing your website with HTTPS?

    When you create a website, you can only access it through HTTP (http://), and not securely through HTTPS (https://) if you do not own an SSL Certificate.

    When it comes to website certificates, you can choose from free or paid SSL certificates!

    Free certificates can be obtained from Certificate Authorities like Let's Encrypt, which is helping provide free and automated certificates for the web.

    Free certificates:

    • provide the same level of SSL encryption as paid certificates;
    • provide HTTPS with a green padlock on the address bar of your browser, just like paid certificates;
    • can be automatically renewed easily, through programs like Certify The Web or win-acme

    letsenc
    Good Example: Let's Encrypt Free Certificate Authority

    Why would anyone use paid certificates, then?

    If you are operating a big business, paid certificates give you some more assurances over free ones, and you can obtain them through reputable Certificate Authorities like Comodo, GeoTrust, Symantec, etc:

    Paid certificates:

    • gives you warranty against misuse or wrongly issued certificates;
    • are normally valid for at least 1 year or more, while free certificates are only valid for 3 months;
    • offer support for any errors or problems you have with your certificates.

    comodo
    Good Example: Comodo Paid Certificate Authority

    SSL Certificates are an important part of any reputable website, so if you are operating a small website, blog, testing environment, personal site, anything that doesn't need too much support, getting a free certificate is the way to go.

    If your business or site does not fit on the above affirmation, getting a paid certificate is the best option!

  19. Wireless - Do you secure your wireless connection?

    Wireless networks are everywhere now. You can't drive down the street without finding a network which is insecure. However, in an office environment, there is a lot more to lose than a bit of bandwidth. It is vital that wireless is kept secure.

    WEP, No SSID broadcast, allowed MAC addresses are all OK but these are more home security.

    Figure: Bad example - the above settings are not suitable for a company's wireless access point

    For the office, you need something a bit more robust and not requiring much management overhead.

    It is recommended to use Radius authentication to integrate with your Active Directory.

    Figure: Good example - configure your wireless access point to authenticate against AD

    This article explains how to setup your wireless AP to use WPA2-enterprise. WPA2-Enterprise verifies network users (AD a/c's) through a server (Domain Controller).

    The recommended method of authentication is PEAP (Protected Extensible Authentication Protocol), which authenticates wireless LAN clients using only server-side digital certificates (In our case we used an AD CA) by creating an encrypted SSL/TLS tunnel between the client and the authentication server. The tunnel then protects the subsequent user authentication exchange.

    Requirements:

    • 802.1X-capable 802.11 wireless access points (APs)
    • Active Directory with group policy
    • Network Policy Server (NPS) servers
    • Active Directory Certificate Services based PKI for Server certificates for NPS computer/s and your wireless PC's

    Assumptions:

    This document assumes you have some knowledge of how to configure your wireless access points and install server roles. It also assumes that you have already configured an Enterprise Certificate Authority on your Active Directory Domain.

    1. Configure your wireless access points In SSW we use Unifi APs. I have configured these access points to: ubntuap ac lite
    2. Install NPS on your server On Windows 2008 or 2008 R2 open up the server manager and:

      1. Add the "Network Policy and Access Services" Role Under role services add:
      2. Network Policy Server
      3. Routing and Remote Access Services
    3. Configure Radius Clients on NPS Open up the NPS Console. Right click on "Radius Clients", and then click on "New". Fill out the fields for Friendly Name (enter the name of the wireless access point), Address (IP address) and then add the shared secret (Keep this safe for example we use Keepass as a password repository) you configure on your access point.

    NPS2
    Figure: Radius client settings

    1. Configure 802.1x on the NPS server In the NAP servers Server Manager, open "Roles", then "Network Policy and Access Services" then click on NPS (Local). In the right-hand pane under standard configuration choose "Radius Server for 802.1x Wireless or Wired Connections", and then click on "Configure 802.1X" to start a wizard-based configuration.

      1. Select the top radio button “Secure Wireless Connections" click next
      2. On the Specify 802.1X Switches Page check the AP's you have configured under Radius Clients are in that list then click next
      3. Now the authentication method. From the Drop Down lists select Protected EAP (PEAP) NOTE: This method requires a Computer Certificate and the Radius Server and either a computer or user certificate on the client machine
      4. Select the groups (eg. Domain\WirelessAccess) you would like to give wireless access to. You can do this by user or computer or both
      5. If you need to configure VLan's in the next step, wasn't required in my case I just used the defaults
      6. You then need to register the server with Active Directory. So right click on NPS (local) and select Register Server in Active Directory

    NPS
    Figure: How to register NAP server with AD
    You should now have a Connection Request Policy and a Network Policy. Remove the MS-CHAP v1 authentication method from the network policy (under the constraint's tab).

    1. Configure Certificate Auto enrolment First open Group Policy Management.

      1. Create a new GPO policy and name it "CertEnrollmentWireless" or whatever name you deem suitable and link it to the root of the domain or a specific OU depending on your needs and OU structure
      2. Under the security filtering scope for what the policy gets applied to remove "Authenticated Users" and add your AD created. This ensures that the policy, once configured, is applied only to members of those groups.
      3. Edit the settings of the group policy and go to:
      4. Computer Configuration\Policies\Windows Settings\Security Settings\Public Key Policies In the details pane, you need to right-click the Certificate Services Client – Auto-enrolment and then select properties. In the Properties, dialog box select enabled from the drop down box and then place a tick in all the remaining tick boxes. This makes sure that the computer auto-enrolls for a certificate from AD CA.
      5. Now navigate to Computer Configuration\Policies\Windows Settings\Security Settings\Public Key Policies\Automatic Certificate Request Settings Right-click in the details pane and select New | Automatic Certificate Request. This will open up a wizard and you can select a Computer Certificate.

    Cert4
    Figure: Group policy settings

    1. Creating a Windows Wireless 802.1x GPO Policy

      1. Now go to Computer Configuration\Policies\Windows Settings\Security Settings\Wireless Network (IEEE 802.11) Policies Right click and Create a new policy for Windows Vista and later (if you only have XP machines, do only an XP one). If you have Vista or later you must do a Vista policy or else Vista will try to use the XP policy (not recommended).
      2. Enter a Policy Name (e.g. BeijingWifiSettings) and description and link to the root of the domain.

    Cert3
    Figure: GP link and scope settings
    3. Click "Add" and then enter a Profile Name and then Add the SSID name from the Wireless Access Point/s. Make sure the tick box "Connect Automatically when this network is in range" is ticked... 4. Click on the Security Tab Make sure Authentication is "WPA2-Enterprise" and Encryption is "AES). Under "Select a network authentication method, choose "Microsoft: Protected EAP (PEAP). Under Authentication Mode, you need to choose whether you want to authenticate computers and/or users with your digital certs. Then select "Computer Authentication". 5. Click on the "Properties" button Tick "Validate server certificate" and then tick "Connect to these servers". Enter the FQDN of the NPS. Then under Trusted Root Certification Authority, tick your Root CA certificate. Then click OK.

    Cert2
    Figure: Connection security settings
    6. Click OK twice. Optional: Under Network Permission tab you can use the tick boxes to restrict clients to infrastructure networks or only GPO profiled allowed networks if you desire. 7. Click OK and you have completed your Windows Wireless Policy

    GPU
    Figure: Wifi_Settings settings

  20. Wireless - Do you Provide Guests with easy Wifi Access?

    When guests come to an SSW Office, we provide them with easy Wifi access using a QR code. This saves people manually typing in a password and can have them up and running in a matter of moments.QR codes can easily be created with services like QR Code Monkey.

    Bad Example: Providing an SSID and Password for guest to manually sign in to

    Good Example: QR Code for Guest Wifi

  21. Storage - Do you keep your file servers clean?

    How often do you find files on your network file server that clearly shouldn't be there? Developers are notorious for creating temporary files and littering your file system with them. So how can you identify exactly who created or modified the file, and when?

    DuplicateFile
    Figure: Who created this file?

    RDP
    Figure: Terminal into your file server using Terminal Services

    FileOwner
    Figure: It was Jatin!

    The easiest way is to configure Windows file auditing .

    Thankfully, Windows Server come with built-in file auditing. Any changes create and delete can be logged to your system event log. Here's how to set it up.

    How to implement auditing on your file server

    1. Terminal Server into the file server
    2. In Windows Explorer, locate the directory you want to configure logging for (e.g. C:\Inetpub\wwwroot for logging changes to your website files)
    3. Select Security tab | Advanced
      Figure: Select the folder you want to configure auditing for
    4. Click the Auditing tab
    5. Select the users whose usage you want to monitor (usually all users, so select Everyone )
      Figure: Select Everyone so that anyone who modifies any of the files will be logged
    6. Select what you want to monitor. For best performance, we only tick the options in shown in the figure below - there's no need to log when someone opens a file.
      Figure: Select these 4 options (only audit the events you need to audit - there's no need to log when someone opens a file)
    7. Click OK and OK again to apply the changes. The process may take some time depending on the number of subfolders and files selected. Now you need to configure the system event log.
    8. Open Control Panel->Administrative Tools->Event Viewer
    9. Right-click the Security node and Control Panel | Administrative Tools | Event Viewer
    10. Right-click the sure Overwrite events as needed is checked
      Figure: Keep your log file to about 250MB - otherwise, your system performance may suffer

    Checking who created the file

    Now test to see if auditing is working.

    1. On the server, create a file called "test.aspx" somewhere in the path that is being audited
    2. Open Control Panel->Administrative Tools->Event Viewer
    3. Select the Security node, and notice the entries that have been created. They will have a similar format to the figure below.
      Figure: Any creates, deletes and updates now get logged to the Event Log

    That's all! It is also great for finding out who accidentally deleted files from the file system.

    Furthermore, we can dump the event log to an Access or SQL Server database to make it easier to handle. Here is how to do it:

    • Download the scripts: one for Access database and the other for SQL Server.
    • Find and change the strEventDBConn variable to your connection string, also, modify strEventDB and tblEvents variable to your database name and table name.
    • Write down the names of the servers to monitor in EventHosts.txt.

    Done, now you need only double-click to start it.

    Figure: Caught an action on remote server and logged it to database

  22. Logon - Do you have a company-wide Word template?

    A company-wide Word template brings many benefits e.g.:

    • Consistency - It's important to maintain consistency on documents internally and for clients
    • Automatic footers and headers - Showing the latest edit time and who the editor was, updating automatically on save
    • Branding - More and better branding and correct company colors

    word template bad
    Figure: Bad example - Creating an email/document does not have the company templates

    word template good
    Figure: Good example - Creating an email/document with the company templates

    How to have a company-wide Word template:

    • Modify your Normal.dotm file to have the headings and format that you want for Word document
    • Create standard employee email footer files e.g. JamesZhou.htm or JamesZhou.txt
    • Put the files on a network location - this is the place that will have the master copies
    • Have a logon script which is set up through Group policy that will copy the file to the users' computer when they logon
    ECHO Copy Office Templates To Workstation >> %LogonLogFile%
    call %ScriptFolder%\SSWLogonScript\BatchScript\SafeCopyNewerFile.bat "\\fileserver\DataSSW\DataSSWEmployees\Templates\Normal.dot" "%APPDATA%\Microsoft\Templates\Normal.dot" %LogonLogFile%
    call %ScriptFolder%\SSWLogonScript\BatchScript\SafeCopyNewerFile.bat "\\fileserver\DataSSW\DataSSWEmployees\Templates\Normal.dotm" "%APPDATA%\Microsoft\Templates\Normal.dotm" %LogonLogFile%
    call %ScriptFolder%\SSWLogonScript\BatchScript\SafeCopyNewerFile.bat "\\fileserver\DataSSW\DataSSWEmployees\Templates\ProposalNormalTemplate.dotx" "%APPDATA%\Microsoft\Templates\ProposalNormalTemplate.dotx" %LogonLogFile%
    call %ScriptFolder%\SSWLogonScript\BatchScript\SafeCopyNewerFile.bat "\\fileserver\DataSSW\DataSSWEmployees\Templates\NormalEmail.dot" "%APPDATA%\Microsoft\Templates\NormalEmail.dot" %LogonLogFile%
    call %ScriptFolder%\SSWLogonScript\BatchScript\SafeCopyNewerFile.bat "\\fileserver\DataSSW\DataSSWEmployees\Templates\Microsoft_Normal.dotx" "%APPDATA%\Microsoft\Templates\Microsoft_Normal.dotx" %LogonLogFile%
    call %ScriptFolder%\SSWLogonScript\BatchScript\SafeCopyNewerFile.bat "\\fileserver\DataSSW\DataSSWEmployees\Templates\Blank.potx" "%APPDATA%\Microsoft\Templates\Blank.potx" %LogonLogFile%
    xcopy /Y "\\fileserver\DataSSW\DataSSWEmployees\Templates\NormalEmail.dotm" "%APPDATA%\Microsoft\Templates\" >> %LogonLogFile%
    xcopy /Y "\\fileserver\DataSSW\DataSSWEmployees\Templates\NormalEmail.dotx" "%APPDATA%\Microsoft\QuickStyles\" >> %LogonLogFile%
    ECHO Templates Copied

    Figure: Bad example - This is a snippet of an old login script

    You can automatically have your SSW Word doc template on sign-in via a script. E.g. PowerShell login script.

    Good example - New Login script on Github

    Note #1: We don't want people using .RTF emails.

    Note #2: If you use a Mac computer, a login script will not work. In order to use a Word template, you must open the template on Word locally, hit "Save as Template", and then upload that document to Teams.

  23. Hardware - Do you track and label your assets?

    Most companies have physical assets and it is crucial to keep track of those assets: Are they in a particular location? Who are the assets with? Are they assigned somewhere else?

    Businesses generally need to provide their employees with a multitude of assets. E.g.:

    1. Keyboards
    2. Mouses
    3. Laptops
    4. Workstations
    5. Mobile Phones

    Keeping track of those assets is essential for the business to have any control over them, and having a spreadsheet with values for the assets and all that is not the best approach.

    asset tracking
    Figure: Bad example - Asset Tracking on spreadsheets is bad

    In our day and age, we have better (and free!) systems that allow us to track the businesses' assets, including:

    1. Purchase Date
    2. Order Number
    3. Serial Number
    4. Model
    5. Which location that asset belongs to
    6. Which user that asset belongs to (or is in possession of/checked out to)
    7. Number of assets
    8. And even their depreciation value

    All this in a nice UI that allows for you - or even your user themselves - to edit and check out assets.

    Tracking is all fun and games, but what about knowing which asset is which? You also need to physically label your assets.

    This means that after creating the asset in the system, it generally gets a unique ID within it, and you should generate a label (preferably with a QR or bar code for easy scanning) and attach the label to the asset in question. This makes it super easy to see the asset ID and name at a glance, and, in the case the asset is lost somewhere, anyone can easily scan the QR code and be brought to a site with instructions on how to return or notify the company that asset is lost.

    There is a couple of exceptions to the above:

    1. When the items are physically small and can't have a tag on them you shouldn't put one on.
    2. When the items are too cheap they don't need to be individually tagged, having the total number + the number of items checked out to people is enough.

    qr code v2
    Figure: Good example - A professional label printed with the important asset info e.g. ID, name and serial number

    A good system that does all this is SnipeIT. It has a nice interface, easy to use, maintain and upgrade. SnipeIT also generates labels for you, wiht an API to integrate with your current systems. It is free if you host it yourself!

  24. Do you know how to add a print server?

    When you are connected to the company's network, you should complete the following procedure if you want to setup a printer server.

    For Windows Server

    Steps to add a printer to Active Directory:

    1. In Windows Run | Type "printmanagement.msc" | Hit Enter
    2. Right-click 'Print Server' | Choose 'Add/Remove Servers' | Add IP address or computer name | Finish
      or
      Right click the 'Print Server' | Add printer | Choose the best option (e.g TCP/IP) | Put the IP address of the Printer | Finish

    46d5125c b334 49f4 b1ee 45bc78b5dae1
    Figure: Add Print servers to AD

    1. Add DNS entry for your print server (e.g \printer) to make it friendly for the users to find

    Note: Another method is using a Universal Printer in Azure  https://azurescene.com/2020/04/10/how-to-configure-universal-print/

    Finding the Printers

    Now your users can find the printers by doing the following:

    1. In the File explorer | Type \printer on the address bar to show all the printers connected to the server

    primt
    Figure: Bad example – Windows 11 | Printers & scanners - Users won’t see all the printers by default

    printers
    Figure: Good example - Printers listed in Printer Server

    1. Double click on your printer name to connect/add it. Follow prompt to finish the printer driver installation
  25. Do you automate update and patch management?

    To keep your systems secure, it is important to make sure everything is kept up to date - the OS, and any installed apps.

    Updating everything manually is time consuming, and it can be easy to miss patches without an automated system.

    windows update
    Figure: Bad example - Manually checking for updates

    WSUSis a great way to keep Microsoft operating systems and products up to date. It can be painful to manage, but with a bit of work it is a great tool. The only issue is that it cannot be used to manage any non-Microsoft apps. If your environment is big enough, you can use Configuration Manager (formerly SCCM) for 3rd party apps - but it is not worth setting up for smaller environments.

    01 wsus console
    Figure: OK example - WSUS is a good tool, but it only does Microsoft Updates

    This is where other Patch Management solutions come in. There are many options out there, including:

    These products have varied pricing options, including some free options with limitations on the number of devices and/or users. These solutions could be used alongside WSUS, but they do support Microsoft updates as well as 3rd party apps - so they can replace WSUS altogether.

    The main benefits of patch management solutions are:

    • Automatic installation of Windows updates (with or without rebooting)
    • Automatic installation of third-party updates
    • Manual deployment of patches without RDP access to the computer/s
    • Reporting - lots of information about installed or missing patches, and vulnerability levels

    You should consider when to automatically install updates - of course, it needs to be a time that will cause minimal disruption, but it should also be a suitable amount of time after the updates are released in case there are any issues. Microsoft updates are released on the 2nd Tuesday of every month - known as Patch Tuesday - so you might choose to install the updates a week or two after this date.

    patch tuesday
    Figure: Good example - In Patch Manager Plus, you can set the deployment date based on Patch Tuesday

    patch list
    Figure: Good example - A report of installed patches

    These patch management solutions also include a bunch of other useful features, such as the ability to deploy scripts or configure settings remotely.

  26. Do you call your System Administrators before raising a ticket?

    The tickets sent to SysAdmins are often quickly resolved with a few clicks of the mouse. Calling SysAdmins first can save valuable time versus waiting for someone to respond to your ticket, making you more productive and saving the SysAdmins time managing ticketing systems.

    When you need to request technical help, the steps you should take are:

    1. Draft an email with the details of the problem you want resolved. When describing the defect, follow the guidance at “Do you know how to report bugs and give suggestions?”. This will give you an opportunity to think through the problem and ensure that you cannot resolve it yourself
    2. Call an available SysAdmin to discuss the issue. Share your screen with the email so that they can review the details you have collected

      Note: If you are working outside of normal working hours and it is not an emergency, just send the email to raise the ticket.

    3. You likely won’t need to send the email if the problem can be resolved quickly. If the issue requires further investigation, add “(Checked by {{ SYSADMIN NAME }})” to the start of the email and send it
  27. Do you know how to educate your developers?

    To ensure that developers have a clear understanding of how permissions are granted, it's important to educate them on the process.

    User sends an email with a task to grant access to a resource and SysAdmins grant it. A developer wouldn't know how a SysAdmin granted the permission.

    2024 03 05 16 34 15
    Bad Example - Issac wouldn't how he was added to GitHub

    As a SysAdmin, call a developer on Teams and share the screen to show how you would grant permission to a resource. Warn them before calling as per Calling - Do you warn then call?

    Steps to effectively educate your developers

    • Start by explaining the importance of granting permissions correctly and securely.
    • Show developers how to navigate to the appropriate access control section in the relevant platform (e.g., Azure, AWS, SharePoint).
    • Demonstrate how to select the specific resource or application for which permissions need to be granted.
    • Emphasize the principle of least privilege and guide developers on granting only the necessary permissions.
    • Provide examples of common scenarios where specific permissions are required and explain how to grant them.
    • Encourage developers to ask questions and seek clarification during the process.
  28. UPS - Do you have your UPS send an email when it kicks in?

    Of course, all your servers are on UPS. (If not they should be!) How do you know that all the money you paid for a UPS was worth it? How many times has it saved our servers? How long do the batteries last for before they go flat? Why was a server off when you came in in the morning?

    If you get your UPS to email you when an event occurs then you will have answers to these questions.The problem is that there is no uniform software that will work with all UPS's as they all have their own format.All UPS's come with management software or hardware that can perform these actions. You just need to set it up.

    For example, your company might use APC UPS' and they have physical management cards (hardware), which are able to send emails. The event categories are "severe", "warning" and "informational".

    UPSexample
    Figure: Good Example - APC UPS have a physical management card with some options

  29. Do you clean up your groups with Entra Access Reviews?

    When you have multiple ongoing projects with people moving in and out of project teams, you can end up with too many people in the related groups - especially if you are using public Microsoft 365 groups that anyone in the organization can join.

    With Access Reviews, you can automate cleaning up these groups and make sure only the right people have ongoing access.

    Why use Access Reviews?

    In today's digital landscape, ensuring the right people have the right access to resources is paramount. Over time, as employees change roles, projects evolve, or external collaborators come and go, permissions can become outdated. This can lead to excessive access rights or, conversely, insufficient access, both of which pose risks. Excessive access can open doors to potential security breaches, while insufficient access can hinder productivity.

    "Entra Access Reviews" provides a systematic way to review and validate user access rights regularly. By conducting periodic access reviews, organizations can identify and rectify any inappropriate permissions, reducing the risk of unauthorized access or data breaches. Moreover, it ensures that users have the necessary access to perform their roles efficiently. Access reviews also support compliance efforts, as many regulatory frameworks require periodic reviews of access rights. With "Entra Access Reviews", organizations can automate this process, ensuring a consistent, auditable, and efficient approach to maintaining secure and compliant access controls.

    User Experience During an Access Review

    When it's time for an access review, users receive a notification prompting them to validate their access rights. This user-friendly process is designed to be intuitive, guiding users step-by-step through the review of their permissions. They'll see a clear list of the resources they currently have access to and will be asked to confirm if they still require that access. This self-review empowers users to be part of the security and compliance process, ensuring they only have access to what they genuinely need. The interface is clean and straightforward, minimizing any potential confusion. Below is a screenshot that provides a glimpse into what users see during this process:

    2023 10 09 9 09 17
    Figure: Reviewing your access is as simple as clicking a link in an email

    Creating an Access Review

    1. Go to the Azure Portal | Identity Governance | Access Reviews
    2. Click + New Access Review

    access review 1
    Figure: New Access Review

    1. Under Select what to review, choose Teams + Groups
    2. Under Review scope, choose Select Teams + Groups
    3. Click on + Select groups and choose the group you want to review
    4. Under Scope select All users
    5. Click Next: Reviews

    access review 2
    Figure: Access Reviews | Review type

    1. Check the Multi-stage review box
    2. Under First stage review | Select reviewers, choose Users review their own access
    3. Select a stage duration (default is 3 days)
    4. Under Second stage review | Select reviewers, choose Group owner(s)
    5. Select a stage duration again (default is 3 days)

    access review 3
    Figure: Access Review | Stages

    1. Under Specify recurrence of review, select a Review recurrence and Start date
    2. Under Specify reviewees to go to next stage, choose Approved reviewees
    3. Click Next: Settings

    access review 4
    Figure: Access Reviews | recurrence & reviewees

    1. Under Upon completion settings, tick Auto apply results to resource
    2. Under If reviewers don't respond, choose Remove access

    access review 5
    Figure: Access Reviews | Upon completion

    Under Advanced Settings

    1. Turn off Justification required
    2. Under Additional content for reviewer email, add an explanation so there's no confusion over what this email is.
    3. Click Next: Review + Create

    access review 6
    Figure: Access Reviews | Advanced settings

    1. Under Name new access review, add a name and description
    2. Review the details and click Create

    access review 7
    Figure: Access Review | Review + Create

    The Results

    At the end of the review we get to see the results

    screenshot 2023 09 27 094036
    Figure: At the conclusion we see these great stats!!

  30. Do you know how to run RSAT from a non-domain computer?

    With more companies adopting BYOD policies, it is important for SysAdmins to be able to connect to Remote Server Administrative Tools (RSAT) like Active Directory Users and Computers (ADUC) in a secure way, even if their computer is not connected to the domain.

    Note: You should make sure any personal devices connecting to your network are secure, with Intune or a similar solution.

    RDP to the domain controller (don't do this!)

    The least secure way is to use Remote Desktop Connection to make changes directly on the domain controller. Domain controllers should be locked down to only accept log ins from domain admin accounts - and should only be used when changes require these credentials.

    rdp dc
    Figure: Bad example - RDP directly to the domain controller

    Another option is to connect to a different computer or server that is on the domain, like a jump box. This is a more secure solution, but for many companies it adds infrastructure that is not necessary.

    Windows Admin Center

    Microsoft have a browser-based server management tool called Windows Admin Center. It is very useful for managing servers, and it can also be used to manage your AD environment - as well as DHCP, DNS and other Windows Server services.

    Since the tool is browser-based, you only need to allow access to one port for HTTPS communication.

    admin center aduc
    Figure: Managing AD in Windows Admin Center

    Read more about Windows Admin Center here: Do you use Windows Admin Center?

    Running RSAT from a non-domain joined computer

    While Windows Admin Center is a great solution, many SysAdmins prefer the extra functionality and classic interface of RSAT (Remote Server Administration Tools) in MMC (Microsoft Management Console) that you can easily run from a domain joined computer.

    You can also use this if you have a domain-joined computer, but you need to use a different account to the one you log in with to access RSAT.

    To get RSAT connected on a non-domain joined computer, there are some extra steps:

    1. Make sure you have the RSAT features you need: Install RSAT Features
    2. Run Command Prompt as Administrator
    3. Run this command to open an empty MMC window (replace admin@domain):

      runas.exe /netonly /noprofile /user:"admin@domain" mmc.exe

    4. Go to File | Add/Remove Snap-in... to add the tools you need, e.g. ADUC, DHCP, DNS, GPO Management
      mmc add snapin
      Figure: MMC | Add or Remove Snap-ins
    5. For ADUC (and possibly other tools), you will need to specify the domain to connect to. Make sure you tick the box Save this domain setting for the current console.

      aduc domain
      Figure: ADUC | Change domain

    6. Go to File | Save As... and save the console somewhere appropriate, e.g. C:\work\rsat.msc
    7. Create a batch file with this command - similar to the command above, but we specify the .msc file to use:

      runas.exe /netonly /noprofile /user:"admin@domain" "mmc.exe "C:\work\rsat.msc""

    8. Save the batch file and run it as administrator.
    9. Your MMC window will open with your snap-ins ready to go!
  31. Do you know what DNS is and how it works?

    Have you been in a scenario when you look at a website in your phone and it works. Meanwhile, one of your colleagues is looking at it in their PC and they get a response saying this site doesn't exist. That's probably a DNS (Domain Name System) issue.

    DNS is akin to the internet's phonebook. It's easy to remember a website's name, like www.ssw.com.au, but computers and networks need numerical IP addresses to access websites. DNS translates human-readable domain names to machine readable IP addresses.

    DNS explained

    Video: Everything You Need to Know About DNS (5 min)

    Understanding DNS is crucial for troubleshooting connectivity issues, optimizing network performance, and ensuring secure internet navigation

    When you type www.ssw.com.au into your browser, the process to translate this human-readable domain name into a machine-readable IP address involves several steps and servers in the Domain Name System (DNS). Here's a detailed breakdown:

    1. Domain Name Input - You enter www.ssw.com.au into your web browser.
    2. Browser Checks Cache - First, your browser checks its own cache to see if it has recently resolved the IP address for www.ssw.com.au. If it finds the IP address there, it skips the remaining DNS steps and proceeds to connect to the web server.
    3. Operating System Cache Check - If the browser cache doesn't have the IP address, the query moves to the operating system's DNS cache. If the operating system (OS) has the IP address cached, the DNS lookup process stops here, and the browser uses this IP address. If not, the process moves to the next step.
    4. DNS Resolver Query - The query is sent to a DNS resolver, typically operated by your Internet Service Provider (ISP). The resolver checks its cache; if the IP address is there (and still valid based on its TTL), the process ends, and the IP is returned to your browser. If not, the resolver queries a root nameserver.
    5. Root Nameserver Query - The DNS resolver contacts one of the root nameservers. The root server doesn't know the IP address for www.ssw.com.au but knows where to direct queries for .au domains. It responds with the address of the TLD nameserver for .au.
    6. TLD Nameserver Query - Next, the resolver contacts the .au TLD nameserver. This server manages information for .au domains but doesn't store individual IP addresses. Instead, it knows which authoritative nameserver handles ssw.com.au. It responds with the address of this nameserver.
    7. Authoritative Nameserver Query - The resolver then queries the authoritative nameserver for ssw.com.au, which has the actual IP address for www.ssw.com.au. This server responds with the IP address of the web server hosting the ssw.com.au site.
    8. Resolver Caching - The DNS resolver caches the IP address of www.ssw.com.au with the corresponding TTL. This caching helps speed up future requests to the same domain.
    9. Browser Connection to Web Server - With the IP address now known, your browser can establish a connection to the web server hosting www.ssw.com.au. It sends an HTTP request to the server asking for the web page associated with www.ssw.com.au.
    10. Web Server Response - The web server processes the request and sends the requested web page back to your browser, which then displays the content to you.

    Each of these steps involves complex interactions between your computer, various DNS servers, and the final web server hosting the content you wish to access. This process, although it might seem lengthy, happens within milliseconds, allowing for the quick loading of web pages.

    DNS how it works
    Figure: DNS - finding the correct authoritative nameserver

    Image source: ByteByteGo's DNS Video

    Hierarchical Structure of Domain Names

    Domain names are structured hierarchically, with the right-most component being the top-level domain (TLD). In the domain name www.ssw.com.au:

    • .au is the country-code top-level domain (ccTLD) for Australia
    • com.au is considered a second-level domain within the .au ccTLD. It's commonly used by commercial entities in Australia
    • ssw.com.au is a domain registered by an entity (in this case, SSW) within the com.au space
    • www.ssw.com.au includes a subdomain (www) of the ssw.com.au domain

    How DNS Knows com.au is a TLD

    In essence, DNS doesn't treat com.au as a single TLD but rather as a combination of a second-level domain (com) under the .au TLD. The distinction comes from the DNS hierarchy and the namespace management:

    1. Root Nameservers: At the top of the DNS hierarchy are the root nameservers. They have the information necessary to direct queries to the TLD nameservers.
    2. TLD Nameservers: Each TLD, like .com, .net, .org, or a country-code TLD like .au, has its own nameserver(s). When a query reaches this level, the TLD nameserver directs the query to the appropriate second-level domain nameserver, if applicable.
    3. Registry and Registrar: The registry for a TLD manages the domain names within that TLD. For example, the registry for .au manages all domains ending in .au, including com.au, org.au, etc. When someone registers a domain like ssw.com.au, they are registering a second-level domain within the .au TLD. The registry ensures that each domain name is unique within its namespace.
    4. Authoritative Nameservers: For a given registered domain, like ssw.com.au, there are authoritative nameservers that know the IP addresses for subdomains (like www.ssw.com.au).

    Direct Browsing to a Second-Level Domain

    You can browse to a second-level domain if it is set up to host content. For example, if com.au were registered as a domain with its own website, you could browse to it directly. However, com.au is reserved for structuring domain names within Australia and is not used as a standalone website. This is managed through DNS policy and registration rules set by the domain registry responsible for the .au domain space.

    In summary, DNS distinguishes between different levels of domains through its hierarchical structure, managed by a combination of root, TLD, and authoritative nameservers. The ability to browse to a domain depends on whether it is registered and configured to host content, regardless of whether it's a TLD, a second-level domain, or lower.

    Common DNS record types

    In the context of DNS (Domain Name System), a "type" refers to the kind of DNS record in a DNS server's database, here are some common ones:

    TypeFunctionCommon Example
    Address Record (A)Maps a domain to an IPv4 addressexample.com maps to 93.184.216.34
    IPv6 Address Record (AAAA)Maps a domain to an IPv6 addressexample.com maps to 2606:2800:220:1:248:1893:25c8:1946
    Canonical Name Record (CNAME)Maps a domain to another domain name (aliasing)www.example.com aliases to example.com
    Mail Exchange Record (MX)Specifies mail servers for a domainexample.com mail handled by mail.example.com
    Name Server Record (NS)Delegates a subdomain to a set of name serverssub.example.com delegated to ns1.example.com
    Pointer Record (PTR)Maps an IP address to a domain (reverse DNS)34.216.184.93 reverses to example.com
    Start of Authority Record (SOA)Stores administrative information about a zoneexample.com SOA record indicates ns1.example.com as primary NS
    Service Locator Record (SRV)Specifies services available in a domain_sip._tcp.example.com points to SIP server at sipserver.example.com port 5060
    Text Record (TXT)Holds text information for external sources to readexample.com uses a TXT record for SPF: "v=spf1 include:_spf.example.com ~all"
We open source. Powered by GitHub