Rules to Better Azure - 28 Rules
If you still need help, visit our Azure consulting page and book in a consultant.
Whether you're an expert or just getting started, working towards gaining a new certification is a worthwhile investment.
Microsoft provides numerous certifications and training options to help you:
- Learn new skills
- Fill technical knowledge gaps
- Boost your productivity
- Prove your competence
Figure: Microsoft Certification RoadMap
Fundamentals
If you're just getting started, take a look at:
Microsoft Certified: Azure Fundamentals
Earn this certification to prove you have a foundational knowledge of the Power Platform and how to build solutions using these services.
You will need to pass Exam AZ-204: Developing Solutions for Microsoft Azure.
Microsoft Certified: Azure Data Fundamentals
Earn this certification to prove you have foundational knowledge of core data concepts and how they are implemented using Microsoft Azure data services.
You will need to pass: Exam DP-900: Microsoft Azure Data Fundamentals.
Associate
Once you've mastered the fundamentals, developers should move on to:
Microsoft Certified: Azure Developer Associate
Earn this certification to prove your subject matter expertise in designing, building, testing, and maintaining cloud applications and services on Microsoft Azure.
You will need to pass: Exam AZ-204: Developing Solutions for Microsoft Azure.
Microsoft Certified: Azure Data Engineer Associate
Earn this certification to prove you have subject matter expertise integrating, transforming, and consolidating data from various structured and unstructured data systems into structures that are suitable for building analytics solutions.
You will need to pass: Exam DP-203: Data Engineering on Microsoft Azure.
Microsoft Certified: Azure Security Engineer Associate
Earn this certification to prove your subject matter expertise implementing security controls and threat protection, managing identity and access, and protecting data, applications, and networks in cloud and hybrid environments as part of an end-to-end infrastructure.
You will need to pass: Exam AZ-500: Microsoft Azure Security Technologies.
Microsoft Certified: Azure Data Scientist Associate
Earn this certification to prove you have subject matter expertise applying data science and machine learning to implement and run machine learning workloads on Azure.
You will need to pass: Exam DP-100: Designing and Implementing a Data Science Solution on Azure.
Microsoft Certified: Azure Administrator Associate
Earn this certification to prove you have understand how to implement, manage and monitor an organization's Azure environment.
You will need to pass: Exam AZ-104: Microsoft Azure Administrator.
Specialty
Cosmos is becoming a very popular database solution. Learn more by completing:
Microsoft Certified: Azure Cosmos DB Developer Specialty
Earn this certification to prove that you have strong knowledge of the intricacies of Azure Cosmos DB.
You will need to pass: Exam DP-420: Designing and Implementing Cloud-Native Applications Using Microsoft Azure Cosmos DB
Expert
Eventually, all rock star developers and solution architects should set their sights on:
Microsoft Certified: Azure Solutions Architect Expert
Earn this certification to prove your subject matter expertise in designing and implementing solutions that run on Microsoft Azure, including aspects like compute, network, storage, and security. Candidates should have intermediate-level skills for administering Azure. Candidates should understand Azure development and DevOps processes.
You will need to pass: Exam AZ-303: Microsoft Azure Architect Technologies and Exam AZ-304: Microsoft Azure Architect Design.
Now that you can build awesome cloud applications, you might want to Deploy your applications to Microsoft Azure:
Microsoft Certified: DevOps Engineer Expert
Earn this certification to prove your subject matter expertise working with people, processes, and technologies to continuously deliver business value.
You will need to pass: Exam AZ-400: Designing and Implementing Microsoft DevOps Solutions.
Figure: Get the poster to see Microsoft's certifications Check the Become Microsoft Certified poster for details of exams required for each of the certifications.
Preparing for exams can involve a lot of work, and in some cases stress and anxiety. But remember, you're not in school anymore! You've chosen to take this exam, and no one is forcing you. So just sit back and enjoy the journey - you should feel excited by the new skills you will soon learn. If you want some great advice and tips, be sure to check out Successfully Passing Microsoft Exams by @JasonTaylorDev.
Good luck!
To help you out, here is a list of the top 9 Azure services you should be using:
- Computing: App Services
- Best practices: DevOps Project
- Data management: Azure Cosmos DB (formerly known as Document DB)
- Security: Azure AD (Active Directory)
- Web: API Management
- Automation: Logic Apps
- Automation: Cognitive Services
- Automation: Bots
- Storage: Containers
Watch the video
More details on Adam's Blog - The 9 knights of Azure: services to get you started
The goal of a modern complex software project is to build software with the best software architecture and great cloud architecture. Software developers should be focusing on good code and good software architecture. Azure and AWS are big beasts and it should be a specialist responsibility.
Many projects for budget reasons, have the lead developer making cloud choices. This runs the risk of choosing the wrong services and baking in bad architecture. The associated code is hard and expensive to change, and also the monthly bill can be higher than needed.
The focus must be to build solid foundations and a rock-solid API. The reality is even 1 day of a Cloud Architect at the beginning of a project, can save $100K later on.
2 strong developers (say Solution Architect and Software Developer) No Cloud Architect No SpendOps
Figure: Bad example of a team for a new project
2 strong developers (say Solution Architect and Software Developer) + 1 Cloud Architect (say 1 day per week, or 1 day per fortnight, or even 1 day per month) after choosing the correct services, then looks after the 3 horsemen:
- Load/Performance Testing
- Security choices
- SpendOps
Figure: Good example of a team for a new project
Problems that can happen without a Cloud Architect:
- Wrong tech chosen e.g. nobody wants to accidentally build and need to throw away
- Wrong DevOps e.g. using plain old ARM templates that are not easy to maintain
- Wrong Data story e.g. defaulting to SQL Server, rather than investigating other data options
- Wrong Compute model e.g. Choosing a fixed price, always-on, slow scaling WebAPI for sites that have unpredictable and large bursts of traffic
- Security e.g. this word should be enough
- Load/Performance e.g. not getting the performance to $ spend ratio right
Finally, at the end of a project, you should go through a "Go-Live Audit". The Cloud Architect should review and sign off that the project is good to go. They mostly check the 3 horsemen (load, security, and cost).
Azure Architecture Center (https://docs.microsoft.com/en-us/azure/architecture/ ) is a one stop shop for all things Azure Architecture. It’s got a library of reference implementations to get you started. Lots of information on best practices from the big decisions you need to make down to the little details that can make a huge difference to how your application behaves.
Reference Architectures
Figure: Use Browse Architectures to find a reference architecture that matches your application The architectures presented fit into 2 broad categories:
- Complete end to end architectures. These architectures cover the full deployment of an application.
- Architectures of a particular feature. These architectures explain how to incorporate a particular element into your architecture. The Caching example above explains how you might add caching into your application to improve performance.
Each architecture comes with comprehensive documentation providing all the information you need to build and deploy the solution.
Best Practices
Figure: Use Explore Best Practices to find information on particular best practice The Best Practices is a very broad set of documentation from things like performance tuning all the way through to designing for resiliency and some of the more common types of applications and their requirements.Because of this there is almost always something useful, no matter what stage your application is at. Many teams will add a sprint goal of looking at one best practise per sprint or at regular intervals. The Product Owner would then help prioritise which areas should be focussed on first.
The Well-Architected Framework is a set of best practices which form a repeatable process for designing solution architecture, to help identify potential issues and optimize workloads.
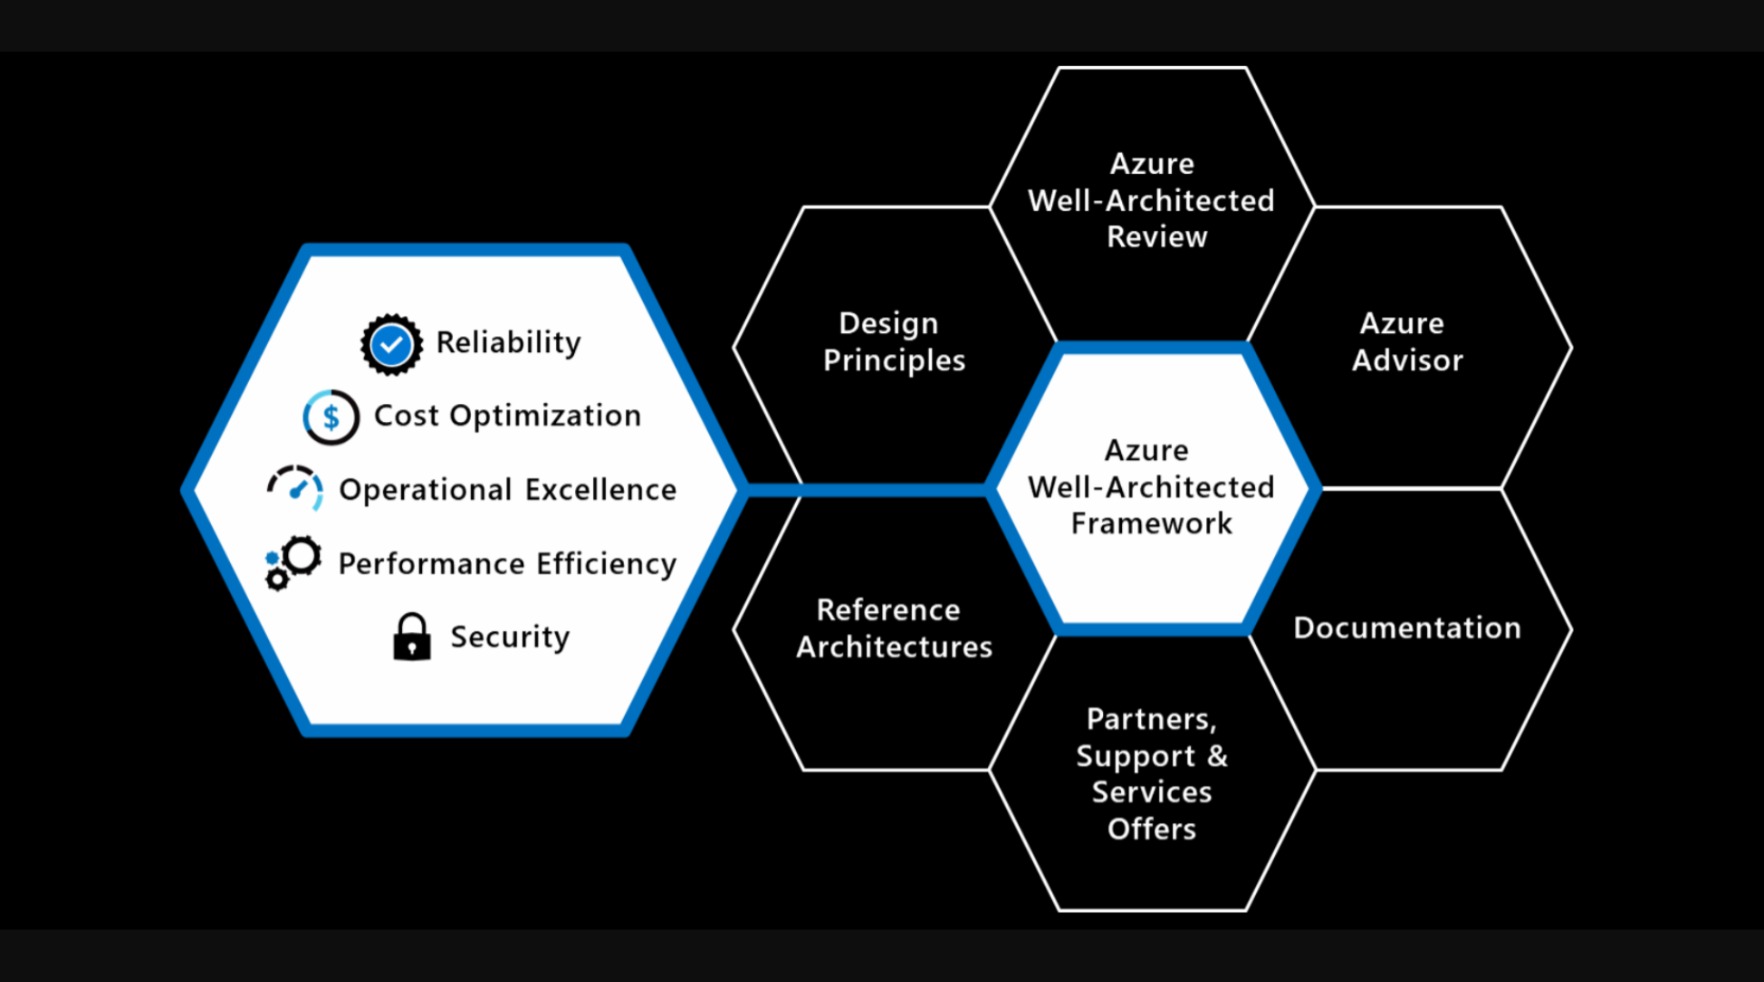
Figure: The Well-Architected Framework includes the five pillars of architectural excellence. Surrounding the Well-Architected Framework are six supporting elements The 5 Pillars
- Reliability – Handling and recovering from failures https://docs.microsoft.com/en-us/azure/architecture/framework/resiliency/principles
- Cost Optimization – Minimizing costs without impacting workload performance https://docs.microsoft.com/en-us/azure/architecture/framework/cost/principles
- Performance Efficiency (Scalability) – Testing, monitoring and adapting to changes in load e.g. new product launch, Black Friday sale, etc. https://docs.microsoft.com/en-us/azure/architecture/framework/scalability/principles
- Security – Protecting from threats and bad actors https://docs.microsoft.com/en-us/azure/architecture/framework/security/security-principles
- Operational Excellence (DevOps) – Deploying and managing workloads once deployed https://docs.microsoft.com/en-us/azure/architecture/framework/devops/principles
Trade-offs
There are trade-offs to be made between these pillars. E.g. improving reliability by adding Azure regions and backup points will increase the cost.
Why use it?
Thinking about architecting workloads can be hard – you need to think about many different issues and trade-offs, with varying contexts between them. WAF gives you a consistent process for approaching this to make sure nothing gets missed and all the variables are considered.
Just like Agile, this is intended to be applied for continuous improvement throughout development and not just an initial step when starting a new project. It is less about architecting the perfect workload and more about maintaining a well-architected state and an understanding of optimizations that could be implemented.
What to do next?
Assess your workload against the 5 Pillars of WAF with the Microsoft Azure Well-Architected Review and add any recommendations from the assessment results to your backlog.
Figure: Some recommendations will be checked, others go to the backlog so the Product Owner can prioritize Figure: Recommended actions results show things to be improved Azure transactions are CHEAP. You get tens of thousands for just a few cents. What is dangerous though is that it is very easy to have your application generate hundreds of thousands of transactions a day.
Every call to Windows Azure Blobs, Tables and Queues count as 1 transaction. Windows Azure diagnostic logs, performance counters, trace statements and IIS logs are written to Table Storage or Blob Storage.
If you are unaware of this, it can quickly add up and either burn through your free trial account, or even create a large unexpected bill.
Note: Azure Storage Transactions do not count calls to SQL Azure.
Ensure that Diagnostics are Disabled for your web and worker roles
Having Diagnostics enabled can contribute 25 transactions per minute, this is 36,000 transactions per day.
Question for Microsoft: Is this per Web Role?
Figure: Check the properties of your web and worker role configuration files Figure: Disable diagnostics Disable IntelliTrace and Profiling
Figure: When publishing, ensure that IntelliTrace and Profiling are both disabled Robots.txt
Search bots crawling your site to index it will lead to a lot of transactions. Especially for web "applications" that do not need to be searchable, use Robot.txt to save transactions.
Figure: Place robots.txt in the root of your site to control search engine indexing Continuous Deployment
When deploying to Azure, the deployment package is loaded into the Storage Account. This will also contribute to the transaction count.
If you have enabled continuous deployment to Azure, you will need to monitor your transaction usage carefully.
References
If you use the default Azure staging web site URL, it can be difficult to remember and a waste of time trying to lookup the name every time you access it. Follow this rule to increase your productivity and make it easier for everyone to access your staging site.
Default Azure URL: sugarlearning-staging.azurewebsites.net
Figure: Bad example - Site using the default URL (hard to remember!!)
Customized URL: staging.sugarlearning.com
Figure: Good example - Staging URL with "staging." prefix
How to setup a custom URL
- Add a CName to the default URL to your DNS server
Figure: CName being added to DNS for the default URL - Instruct Azure to accept the custom URL
Figure: Azure being configured to accept the CName AzureSearch is designed to work with Azure based data and runs on ElasticSearch. It doesn't expose all the advanced search features. You may resist to choose it as your search engine from the missing features and what seems to be an expensive monthly fee ($250 as of today). If this is the case, follow this rule:
Consider AzureSearch if your website:
- Uses SQL Azure (or other Azure based data such as DocumentDB), and
- Does not require advanced search features.
Consider ElasticSearch if your website:
- Requries advance search features that aren't supported by AzureSearch
Keep in mind that:
- Hosting of a full-text search service costs you labour to set up and maintain the infrastructure, and
- A single Azure VM can cost you up to $450. So do not drop AzureSearch option unless the missing features are absolutely necessary for your site
Like other services, it is important that your company has a structured and secure approach to managing Azure Permissions.
First a little understanding of how Azure permissions work. For each subscription, there is an Access Control (IAM) section that will allow you to grant overall permissions to this Azure subscription. It is important to remember that any access that is given under Subscriptions | "Subscription Name" | Access Control (IAM), will apply to all Resource Groups within the Subscription.
Figure: Good Example - only Administrators that will be managing overall permissions and content have been given Owner/Co-administrator From the above image, only the main Administrators have been given Owner/Co-administrator access, all other users within the SSWDesigners and SSWDevelopers Security Groups have been given Reader access. The SSWSysAdmins Security group has also been included as an owner which will assist in case permissions are accidentally stripped from the current Owners.
We've been down this road before where developers had to be taught not to manually create databases and tables. Now, in the cloud world, we're saying the same thing again. Don't manually create Azure resources.
Manually Creating Resources
This is the most common and the worst. This is bad because it requires manual effort to reproduce and leaves margin for human error.
- Create resources in Azure and not save a script
Figure: Bad Example – creating resources manually Manually creating and saving the script
Some people half solve the problem by manually creating and saving the script. This is also bad because it’s like eating ice cream and brushing your teeth – it doesn’t solve the health problem.
Figure: Warning - The templates are crazy verbose. They often don't work and need to be manually tweaked Tip: Save scripts in a folder called Azure\
Figure: Good example - However you generate your ARM template, save it in an Azure folder like this example (SSW TimePro) So if you aren't manually creating your Azure resources, what options do you have?
Option A: Farmer (Bad Example)
Farmer - Making repeatable Azure deployments easy!
- It makes creating ARM templates easier
- It's a great tool
- Simply add a very short and readable F# project in your solution
- Tip: The F# solution of scripts should be in a folder called Azure
Option B: Bicep by Microsoft (recommended)
Bicep - a declarative language for describing and deploying Azure resources
- Is free and fully supported by Microsoft
- Has 'az' command line integration
- Awesome extension for VS Code to author ARM Bicep files ⭐️
- Under the covers - Compiles into an ARM JSON template for deployment
- Much simpler syntax than ARM JSON
- Handles dependencies automatically
Announcement info: Project Bicep – Next Generation ARM Templates
Example Bicep files: Fullstack Webapp made with Bicep
Option C: Enterprise configuration management $$$
The other option when moving to an automated Infrastructure as Code (IaC) solution is to move to a paid provider like Pulumi or Terraform. These solutions are ideal if you are using multiple cloud providers or if you want to control the software installation as well as the infrastructure.
- They're both great tools
- Both have free options for limited numbers of users
-
Pulumi is better because:
- Terraform's proprietary ‘HCL’ (Hashicorp Configuration Language), which is as bad as YAML
- It's a great tool that uses real code (C#, TypeScript, Go, and Python) as infrastructure rather than JSON/YAML
Figure: Good Example - Code from the Pulumi Azure NextGen provider demo with Azure resources defined in C# Tip: After you’ve made your changes, don’t forget to visualize your new resources
Organizing your cloud assets starts with good names. It is best to be consistent and use:
- All lower case
- Use kebab case (“-“ as a separator)
- Include which environment the resource is intended for i.e. dev, test, prod, etc.
- Do not include the Resource Type in the name (Azure displays this)
- If applicable, include the intended use of the resource in the name e.g. an app service may have a suffix api
Azure defines some best practices for naming and tagging your resource.
Having inconsistent resource names across projects creates all sorts of pain
- Developers will struggle to find a project's resources and identify what those resources are being used for
- Developers won't know what to call new resources they need to create.
- You run the risk of creating duplicate resources... created because a developer has no idea that another developer created the same thing 6 months ago, under a different name, in a different Resource Group!
Keep your resources consistent
If you're looking for resources, it's much easier to have a pattern to search for. At a bare minimum, you should keep the name of the product in the resource name, so finding them in Azure is easy. One good option is to follow the "productname-environment" naming convention, and most importantly: keep it consistent!
Name your resources according to their environment
Resource names can impact things like resource addresses/URLs. It's always a good idea to name your resources according to their environment, even when they exist in different Subscriptions/Resource Groups.
Good Example - Consistent names, using lowercase letters and specifying the environment. Easy to find, and easy to manage! Plan for the exceptions
Some resources won't play nicely with your chosen naming convention (for instance, storage accounts do not accept kebab-case). Acknowledge these, and have a rule in place for how you will name these specific resources.
Automate resource deployment
ClickOps can save your bacon when you quickly need to create a resource and need to GSD. Since we are all human and humans make mistakes, there will be times when someone is creating resources via ClickOps are unable to maintain the team standards to consistent name their resources.
Instead, it is better to provision your Azure Resources programmatically via Infrastructure as Code (IaC) using tools such as ARM, Bicep, Terraform and Pulumi. With IaC you can have naming conventions baked into the code and remove the thinking required when creating multiple resources. As a bonus, you can track any changes in your standards over time since (hopefully) your code is checked into a source control system such as Git (or GitHub, Azure Repos, etc.).
You can also use policies to enforce naming convention adherance, and making this part of your pipeline ensures robust naming conventions that remove developer confusion and lower cognitive load.
For more information, see our rule: Do you know how to create Azure resources?
Want more Azure tips? Check out our rule on Azure Resource Groups.
Naming your Resource Groups
Resource Groups should be logical containers for your products. They should be a one-stop shop where a developer or sysadmin can see all resources being used for a given product, within a given environment (dev/test/prod). Keep your Resource Group names consistent across your business, and have them identify exactly what's contained within them.
Name your Resource Groups as Product.Environment. For example:
- Northwind.Dev
- Northwind.Staging
- Northwind.Production
There are no cost benefits in consolidating Resource Groups, so use them! Have a Resource Group per product, per environment. And most importantly: be consistent in your naming convention.
Keep your resources in logical, consistent locations
You should keep all a product's resources within the same Resource Group. Your developers can then find all associated resources quickly and easily, and helps minimize the risk of duplicate resources being created. It should be clear what resources are being used in the Dev environment vs. the Production environment, and Resource Groups are the best way to manage this.
Don't mix environments
There's nothing worse than opening up a Resource Group and finding several instances of the same resources, with no idea what resources are in dev/staging/production. Similarly, if you find a single instance of a Notification Hub, how do you know if it's being built in the test environment, or a legacy resource needed in production?
Don't categorize Resource Groups based on resource type
There is no cost saving to group resources of the same type together. For example, there is no reason to put all your databases in one place. It is better to provision the database in the same resource group as the application that uses it.
To help maintain order and control in your Azure environment, applying tags to resources and resources groups is the way to go.
Azure has the Tag feature, which allows you to apply different Tag Names and values to Resources and Resource Groups:
Figure: Little example of Tags in Resource Groups You can leverage this feature to organize your resources in a logical way, not relying in the names only. E.g.
- Owner tag: You can specify who owns that resource
- Environment tag: You can specify which environment that resource is in
Tip: Do not forget to have a strong naming convention document stating how those tags and resources should be named. You can use this Microsoft guide as a starter point: Recommended naming and tagging conventions.
Looking at a long list of Azure resources is not the best way to be introduced to a new project. It is much better to visualize your resources.
You need an architecture diagram, but this is often high level, just outlining the most critical components from the 50,000ft view, often abstracted into logical functions or groups. So, once you have your architecture diagram, the next step is to create your Azure resources diagram.
Option A: Just viewing a list of resources in the Azure portal
Note: When there are a lot of resources this doesn't work.
Option B: Visually viewing the resources
Figure: Good Example - ARM template and automatically generated Azure resources diagram in the SSW Rewards repository on GitHub Figure: Good Example - The Azure resources diagram generated by the ARM Template Viewer extension for SSW Rewards Install ARM Template Viewer from VisualStudio Marketplace.
Note: Microsoft has a download link for all the Azure icons as SVGs.
Suggestion to Microsoft: Add an auto-generated diagram in the Azure portal. Have an option in the combo box (in addition to List View) for Diagram View.
Update: This is now happening.
BIG NEWS! My ARM visualiser is now a native part of the Azure portal 😁 The engineering team did most of the hard work, but I'm chuffed to bits. It's currently in the special RC portal, please try it out (in the 'export template' view) https://t.co/iEvAhxxGRK & provide feedback! pic.twitter.com/4KTu7GGOeQ
— Ben Coleman (@BenCodeGeek) April 9, 2020Scrum Warning: Like the architecture diagram, this is technical debt as it needs to be kept up to date each Sprint. However, unlike the architecture diagram, this one is much easier to maintain as it can be refreshed with a click. You could reduce this technical debt by automatically saving the .png to the same folder as your architecture diagram. It is easy to do this by using Azure Event Grid and Azure Functions to generate these for you when you make changes to your resources.
Azure is Microsoft's Cloud service. However, you have to pay for every little bit of service that you use.
Before diving in, it is good to have an understanding of the basic built-in user roles:
Figure: Roles in Azure More info: https://docs.microsoft.com/en-us/azure/role-based-access-control/built-in-roles
It's not a good idea to give everyone 'Contributor' access to Azure resources in your company. The reason is cost: Contributors can add/modify the resources used, and therefore increase the cost of your Azure build at the end of the month. Although a single change might represent 'just a couple of dollars', in the end, everything summed up may increase the bill significantly.
The best practice is to have an Azure Spend Master . This person will control the level of access granted to users. Providing "Reader" access to users that do not need to/should not be making changes to Azure resources and then "Contributor" access to those users that will need to Add/Modify resources, bearing in mind the cost of every change.
Also, keep in mind that you should be giving access to security groups and not individual users. It is easier, simpler, and keeps things much better structured.
Microsoft Azure SQL Database has built-in backups to support self-service Point in Time Restore and Geo-Restore for Basic, Standard, and Premium service tiers.
You should use the built-in automatic backup in Azure SQL Database versus using T-SQL.
T-SQL: CREATE DATABASE destination_database_nameAS COPY OF[source_server_name].source_database_name
Figure: Bad example - Using T-SQL to restore your database
Figure: Good example - Using the built-in SQL Azure Database automatic backup system to restore your database Azure SQL Database automatically creates backups of every active database using the following schedule: Full database backup once a week, differential database backups once a day, and transaction log backups every 5 minutes. The full and differential backups are replicated across regions to ensure the availability of the backups in the event of a disaster.
Backup Storage
Backup storage is the storage associated with your automated database backups that are used for Point in Time Restore and Geo-Restore. Azure SQL Database provides up to 200% of your maximum provisioned database storage of backup storage at no additional cost.
Service Tier Geo-Restore Self-Service Point in Time Restore Backup Retention Period Restore a Deleted Database Web Not supported Not supported n/a n/a Business Not supported Not supported n/a n/a Basic Supported Supported 7 days √ Standard Supported Supported 14 days √ Premium Supported Supported 35 days √ Figure: All the modern SQL Azure Service Tiers support back up. Web and Business tiers are being retired and do not support backup. Check Web and Business Edition Sunset FAQ for up-to-date retention periods
Learn more on Microsoft documentation:
Other ways to back up Azure SQL Database:
- Microsoft Blog - Different ways to Backup your Windows Azure SQL Database
Do you configure your web applications to use application specific accounts for database access?
An application's database access profile should be as restricted as possible, so that in the case that it is compromised, the damage will be limited.
Application database access should be also be restricted to only the application's database, and none of the other databases on the server
Bad Example – Contract Manager Web Application using the administrator login in its connection string
Good Example – Application specific database user configured in the connection string
Most web applications need full read and write access to one database. In the case of EF Code first migrations, they might also need DDL admin rights. These roles are built in database roles:
db_ddladmin Members of the db_ddladmin fixed database role can run any Data Definition Language (DDL) command in a database. db_datawriter Members of the db_datawriter fixed database role can add, delete, or change data in all user tables. db_datareader Members of the db_datareader fixed database role can read all data from all user tables. Table: Database roles taken from Database-Level Roles
If you are running a web application on Azure as you should configure you application to use its own specific account that has some restrictions. The following script demonstrates setting up an sql user for myappstaging and another for myappproduction that also use EF code first migrations:
USE master
GO
CREATE LOGIN myappstaging WITH PASSWORD = '****'; GO CREATE USER myappstaging FROM LOGIN myappstaging; GO USE myapp-staging-db; GO CREATE USER myappstaging FROM LOGIN myappstaging;GO
EXEC spaddrolemember 'dbdatareader', myappstaging; EXEC spaddrolemember 'dbdatawriter', myappstaging; EXEC spaddrolemember 'dbddladmin', myappstaging;Script: Example script to create a service user for myappstaging
Note: If you are using stored procedures, you will also need to grant execute permissions to the user. E.g.:
GRANT EXECUTE TO myappstaging
Data Source=tcp:xyzsqlserver.database.windows.net,1433; Initial Catalog=myapp-staging-db; User ID=myappstaging@xyzsqlserver; Password='*************'
Figure: Example connection string
Here's a cool site that tests the latency of Azure Data Centres from your machine. It can be used to work out which Azure Data Centre is best for your project based on the target user audience: http://www.azurespeed.com
As well as testing latency it has additional tests that come in handy like:
- CDN Test
- Upload Test
- Large File Upload Test
- Download Test
Figure: AzureSpeed.com example Setting up a WordPress site hosted on Windows Azure is easy and free, but you only get 20Mb of MySql data on the free plan.
Figure: Once you approach your 20Mb limit you will receive a warning that your database may be suspended Figure: If you are serious about your blog and including content on it, you should configure a paid Azure Add-on to host your MySQL Database when you set it up Figure: If you have already created your blog, navigate to your Web Site within the Azure portal, select Linked Resources, select the line for the MySQL Database and click the Manage link. This will open the ClearDb portal. Go to the Dashboard and click Upgrade
References: John Papa: Tips for WordPress on AzureData in Azure Storage accounts is protected by replication. Deciding how far to replicate it is a balance between safety and cost.
Figure: It is important to balance safety and pricing when choosing the right replication strategy for Azure Storage Accounts Locally redundant storage (LRS)
- Ma intains three copies of your data.
- Is replicated three times within a single facility in a single region.
- Protects your data from normal hardware failures, but not from the failure of a single facility.
- Less expensive than GRS
-
Use when:
- o Data is of low importance – e.g. for test websites, or testing virtual machines
- o Data can be easily reconstructed
- o Data is non-critical
- o Data governance requirements restrict data to a single region
Geo-redundant storage (GRS).
- The default when you create it storage accounts.
- Maintains six copies of your data.
- D ata is replicated three times within the primary region, and is also replicated three times in a secondary region hundreds of miles away from the primary region
- In the event of a failure at the primary region, Azure Storage will failover to the secondary region.
- Ensures that your data is durable in two separate regions.
-
Use when:
- o Data cannot be recovered if lost
Read access geo-redundant storage (RA-GRS).
- Replicates your data to a secondary geographic location (same as GRS)
- P rovides read access to your data in the secondary location
- Allows you to access your data from either the primary or the secondary location, in the event that one location becomes unavailable.
-
Use when:
- o Data is critical, and access is required to both the primary and the secondary regions
More reading
Often we use Azure VM's for presentations, training and development. As there is a cost involved to store and use the VM it is important to ensure that the VM is shutdown when it is no longer required.
Shutting down the VM will prevent compute charges from incurring. There is still a cost involved for the storage of the VHD files but these charges are a lot less than the compute charges.
Please note that is for Visual Studio subscriptions.
You can shutdown the VM by either making a remote desktop connection to the VM and shutdown server or using Azure portal to shutdown the VM.
Figure: Azure Portal If you use a strong naming convention and is using Tags to its full extent in Azure, then it is time for the next step.
Azure Policies is a strong tool to help in governing your Azure subscription. With it, you make it easier to fall in The Pit of Success when creating or updating new resources. Some features of it:
- You can deny creation of a Resource Group that does not comply with the naming standards
- You can deny creation of a Resource if it doesn't possess the mandatory tags
- You can append tags to newly created Resource Groups
- You can audit the usage of specific VMs or SKUs in your Azure environment
- You can allow only a set of SKUs within Azure
Azure Policy allow for making of initiatives (group full of policies) that try to achieve an objective e.g. a initiative to audit all tags within a subscription, to allow creation of only some types of VMs, etc...
You can delve deep on it here: https://docs.microsoft.com/en-us/azure/governance/policy/overview
Azure Machine Learning provides an easy to use yet feature rich platform for conducting machine learning experiments. This introduction provides an overview of ML Studio functionality, and how it can be used to model and predict interesting rule world problems.
Azure Notebooks offer a simple, transparent and complete technology for analysing data and presenting the results. They are quickly become the default way to conduct data analysis in the scientific and academic community.
Most sysadmins set up Azure alerts to go to a few people and then they have given themselves a job to forward the email to the right people every time there is a problem. What happens when they are away and why do they need to keep adding and removing emails when people join and leave the team.
There is a better way. Have those emails go to the Team. Every team channel has a specific email address and then Team members can pin that. This way these important emails are sitting right at the top.
Azure Site Recovery is the best way to ensure business continuity by keeping business apps and workloads running during outages. It is one of the fastest ways to get redundancy for your VMs on a secondary location. For on-premises local backup see www.ssw.com.au/rules/why-use-data-protection-manager
Ensuring business continuity is priority for the System Administrator team, and is part of any good disaster recovery plan. Azure Site Recovery allows an organization to replicate and sync Virtual Machines from on-premises (or even different Azure regions) to Azure. This replication can be set to whatever frequency the organization deems to be required, from Daily/Weekly through to constant replication.
This way when there is an issue, restoration can be in minutes - you just switch over to the VMs in Azure! They will keep the business running while the crisis is dealt with. The server will be in the same state as the last backup. Or if the issue is software you can restore an earlier version of the virtual machine within a few minutes as well.
Figure: Azure Backup and Site Recovery backs up on-premises and Azure Virtual Machines Managing the monthly spend on cloud resources eg. Azure is hard. It gets harder for SysAdmins when developers add services without sending an email to aid in reconciliation.
Azure has a nice tool for managing its own costs, called the Cost Analysis - https://docs.microsoft.com/en-us/azure/cost-management-billing/costs/quick-acm-cost-analysis
You can break down costs per resource group, resource type and many other aspects in Azure.Note: If your subscription is a Microsoft Sponsored account, you can't use the Cost Analysis tool to break down your costs, unfortunately. Microsoft has this planned for the future, but it's not here yet.
Even with Cost Analysis, Developers with enough permissions (e.g. Contributor permissions to a Resource Group) are able to create resources without the spend master (generally the SysAdmins) knowing, and this will lead to budget and spending problems at the end of the billing cycle.
For everyone to be on the same page, the process a developer should follow is:
- Use the Azure calculator - work out the monthly resource $ price
https://azure.microsoft.com/en-au/pricing/calculator - Email SysAdmins with $ and a request to create resources in Azure, like the below:
To: SysAdmins Subject: Purchase Please - Azure Resource Request for xx To SSWSysAdmins,
I would like you to provision a new Azure Resource
- Azure Resource needed: I would like to create a new App Service Plan
- Azure Calculator link: https://azure.com/e/f41a4bdd0d2d4b67b7bcb5939adbc22f
- Environment eg. Dev/Staging/Prod: Prod
For what project?
- Project Name: A new project called SSW.Northwind
- Project Description (The SysAdmin will copy this info to the Azure Tag):
- Project URL eg. Azure DevOps / Github: https://github.com/SSWConsulting/SSW.Rules.Content
Total: A$411 per month
Figure: I generated the price from https://azure.microsoft.com/en-au/pricing/calculator Please approve
David
<As per SSW Rule: https://www.ssw.com.au/rules/manage-costs-azure>
- Use the Azure calculator - work out the monthly resource $ price
Azure App Services are powerful and easy to use. Lots of developers choose it as the default hosting option for their Web Apps and Web APIs. However, to set up a staging environment and manage the deployment for the staging environment can be tricky.
We can choose to create a second resource group or subscription to host our staging resources. As a great alternative, we can use a fully-fledged feature on App Service called deployment slot.
How to use deployment slots
To start using slot deployment, we can spin up another web app – it sits next to your original web app with a different url. Your production url could be production.website.com and the corresponding staging slot is staging.website.com. Your users would access your production web app while you can deploy a new version of the web app to your staging slot. That way, the updated web app can be tested before it goes live. You can easily swap the staging and production slot with only a turnkey configuration. See figure 1 to 5 below.
Other benefits of deployment slots
The benefit of using deployment slot is that if anything goes wrong on your production web app, you can easily roll it back by swapping with the staging slot – your previous version of web app sits on the staging slot – ready to be swapped back anytime before a newer version is pushed to staging slot.
Deployment slot can also work hand in hand with your blue green deployment strategy – you can opt user to the beta feature on the staging slot gradually.
Figure 1: Before Swap - Production slot Figure 2: Before swap - Staging slot Figure 3: Swap the slot with one click Figure 4: After swap – Production slot Figure 5: After swap – Staging slot