SSW Foursquare

Rules to Better Scrum using GitHub (Issues and Projects) - 14 Rules

Learn more on Rules to Better Scrum.
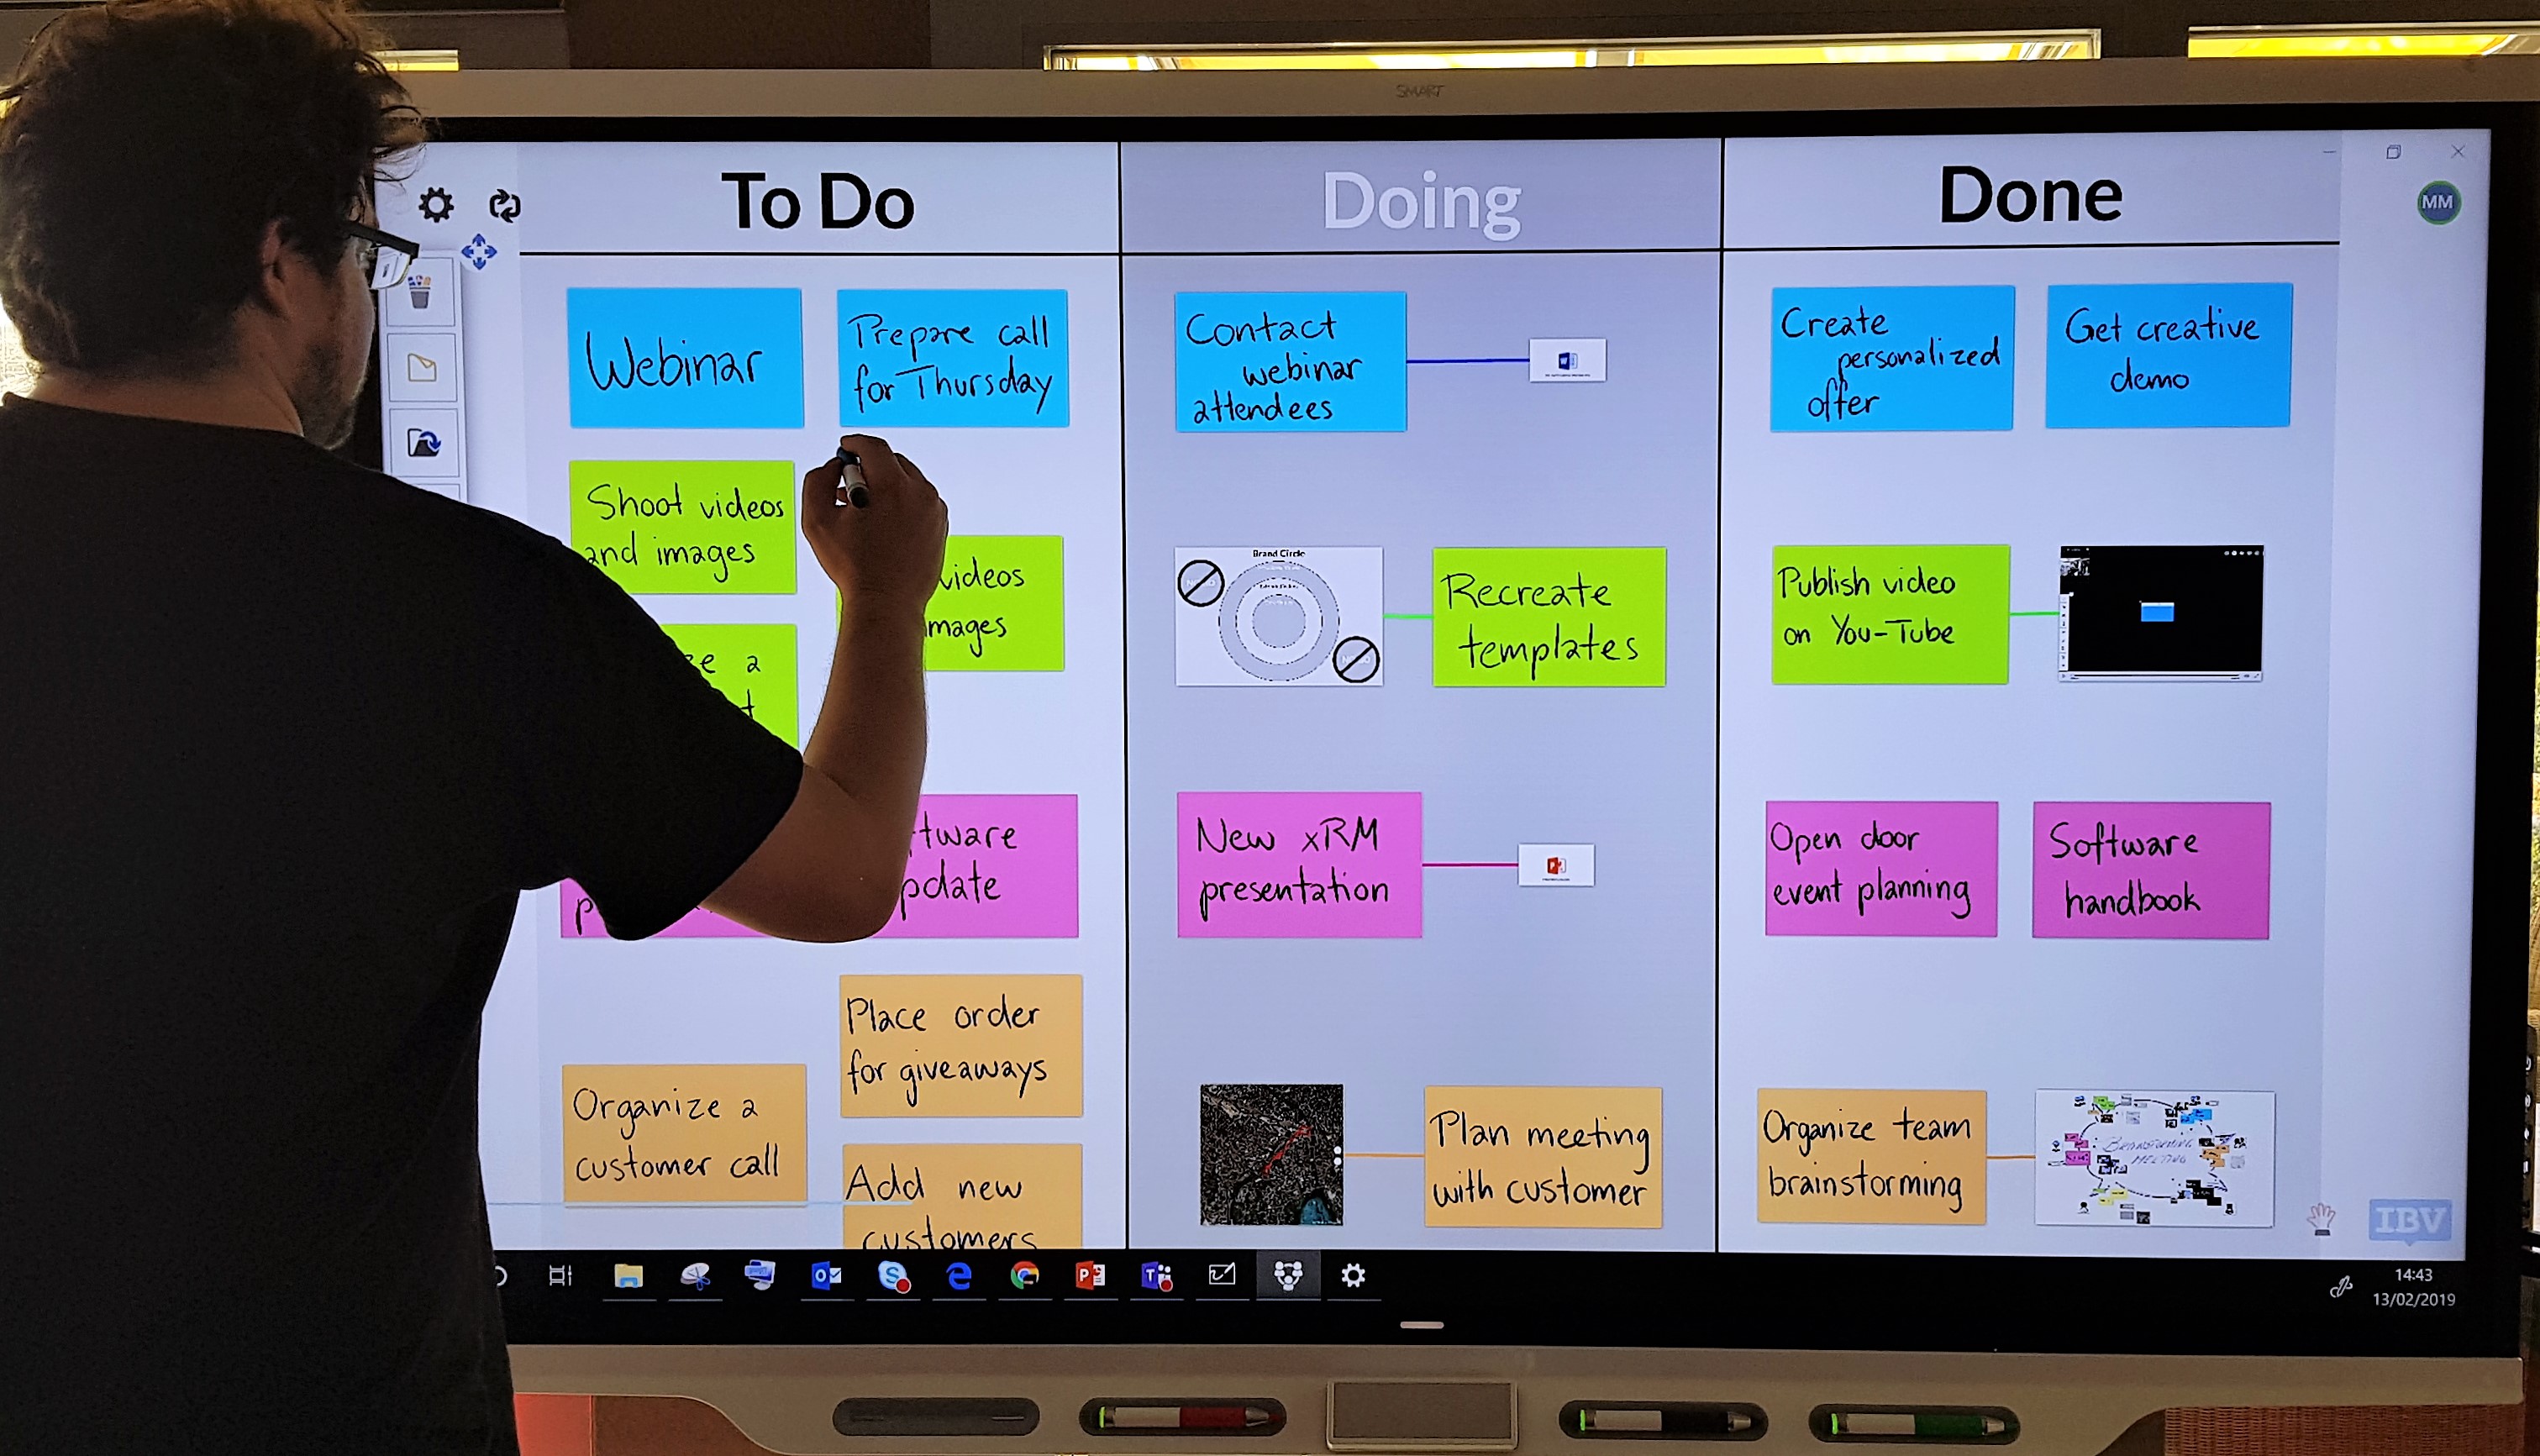
  1. GitHub Issues - Do you use Issue Templates?

    GitHub Issues offer a great way of raising Issues within projects. However, it can be difficult to distinguish whether the Issue is a bug, feature request or just a question. GitHub Issue Templates should be used to help standardize Issues and ensure they have enough information for a developer to start work.

    Let's take a look at how implementing Issue Templates can improve repository backlogs...

    bad example issue
    Figure: Bad Example - Issue created without a Template

    good example issue
    Figure: Good Example - Issue created from a Template

    list of options
    Figure: Good Example - All the available Issue Template

    For instructions on setting this up:

  2. GitHub Projects - Do you know how to do Scrum?

    GitHub is an awesome place to manage your code, but initially it wasn't the easiest place to manage Scrum. Things improved in 2021 with GitHub Projects.

    GitHub Projects lets you create Sprints and manage Issues (aka PBIs or Tasks) with far more power.

    Let's take a look at some of the great new things you can do...

    • Track Sprints
    • Track estimates
    • Add custom fields to Issues
    • Collate Issues from multiple repos
    • Set up automated workflows for your Issues in a project

    githubscrumworkflowimproved
    Figure: Good example - GitHub Projects gives you much more powerful project management ability

    That's a tonne of awesome features....but it requires a bit of set up, follow these steps to get up and running:

    1. Navigate to Projects | Projects (Beta) | New project

    newbetaproject
    Figure: Create a new GitHub Project

    1. Now we have a blank slate, we need to setup our Sprint (they call them Iterations). Navigate to + | + New field

    newfield
    Figure: Create a new field for your Sprint

    1. Select the Iteration field type

    selectiteration
    Figure: Turn this into an Sprint via the Iteration field type

    1. You will see a window with options for your new Iteration, name it Sprint and enter Start on and Duration.

    iterationoptions
    Figure: Pick the name and the dates via the Iteration field options

    1. Now add some Issues to the project and then you can assign them to the correct Sprint, by clicking the drop down in the Sprint field.

    Note: You can even add Issues from different Repos

    assignpbitodropdown
    Figure: Pick the Sprint you want for your Issues

    1. To add more Sprints, navigate to Settings | Sprint | Add iteration

    Note: You can also change Starts on and Duration here

    settingsnav
    Figure: To add a Sprint, Settings | Sprint | Add Iteration

    additerations
    Figure: To add new Sprints, select Settings | Add iteration

    1. To give yourself a better view of things, you might want to create a view that groups by Sprint. Name your current view Backlog then create a new view and name it Sprints
    2. To see the Sprints grouped, and the issues ordered by status, click the view drop down and select group:Sprint and sort:Status-asc

    groupandsort
    Figure: To create a list of Sprints add grouping and sorting

    1. Voila! You have Scrum all setup! For bonus points check out the workflow screen where you can automate parts of your issue workflow

    workflownav
    Figure: You can enable or disable predefined Workflows

    workflows
    Figure: There are a bunch of predefined workflows (Coming soon: the ability to create your own! )

  3. Backlog - Do you know how to create a Sprint Backlog?

    Prior to your meeting with the customer you should prepare. Get your Sprint Planning (was Release Plan) email ready, so after the meeting you can adjust and promptly send it.

    Learn how to create your Sprint backlog:

    Once the backlog is ready, you should send the Sprint Forecast email to the client.

  4. GitHub Issues – Do you customize your labels?

    Labels are an important way of categorizing your GitHub Issues. However, it is critical to make sure they are useful, clear and do not overwhelm users.

    The goal is to use consistent labels across all repos. 

    Let's take a look at how to make a simple, yet information rich set of labels...

    Firstly, set up some GitHub Issue Templates that have default labels. Prefix those ones with "Type:" so it is clear they define the type of Issue:

    • Type: Bug
    • Type: DevOps
    • Type: Documentation
    • Type: Feature
    • Type: Refactor

    Also add some extra labels for important ancillary information. Try not to go overboard though, a good example might be 3:

    Some labels to define the area of work:

    • Area: Frontend
    • Area: Backend

    And the standard GitHub label to indicate it is a good Issue for developers new to the project:

    • Good First Issue

    badlabels
    Figure: Bad Example - using Effort labels is not ideal for GitHub Issues

    Learn more about where Effort labels are appropriate with GitHub Projects, which has custom fields.

    extralabels
    Figure: Good Example - Add a few labels beyond the ones that are set based on the Issue Templates

  5. GitHub Repos - Do you write nice commit messages?

    Reading ugly commits is not very pleasant and makes it very confusing when you have to check the commit history.

    2020 09 17 17 19 04
    Bad Example: The commits have no meaning.

    Here are a few ways to improve your commit log.

    Tip #1: Have a nice, concise comment

    Examples:

    • Fixed bug with emoji engine
    • Added new emoji filter
    • Updated Architecture Diagram to have emojis

    Tip #2: Using prefixes

    Even better is to add a helpful prefix to categorize your commits.

    Examples:

    • Fix: Fixed bug with emoji engine
    • Feature: Added new emoji filter
    • Doc: Updated Architecture Diagram to have emojis

    Tip #3: Using emojis 💄

    In a text message, emojis helps to add emotion and context to plain text. Why not use them in commit messages too 😃?

    Examples:

    • 🐛 BUG - Fixed emoji engine in language component
    • 🚀 Feature - Added emoji filter on Snapchat
    • 📄 Doc - Added emoji’s to changelog

    There are a bunch more options to choose from - carloscuesta/gitmoji: An emoji guide for your commit messages. 😜 (github.com)

    Tip #4: Using gitmoji VSCode extension

    Gitmoji - Visual Studio Marketplace (visualstudio.com).

    You can even go 🤘 hardcore and use the gitmoji cli - carloscuesta/gitmoji-cli: A gitmoji interactive command line tool for using emojis on commits. 💻 (github.com)

    commits with emojis
    Good Example: Great use of emoji and concise message.

    See what emojis work best with each topic here: https://gitmoji.dev/

    emojis list
    Figure: Emojis list.

  6. GitHub Issues - Do you turn emails into Issues before starting work?

    If a Product Owner sends an email to the development team with a request, that email should be turned into a Github Issue before any work is started or the work is prioritized on the backlog.

    Power Automate has a connector to do this automatically when an email arrives in Outlook. It can create a new Github Issue by parsing the From, To, Subject and body of the email.

    However, at the moment there is a limitation that it doesn't read inline attachments in emails and therefore you have to create your issues manually in Github.

    email to github issue2
    Figure: Power Automate | Connectors | Github

    email to github issue1
    Figure: Configure Flow connectors to create a new Github Issue from Outlook

    🔥 Warning: This Flow connector does not suport inline images.

    email to github issue3
    Figure: Good Example - Github issue created from Outlook using Flow connectors

    email to github issue
    Figure: Bad Example - Github issue created using Flow - inline attachment shows up as junk characters

  7. Do you know how to handle Undone Work (aka V2 for PBIs)?

    The goal is always to complete Product Backlog Items (PBIs) for the Sprint Review.

    Often PBIs grow or change and it does not make sense to deliver what was originally proposed in the Acceptance Criteria.

    So think of a way to deliver business value and get it in production, then have a hallway conversation with the Product Owner to see if he agrees with you.

    Assuming approval, then adjust some of the Acceptance Criteria, add "v1" to the PBI name and move some of the functionality to a new PBI with the same title and "v2".

    e.g.

    • Customer and Contact Form v1
    • Customer and Contact Form v2

    Note: A common example for when to use this is when the full acceptance criteria of a large PBI (or Epic) would not be attainable within one Sprint, so splitting an Epic into 2 attainable PBIs is a better option.

    2021 07 30 14 58 22
    Figure: A v2 PBI in GitHub

    2021 07 30 14 59 25
    Figure: A v2 PBI in Azure DevOps

  8. Backlog - Does your Product Owner know how to maintain the backlog?

    All good Scrum teams have a backlog. The backlog is built by taking a conversation and recording it as one or more Product Backlog Items (PBIs) (e.g. Azure DevOps) or Issues (e.g. GitHub, JIRA).

    You should create PBIs during or straight after the conversation, rather than using emails that may never be entered into the backlog.

    Typing
    Figure: Get typing during a conversation to make the meeting tangible

    The Product Owner is responsible for owning the Product Backlog. See the video on "Do you know how to be a good Product Owner?"

    Although these requirements come from the Product Owner, it is often the developers who will record these PBIs.

    1. Emails

    EmailBadExample
    Figure: Bad example - This is a poor way to add a PBI/Issue as you can’t order emails by the business priority

    GitHubIssues
    Figure: Good example - Github Issues

    3. Azure DevOps - E.g. https://ssw.visualstudio.com

    AzureDevOpsBacklog 1710232021931
    Figure: Good example - Azure DevOps allows you to enter an item into the backlog, in any priority order

    What's next?

  9. GitHub Issues – Do you sync to Azure DevOps?

    If you store all your code in GitHub, why not create all your issues there too?

    You might be reluctant to move your backlog to GitHub from Azure DevOps as you don’t want to lose the metrics functionality.

    But you can easily sync all your GitHub Issues to Azure DevOps automatically to have the best of both worlds.

    Here's a quick guide in setting it up for your GitHub Repository and Azure DevOps.

    1. Install the Azure Boards App from the GitHub Marketplace
    2. Create the GitHub Action secrets
    3. ADO_PERSONAL_ACCESS_TOKEN (Azure DevOps | User settings | Security | Personal access tokens)
      The Azure Personal Access Token requires "read & write" permission for Work Items.
    4. GH_PERSONAL_ACCESS_TOKEN (GitHub | Personal settings | Developer settings | Personal access tokens)
      The GitHub Personal Access Token requires "repo" permissions.
    5. ADO_ORGANIZATION (https:// ssw .visualstudio.com/SSW.Rules)
      The Organization name is in your Azure DevOps URL.
    6. ADO_PROJECT (https://ssw.visualstudio.com/ SSW.Rules)
      The Project name can also be found in your Azure DevOps URL.
    7. Create the following GitHub Action

    E.g. SSW uses this template for their projects, you may need to change the new and closed states depending on your environment.

    name: Sync issue to Azure DevOps work item
    on:
      issues:
        types:
          [opened, edited, deleted, closed, reopened, labeled, unlabeled, assigned]
    
    jobs:
      alert:
        runs-on: ubuntu-latest
        steps:
          - uses: danhellem/github-actions-issue-to-work-item@master
            env:
              ado_token: "${{ secrets.ADO_PERSONAL_ACCESS_TOKEN }}"
              github_token: "${{ secrets.GH_PERSONAL_ACCESS_TOKEN }}"
              ado_organization: "${{ secrets.ADO_ORGANIZATION }}"
              ado_project: "${{ secrets.ADO_PROJECT }}"
              ado_wit: "Product Backlog Item"
              ado_new_state: "New"
              ado_close_state: "Done"
              ado_bypassrules: true

    Figure: Good Example - GitHub Action to Sync Issues to Azure DevOps

    GitHub Issues Syncing to AzDevOps
    Figure: Good Example - GitHub Issues Syncing to Azure DevOps

    Pros

    • Easily manage Sprints and calculate burndown and cycle time
    • See all your GitHub Issues and Azure DevOps PBIs in one Backlog
    • Automated tagging and hyperlinking between Issues and PBIs

    Cons

    • The sync is only one-way GitHub Issues -> Azure DevOps Backlog
    • It won’t sync existing GitHub Issues unless they are updated

    More information about this GitHub Action can be found here https://github.com/danhellem/github-actions-issue-to-work-item

    To avoid people adding a PBI to the Azure DevOps, add a PBI at the top of your backlog to indicate that they should add it to GitHub issues.

    GitHub PBI Backlog
    Figure: Add the PBI at the top of your backlog

    GitHub PBI Backlog Text
    Figure: Inform users where to add new PBIs

  10. Scrum – Do you know where to discuss the backlog?

    When discussing a PBI/Issue, Pull Request, or a project in general, it is important to do it in the right place.

    Kanban on Screen

    bad mention pbi 1710232021933
    Figure: Bad Example – don't use emails to discuss tasks

    For code

    Sometimes developers need to discuss code implementations - sometimes to improve the code, other times to explain why something was done a certain way.

    This should be done in the Pull Request, if possible comment directly on the line of the code change and once resolved, make sure that the important information is captured in the merge's commit description.

    comment on code in pull request
    Figure: You can add a comment on a specific line of code

    For a new PBI/Issue

    As perDo you know when you use @ mentions in a PBI? - Create a new issue mentioning the Product Owner and the related people

    Create Issue
    Figure: Good Example - When adding a GitHub issue, @ mention the Product Owner and other related people so they receive a notification e.g, an email

    For an existing PBI/Issue

    Discuss it in the existing PBI/Issue.

    existing issue discussion
    Figure: You can discuss an existing issue, even when it has been closed

    For other topics (brainstorm ideas, general discussion, etc.)

    You can:

    • Create a PBI/Issue

      • use a "discussion" label so that others know that it is just a discussion point and not actionable work yet
      • have it checked by the client before publishing it (recommended)
    • Discuss it in the discussion tab in GitHub

    Discussion Tab in GitHub
    Figure: You can create discussions on your project using the Discussion tab in your GitHub repository

    • In the team channel in Teams

    Team channel
    Figure: You can discuss your idea in Teams on the team channel

    In summary, Email should be the last resort.

  11. Do you escalate key updates and deliverables?

    Key updates on projects may include Done Videos, critical text additions, or specification documents. Typically, links to these deliverables would be added to the PBI that they relate to and the relevant people would be mentioned.

    critical update bad example
    Figure: Bad example - Automated notifications from project management tools can be easily missed or overlooked amidst other notifications

    critical update good example
    Figure: Good example - For visibility and to ensure all stakeholders are in the loop, you should also send an email to the relevant people

    Not every PBI will require an email, but if it is a key update or deliverable, it should be escalated. The developers would make this judgement call, although this could also be added upfront by the Product Owner in the Acceptance Criteria for the PBI. Here are the 3 scenarios:

    1. Standard PBI - needed but the outcome is not very interesting: Do the PBI, just following the DoD
    2. Interesting to someone - @ mention them
    3. Really important - Make sure it’s top of mind, email it

    For example, you can send an email similar to this to share a new Done Video to the relevant stakeholders. If you working on a big system or internal projects, include the feature area or project name in the subject for additional context.

    This email is especially important for stakeholders that don't use, want to use, or have access to the project management tools. If they do have access, remember to also @mention them in the PBI update.

    Sometimes the PBI work originated from an email, in which case you should reply to the email instead of starting a new email. This will allow stakeholders to have additional context.

    Notes:

    • Major bugs found on the product should also be communicated to the PO as soon as they are found, e.g. unable to create an invoice
    • You should be able to easily tell if a PBI was created from email. As per turn an email into a PBI before starting work
  12. Do you use tasklists in your PBIs?


    There are many ways to write tasks in PBIs, but the best way is to use tasklists. This allows you to see the progress of the PBI at a glance as well as avoid any unintentional tasks being tracked. Below is the different ways you could write tasks in PBIs.

    Video: GitHub Tips - Why YOU should use tasklists (4 min)

    Numbering tasks

    When sending tasks in email, you might number your tasks to make it clear what you want.

    numbering tasks
    Figure: Numbering tasks in PBIs works but isn't fully utilizing the platform

    Although this would work in PBIs, it's not the best way to do it in GitHub.

    Using checklists

    You can use checkboxes in PBIs to create a checklist for tasks

    task checklist
    Figure: You can click the tasks toolbar button or simple type in a task which is recognized as "- [ ]"

    This will show a visual que as to how many tasks you've completed for the PBI.

    task checklist view
    Figure: OK example - Using tasks we can easily see which are completed

    These tasks are numbered, but if we were to re-order them we'd need to re-number them so the list makes sense again. A better approach to numbering tasks would be to convert a task into it's own issue, this allows you to detail it out further or have more in-depth conversations around the issue specifically.

    task checklist view good
    Figure: Good example - Create issues from tasks to get an immutable reference

    One of the downsides to using checklists is that any checkbox in the issue description would show up as a task. This means that if you had a checkbox in the description that wasn't a task, it would show up as a task. This is why we recommend using tasklists.

    task checklist incorrect tasks
    Figure: When you have more checkboxes, e.g. for bug reports. Your task indicator will not be accurate

    Lastly you should use the tasklist for your tasks, this gives the same advantages as standard checklists without interference from other checkboxes.

    tasklists markdown
    Figure: Using tasklist requires a little extra markdown around your checkboxes

    Besides the benefits described above, there's also the advantage of having a UI component built specifically to markup a tasklist.

    tasklists ui
    Figure: Using tasklist requires a little extra markdown around your checkboxes

    You can see from the UI component there is a convenient button to add a task, easily see who is assigned to tasks; As well as a menu list of options to convert to issue, rename and remove tasks, all through the UI. This is great for team members who don't feel comfortable with markdown.

  13. Do you close PBIs, tasks and goals with context?

    PBIs, tasks, and goals are the backbone of work regardless of whether they are stored in Azure DevOps, GitHub, Jira, Trello, or some other platform. When you finish a task, marking it as done is satisfying, but remember to add a closing comment for future context. By adding a closing comment, it allows others to understand why the PBI was closed and what the outcome was. This comment is critical when closing a PBI as "Won't Fix" or "Duplicate" but is valuable in all scenarios and should be the default approach. For example, if you have UI changes, a couple of screenshots can go a long way to help the team understand what was done. Similarly, if there are changes to architecture documents or the readme, providing a link to those artifacts helps others get across the change.

    When you look at a PBI, you can navigate through the commits or pull requests that were linked to the PBI. This is great for understanding the code changes, but that doesn't easily show you what the outcome was.

    closing pbis without context
    Figure: Bad example - This PBI is closed with no context around changes made

    closing pbis with context
    Figure: Good example - This PBI informs the team that the work is complete and contains some examples of what the changes look like

    Screenshots are just one of the things that you could add for more context, some other things you could add are:

    • Done Videos
    • Mention if there is relevant documentation that was updated
    • Mention any additional context in the pull request that you didn't want to duplicate
    • If you'd had a conversation with someone to change the outcome of the PBI, mention "as per my conversation with..."
    • If you are closing a PBI as "Won't Fix" or "Duplicate", mention the PBI that you are closing it as a duplicate of or why you won't fix it

    Note: If you are using GitHub projects you will want to make sure you've checked the workflows for the your project to make sure the team understands the behavior of the work when it's state changes in the project.

    You can open the Hamburger menu | Workflows to view all the workflows

    project workflows
    Figure: For issues specifically it's recommended you have these workflows configured and enabled

  14. Do you avoid linking issues to PRs in GitHub?

    GitHub provides a way to link issues to PRs. This is useful to see what PRs are associated with what issues. However, when you make this link, the issue will close when the PR is merged.

    This is not a good idea because it can cause issues to be closed prematurely. This can lead to confusion and lost work.

    Issues should not be closed until all the tasks are complete and have a done comment as per Do you close PBIs with context?

    bad link issues prs
    Figure: Bad Example -

    Tip: Avoid using closing keywords e.g. "closes #123" or "fixes #123" in PR descriptions. This will automatically link the issue to the PR and close it on PR merge. Instead, use terms like "relates to #123" or "addresses #123" to link the issue to the PR without closing it.

    This was a feature GitHub added but it is not a good idea to use it, if you agree the behaviour should be changed, go upvote this discussion https://github.com/orgs/community/discussions/17308

We open source. Powered by GitHub