SSW Foursquare

Rules to Better SharePoint - 25 Rules

Organizations are extremely good at accumulating data. Mostly in the form of documents and records, this data is often haphazardly located across the organization, and poorly integrated into document processes.

SharePoint is the best organization tool to improve this situation by storing all documents & records in a centralized system. SharePoint stores every version of a document, allows you to enforce information management policies and improves efficiency by automating common business processes. Here you will find many rules for a better experience with SharePoint.

If you still need help, visit our SharePoint consulting page and book in a consultant.

Other SharePoint Rules:

  1. Rules to Better SharePoint Development
  2. Rules to Better SharePoint for End Users
  3. Rules to Better SharePoint Migration from 2007 to 2010
  4. Rules to Better SharePoint Migration from 2010 to 2013
  5. Rules to Better SharePoint Migration from 2013 to 2016
  6. Rules to Better SharePoint Migration from 2016 to Online
  7. Rules to Better SharePoint Virtualisation
  1. Do you know what are the SharePoint features customers love?

    SharePoint is a great platform for intranet, and the new version SharePoint 2019 and SharePoint Online is getting even better every day.

    • Powerful content discoverability via full-text search
    • Rich workflow capabilities (e.g. approval & distribution processes)
    • Document Accessibility (over the web and via Office programs)
    • Information Management Policies (e.g. Document retention policies)
    • Compliance suitability (e.g. Email archiving)
    • Great for storing both structured and unstructured content. (e.g. meeting workspaces, ad-hoc lists, project workspaces, company portal)
    • Highly customizable and extensible
  2. Do you know how to get the SharePoint version?

    You want to be on the latest version of SharePoint.

    There are multiple ways to get it:

    Check SharePoint DLL version

    Check http://<CentralAdminSite>/\_admin/FarmServers.aspx

    Check http://<AnySiteCollection>/\_vti\_pvt/service.cnf

    See Get SharePoint version number of your platform quickly for details.

    vti\_encoding:SR|utf8-nl 
    vti\_extenderversion:SR|16.0.0.4327  

    Figure: On SharePoint 2016, this is what you get for intranet.ssw.com.au for example

  3. Search - Do you fix search with Office App for content preview ? (on premise only)

    To make office documents with content preview available in search result, you need to setup an Office App server and link it to SharePoint:

    preview sharepoint

  4. Do you know how to create a link to a URL in SharePoint?

    TODO TIAGO: ADD IMAGE OF WINDOWS EXPLORER (4 files in it) AND ANOTHER WITH SHAREPOINT DOCUMENTS LIBRARY

    You may need a link in a SharePoint document to help you navigate to a different URL (like shortcut in Windows), there are different ways to implement this.

    A. Create a shortcut in windows, then upload the shortcut file (.url) to the document library.

    B. Use "Link to a document" content type in SharePoint.

    Details on how you to create a link to a document in a SharePoint library.

    A. Create a shortcut in windows, then upload the shortcut file (.url) to the document library.

    To do this, you need to remove .url file type from your blocked file types in your web application. This will bring some security risk, which is not recommended, and I won't show the step details here.

    B. Use "Link to a document" content type in SharePoint.

    1. Enable "Content Type management" in your document library. EnableContentTypeDocument Figure: Enable Content Type management in library setting
    2. Add "Link to a Document" content type into the library. AddExistContentType Figure: Add from existing site content type SelectLinkToADocumentType Figure: Select "Link to a Document" content type
    3. Create a "Link to a document" instance CreateLinkToADocumentInstance Figure: select "File | New Document (dropdown) | Link to a document" InputLinkUrlAndName Figure: Input "Name" and "URL"
    4. Done

    You should be able to see the link type document in your library: LinksTypeDocumentsWithShortcutIcon Figure: Link type documents with the lovely shortcut icon

  5. Do you give users the friendlier Access Request dialog?

    Instead of displaying a direct " Access Denied " warning info, you can allow end users to send an " Access Request ". PermissionRequest.jpg 
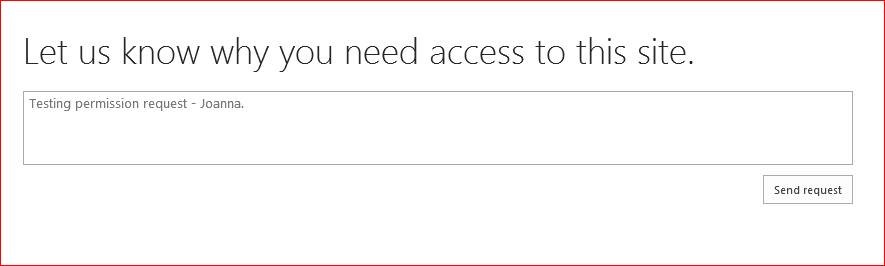
Figure: Joanna is requesting access to SharePoint site

    The "request manager" will receive an email:

    637cf8 RequestNotificationEmail
    RequestNotificationEmail.png
    Figure: Request Notification Email Sample The link in the email will navigate administrator to the Pending Requests list: LinkToPendingRequestsList Figure: Pending Requests List After reading the request infomation, the administrator can "Approve" or "Decline" the request, or he can start a conversation with the request user on the Pending Requests list directly to inquire more information: StartAConversatioinOnPendingList Figure: possible actions for requests (Approve, Decline or start a conversation with the request user)

    To setup permission request for a SharePoint site collection, go to " Site Settings (Gear Wheel icon) | Site Permissions ": SetupPermissionRequest Figure: Open "Access Request" setting

    Limition: This "Access Request" only works for authenticated users to inquire more access permission, that means if your site allows "anonymous access", then an anonymous user cannot send "access request" as he doesn't have an identify to be assigned more access permission.

  6. Do you clean useless calendars in SharePoint?

    Most SharePoint site templates contain a calendar list, this will bring lots of useless calendars.

    Use the below PowerShell script to clean them:

    $site = Get-SPSite("http://<site collection URL>/"); # Specify url here
    foreach ($web in $site.AllWebs) {    
        $lists = $web.Lists
        for ($i=($lists.Count-1);$i -gt 0; $i--) {  
            $list = $lists[$i]
            #Write-host $i  $list.Title $list.BaseTemplate.ToString()
            if ($list.BaseTemplate.ToString().ToLower().contains('events')) {      
                if ($list.Items.Count -eq 0)
                {
                    Write-Host $list.Items.Count "items in the list" $list.Title '('$list.BaseTemplate') at '$web.Url "- cleaning it!"
                    $list.Recycle()
                    #$list.Delete()
                }
            }
        }
    }

    This script will put the calendars which do not have any events into Site Settings | Recycle Bin:

    EmptyCalendarsInRecyckeBin
    Figure: Empty Calendars in Recycle Bin folder

  7. Do you confirm there is no checked out files?

    One of the annoying things with SharePoint document and page libraries is that users often accidentally leave checked out files, that prevents others from modifying them.

    Suggestion to Microsoft: send an email to the user to remind them they have outstanding checkouts potentially blocking other users.

    sp docs
    Figure: Here Greg Harris has not checked in a file

    There are 2 ways to remind users of their "checked out files":

    • Solution A: Use Powershell scripts (see PNP.github.io sample)
    • Solution B: Custom application report (Includes some low-code work) E.g. SSW.Dory

    Solution A. Powershell scripts

    1. Create a new PowerShell Script
    #Config Variables
    $SiteURL = "https://crescent.sharepoint.com/sites/marketing"
    $CSVFilePath = "C:\Temp\CheckedOutFiles.csv"
     
    #Connect to PnP Online
    Connect-PnPOnline -Url $SiteURL -Credentials (Get-Credential)
     
    #Get all document libraries
    $CheckedOutFiles = @()
    $DocumentLibraries = Get-PnPList | Where-Object {$_.BaseType -eq "DocumentLibrary" -and $_.Hidden -eq $False}
     
    #Iterate through document libraries
    ForEach ($List in $DocumentLibraries)
    {
        Write-host "Processing Library:"$List.Title -f Yellow
         
        #Get All Checked out Files of the library
        $FilesCheckedOut = Get-PnPListItem -List $List -PageSize 500 | Where {$_["CheckoutUser"] -ne $Null}
         
        #Collect data from each checked-out file
        ForEach ($File in $FilesCheckedOut) 
        {
            $CheckedOutFiles += [PSCustomObject][ordered]@{
                Library         = $List.Title
                FileName        = $File.FieldValues.FileLeafRef
                CheckedOutTo    = $File.FieldValues.CheckoutUser.LookupValue
                Location        = $File.FieldValues.FileRef
            }
        }
    }
    #Export Checked out Files data to CSV File
    $CheckedOutFiles
    $CheckedOutFiles | Export-Csv -Path $CSVFilePath -NoTypeInformation

    To run the script against your entire tenant, see PNP.github.io sample

    1. Run the PowerShell script
    2. Go chase after the users.

    Solution B. Custom application report (Includes some low-code work)

    Learn more: SSW.Dory

    To make reminding users easier, we have created a Power Automate flow called SSW.Dory that will find checked out files and send out a notification email to all the naughty people automatically every day.

    Figure: An example of the reminder email that all users receive

  8. Do you know how to delete orphaned users from the People Picker?

    The SharePoint "People Picker" is a great tool for quickly selecting users of your SharePoint site. It allows you to quickly select users from your organization by browsing Active Directory.

    PeoplePicker
    Figure: The People Picker

    Unfortunately, if you have added users directly to your site collection, and later deleted or disabled them from Active Directory, you will notice that these orphaned users will still appear in your People Picker. This will eventually clutter up your People Picker.

    PeoplePicker deleted
    Figure: A user in the People Picker that was deleted from Active Directory

    PeoplePicker searching
    Figure: Searching in Active Directory for the user shows the user is in fact deleted

    To remove these orphaned users, as a SharePoint Administrator, you can open the following URL (where <www.northwind.com> is your SharePoint URL):

    • http://www.northwind.com/\_catalogs/users/sample.aspx

    On this page you will find a list of all the users that are members of your site collection, including the orphaned users.

    PeoplePicker found
    Figure: We have found our orphaned user!

    To remove the user simply click on the Username | Click Delete User from Site Collection . This will instantly remove the user from the People Picker.

  9. Do you use content query web part?

    Try to use content query web part to show data instead of jQuery as it's better for Google indexing.

    For those out of date data, you can use an archive page and change the filtering of CQWP to return all of them, so that the old data are still there and the ranking of the page won't be influenced.

    For more SharePoint SEO, check from this article.

    contentquerywebpart
    Figure: Use content query web part

  10. Do you keep SharePoint databases in a separate SQL instance?

    Because SharePoint server will create quite a few databases, it’s easier to manage them in a separate SQL instance rather than mixing it with other system’s databases:

    sharepoint database bad
    Bad example - mixed with other systems' database

    sharepoint database good
    Good example - SharePoint related databases are in a separate SQL instance from other systems' databases

  11. Do you know how to share a file/folder in SharePoint?

    You often need to share links to a file or folder in SharePoint.

    You can select the folder (or file) and click on "Copy link" at the top bar to get the link:

    sharepoint cloud copy folder
    Figure: Getting URL from SharePoint top bar

    You can also right-click the folder/file to copy the link:

    sharepoint right click link
    Figure: Getting URL by right-clicking a file in SharePoint

    On previous versions, you can open the menu on ellipsis link and get it from there:

    sharepoint link
    Figure: Getting URL from SharePoint ellipsis menu

  12. Do you know how to use SharePoint Recycle Bin?

    You might need to recover a delete file in SharePoint. You will find it at the Recycle bin. This is where you can find it:

    sp recycle bin
    Figure: To find deleted files go to "Site Contents" > "Recycle Bin"

  13. Do you know the ideal place to store employee skills?

    Here are the options we have:

    For cloud users:

    • LinkedIn skills [sync] office365 list. (Preferred)
    • Office 365 users profile | skills. (Limited)
    • Azure AD [sync] office365 list

    For on-premises users:

    • User profile [sync] list. (Old)
  14. Do you setup web application for internal and external access

    • default zone should be over http, this is so search can access it over non-secure connection
    • default zone should not be accessible outside of internal network
    • extend the web application to an internet zone, this should be https to provide secure connection
    • this section should be extended with strategy to work with reverse proxy.

    Reverse proxy handle https connection to client, and connects to SharePoint via http to reduce https overhead on SharePoint

    SharePoint also needs to support https for internal traffic, if I click on a link to HTTPS it should work internally

    For this scenario to work, web application needs to be extended 2 to 3 different zone

    Default  (http for internal and search)

    Internet  (http for reverse proxy)

    Intranet  (https for internal https link)

  15. Search - Do you add https by extending web application

    It is recommended to bind https by extending web applications in central admin site, rather than configuring in IIS

    configurationInIIS

    Bad example: Add https binding in IIS

    extendwebapplication

    Good example: Extend web application and assign https to the Internet zone

  16. Search - Do you use default zone URL in search content source?

    Using default zone URL in search content source, it will be automatically convert to the relative URL on the search result (e.g. if a user access search "keyword" via http://projects.ssw.com.au/search, the result will be like http://projects.ssw.com.au/search/keyword).

    While another user access search center via https://projects.ssw.com.au/search, the result will be https://projects.ssw.com.au/search/keyword.

    https data source
    Bad example: use https

    http data source
    Good example: use http

  17. SharePoint Online - Do you get rid of classic features?

    Get rid of classic features in SharePoint Online.

    Microfeed

    Microfeed list is used to support the MicroFeed Classic web part. If you’re using Modern SharePoint Sites and Pages (and you should !) everywhere, you don’t need that list anymore.

    To delete the Microfeed List, simply de-activate the Site Feed feature at the Web level:

    microfeed sharepoint
    site feed sharepoint site feed sharepoint

    Company Announcements

    "Announcements" is a default List that used to be created with classic Team Sites. If you’re not using it, chances are you will never do, and modern News should be your replacement for it.

    company announcements sharepoint

    To remove company News, click “Settings” | “Remove” from Site Contents:

    site feed sharepoint2

    Drop Off Library

    Drop Off Libraries (Content Organizer feature) were a way to automate moving documents around based on Metadata. This is no longer the optimal solution and you should use Power Automate instead. To remove Drop Off Library from your site, you need to disable the “Content Organizer” Web level feature:

    content organizer sharepoint

    Deleting leftovers from Migrations

    After migrating content from older versions of SharePoint, you may end up in a hybrid state where the abovementioned features are disabled, but associated libraries/lists are still present on your site. If that happens, you ideally want to clean it up.The first thing you can try is enabling/disabling the feature again. In some cases, that will fix the issue and remove the unwanted list/library.If that doesn’t work, however, there is a more radical approach: removing the list/library using Powershell:

    jean migration 1

    (In case you prefer using code straight away instead of the screenshot)

    Remove-PnPList -Identity "Workflow Tasks" -Force

    However, on system Lists, you may get an error:

    jean migration 2

    The workaround is to set the “AllowDeletion” flag to true before calling delete:

    jean migration 3

    (In case you prefer using code straight away instead of the screenshot)

    $list = Get-PnPList -Identity "Workflow Tasks"
    $list.AllowDeletion = $true
    $list.Update()
    Remove-PnPList -Identity "Workflow Tasks" -Force
  18. SharePoint Online - Do you review your intranet for classic pages?

    You should review all your Intranet content and for all classic features (pages, web parts, etc…), and decide if you want to keep  or migrate them.

    More info: Getting started with the SharePoint modernization scanner.

  19. Do you know how to search employee skills? (Extending AD vs SharePoint vs Dynamics 365 CRM)

    AD has all your users e.g. Bob, Mary, Jane...

    SharePoint also has all your users, plus you can extend this information using the UserProfile Service.

    The beauty of this is that if everyone has updated their skills, it is wonderfully searchable.

    extending ad 1
    Figure: SharePoint People Search – Notice the Skills coming from UserProfile Service (aka UPS)

    mockup extending ad 3
    Figure: Mockup - Improved SharePoint People Search Results

    SharePoint has an Admin UI to manage User Profiles.

    extending ad 2
    Figure: User Profile UI in your SharePoint Admin Centre – generally this is not needed the Delve out of the box experience works for your organisation

    Delve is a cool product with a nice UI that is essentially a portal onto the User Profiles.

    extending ad 3
    Figure: Delve profile – Click on “Update Profile” to write data back to SharePoint User Profile Service

    Where it all falls down...

    What if your people’s skills are stored in another system such as Dynamics 365 CRM or Salesforce?

    extending ad 4
    Figure: People’s skills are often stored in Dynamics 365 CRM or Salesforce

    You can use PowerShell and SharePoint PNP libraries to programmatically interact with the SharePoint UserProfile service. This process allows you to sync skills across systems with a custom solution:

    extending ad 5
    Figure: Powershell - Reading skills from UserProfile

    extending ad 6
    Figure: Powershell - Adding “Blazor” to Jean’s skill list

    OpenSearch is another solution, using the OpenSearch protocol you can add external data sources to your SharePoint search results.

    Suggestions to Microsoft:

    #1 Help me better sync my Dynamics 365 CRM data with the SharePoint user profile service

    This should be a simple SharePoint connector so this piece of PowerShell glue is not required 👌
    E.g. CRM user skills to User Profile properties

    #2 Help me make Dynamics 365 CRM data searchable from SharePoint search

    If not using a connector, we should be able to easily index and search through Dynamics 365 CRM data. This is essentially just calling a different API.

    #3 Help me customise SharePoint search results

    If you don’t want either of those options (i.e. you users’ skills are stored somewhere else), we should be able to change the search results UI.
    E.g. Search for people here: https://ssw.com.au/people

    sharepointuxforpeopleandbookedindays
    Figure: The SharePoint Search should let you add links like in this image

    #4 Help me search for user entities in Dynamics 365 CRM

    There should be a global user search that goes across all entities in Dynamics 365 CRM.

    extending ad 7
    Figure: Searching User + Skill doesn’t yield any result although this skill is associated to the user

  20. Do you remove orphaned users from SharePoint?

    Did you know that when you delete or disable a user in Active Directory or Azure Active Directory the user is still stored in SharePoint. Did you also know that SharePoint retains any permissions that the user did have in SharePoint at the time? This means that if the user returns and their account is re-enabled they will have all of the same permissions that they had before. Luckily for us ShareGate offer us an easy way to remove these 'orphaned users'.

    1. Open ShareGate Desktop
    2. Click All reports | Orphaned user report
      step2 orphaneduser
      Figure: Orphaned user report
    3. Add your connection
      step3 orphaneduser
      Figure: Add connection
    4. Add your site address, Choose your Authentication method and press Connect
      step4 orphaneduser
      Figure: Connect to your environment
    5. Choose Navigate to choose individual sites or tick the box to choose all sites and teams folders
      step5 orphaneduser
      Figure: Choose navigate or tick
    6. Under Navigate choose the individual site | Click Next
      step6 orphaneduser
      Figure: Choose site
    7. Click Run now
      step7 orphaneduser
      Figure: Choose Run now
    8. Select Users | Select Clean orphaned users
      step8 orphaneduser
      Figure: Clean orphaned users
    9. Click Continue
      step9 orphaneduser
      Figure: Continue
    10. View results of report
      step10 orphaneduser
      Figure: Report Results
  21. Do you use a flat hierarchy in SharePoint?

    In the days of classic SharePoint, subsites were a popular way of organising your intranet. Modern SharePoint architecture leans toward a flatter hierarchy, where sub-sites are generally not recommended.

    Bad: Old SharePoint architecture

    Good: A flat hierarchy with Hub sites allows great flexibility (animated gif)

    There are several reasons why sub-sites are no longer recommended. Callum Crowley talks about some of the important benefits of a flat hierarchy including:

    Flexibility – Sub-sites are a pain to move - you'll never need to do this with a flat hierarchy. Using Hub sites, it’s easy to change links and use dynamic content to make sure your SharePoint architecture matches your organisational structure.

    Microsoft Teams & 365 Groups – Every Microsoft Team you create has its own SharePoint site, and SharePoint integrates with Microsoft 365 groups. So with a flat hierarchy, users and admins have a consistent experience across apps and Document Libraries.

    It is worth noting that this flexibility comes at a cost - permissions can be more difficult to manage, as each site will need permissions set separately, and you cannot use nested groups.


    Introduction to SharePoint information architecture - SharePoint in Microsoft 365 | Microsoft Docs

  22. Do you style your SharePoint link with icons?

    Out of the box, SharePoint provides widgets (aka webparts) to style your link with a consistent look and feel. Standard left-navigation also supports emojis 💖.

    If that's not enough and you want to customize your own links somewhere else on screen, use CSS to match the extension at the end of the <a> tag. Don't forget to add some padding to give it some space before the text (where the icon will be).

    Option A: Standard left navigation + emojis 🔥

    If you want to style your navigation, using emojis is the simplest way to achieve consistency.

    standard left nav
    Figure: Consistent look using emojis in the standard left-navigation

    ✅ UI - Consistent icons
    ✅ No-code solution (configuration only)
    ✅ Fast to load (no extra CSS to load)
    ✅ Free $ (Out of the box)
    ✅ Can be used in any size
    ❌ Somewhat limited choice

    Using webparts is the best way to achieve a consistent look and feel. Webparts can be customized by admin users, and require no maintenance as far as styling is concerned. SharePoint uses Office UI Fabric icons under the hood.

    navigation with webpart
    Figure: Consistent look using out of the box "Quicklinks" webpart

    ✅ UI - Consistent emojis
    ✅ No-code solution (configuration only)
    ✅ Fast to load (no extra CSS to load)
    ✅ Free $ (Out of the box)
    ✅ Can be used in any size
    ✅ Large choice of icons

  23. Do you have consistent SharePoint Sites?

    It's important for all your SharePoint Sites to be as consistent as possible. This helps users' navigation through new pages as they know exactly where to look.

    Following these simple rules makes this really easy:

    1. Put your preferred navigation in the same place (usually on the left-hand side)
    2. Keep the headings consistent
    3. Use icons for each type of link, so users easily know what to expect when clicking on a link (E.g. A Microsoft Word document is going to open a Word document) Aldo, a link to "Home" looks the same on every page.

    inconsistent1
    Figure: Bad example - The page on the left has totally different navigation to the page on the right

    consistent
    Figure: Good example - Both pages looking consistent - common navigation elements in the same spot

    Headings and icons consistency within a page

    inconsistent2
    Figure: Bad example - There are no icons to help users on the left navigation + the headings are the different

    navigation with webpart 1710232021932
    Figure: Good example - Icons help users to know what files each link open on the left navigation + the headings are the same

  24. Do you use SharePoint's News feature?

    Sharing the news is an effective way to update the team about important developments, announcements, and articles. SharePoint's News feature provides a streamlined platform for disseminating information and engaging your team members, now enhanced with the capability to send news directly to email.

    Figure: Sharepoint News - Streamlined and easily accessable

    Getting Started

    1. Navigate to SharePoint and locate the "My News" section on the left side of the page.
    2. If you're using the News feature for the first time:
    3. Select "Create news post" to create a new post from scratch or select from a template.
    4. Alternatively, you can select a news post from the previous month and click the "+ New" button, followed by "Copy of this News Post" to duplicate the content.

    Creating the News

    1. Once you're in the News post editor, update the date to reflect the current or intended publication date.
    2. Enter your news content in the provided text editor. Be clear, concise, and engaging in your writing, keeping in mind the target audience for the news post.
    3. You can use formatting options such as headings, bullet points, bold or italic text to enhance the readability and visual appeal of your news post.
    4. Consider including relevant images, videos, or attachments to provide additional context or resources, if necessary.
    5. Proofread your news post for any spelling or grammatical errors before publishing.
    6. Imform the company that the news is ready by clicking the "Send To" button located on the news site.
    7. New Feature: After creating your post, use the option to send it directly to email. This can be done by selecting a new option to distribute the news post as an email, ensuring wider reach and accessibility.

    Maintaining consistent site naming

    1. Once you have saved the news post, click the settings icon in the top right corner of the SharePoint page.
    2. From the dropdown menu, select "Site Contents" and then click on "Site Pages" to access the page listing.
    3. Locate your news post file within the list and select it.
    4. Click on the "Rename" option to change the file name.
    5. Follow a consistent naming convention, such as using the format "The-SSW-Times-YYYY-MM" (e.g., The-SSW-Times-2023-05).
    6. Ensure that the file name reflects the content of the news post and includes relevant identifiers, such as the title or date.

    Benefits of using SharePoint's News feature, now with email integration

    • Enhanced visibility and discoverability: Provides a central platform for news, now accessible both on SharePoint and directly via email.
    • Structured and organized content: News posts are well-formatted, with the added benefit of being optimized for email viewing.
    • Engagement and collaboration: SharePoint's News feature encourages interaction and collaboration among team members. Readers can leave comments, ask questions, or provide feedback directly on the news post, fostering a sense of community and promoting active engagement.
    • Version control and archiving: With SharePoint, you can easily maintain a version history of your news posts. This allows you to track changes, revert to previous versions if needed, and keep a comprehensive record of past announcements or updates.
    • Analytics and insights: SharePoint provides analytics and usage data, allowing you to track the reach and engagement of your news posts. You can Gain insights from both SharePoint and email interactions, understanding the full scope of your news post's impact.

    2023 06 05 13 40 03

    Figure: Good Example - Share the latest announcement and updates using a digital method, such as SharePoint

  25. SharePoint - Do you review usage?

    Usage analytics is quite important - it allows you to identify popular and unused pages or sites, but also helps measuring users' engagement.

    There are 3 places to check for Usage reports in SharePoint:

    1. Page Usage

    sharepoint page usage
    Figure: Access page usage from any page by clicking "Analytics"

    1. Site Usage

    Site owners can access global site usage reports:

    sharepoint site usage
    Figure: Access site level usage via "Settings" | "Site Usage"

    1. Tenant Usage

    This is by far the most interesting and import report. You need special (tenant-level) permissions to access those usage reports

    sharepoint tenant usage
    Figure: Access tenant level usage via "Office 365 Admin Center" | "Reports" | "Usage" | "View More" (under SharePoint section)


    Now enjoy the full power of SharePoint usage analytics !

    sharepoint tenant usage home
    Figure: Plenty of very useful reports in this dashboard

    You will need SysAdmin help to get access to those reports.

We open source. Powered by GitHub