Rules to Better Specification Reviews - 23 Rules
Spec Reviews are the first step to engaging properly with a client and need to be executed well. The following rules will ensure you know how, and how much, to spec out upfront.
Many teams start their implementation before dedicating time to understanding the primary purpose and functionality of the software. In some agile-leaning environments, the often simplistic user story is considered essential, contrasting with the detailing of all software functionality, which is viewed as "too waterfall." Garnering multiple perspectives from different stakeholders (both business and technical) during Spec Reviews is crucial for accurately capturing the intended function and behavior of the software.
Despite meticulous reviews, some aspects remain overlooked. The unknown 'unknowns' inevitably come to light as the work advances, making the estimation of knowledge work like software development (along with its testing phase) challenging. Risk emerges from the overlooked or unanticipated factors, even after thorough consideration. It's crucial to acknowledge that new insights will continually arise as we navigate through the development and testing phases—irrespective of the upfront thoroughness.
Tools like journey maps are a useful input into both development and testing, providing fertile ground for coming up with test ideas and identifying areas of risk to influence test coverage.
Having senior testers involved in this step can be valuable as they bring different skills and perspectives to the review, especially as they’re generally one of the few people in the team with a focus on what might go wrong (via a critical thinking mindset), rather than focusing on success (typical of the builder’s mindset).

You would never build a house without getting an architect to create a plan first. Usually, a specification process is done with the client before beginning work on a project.
As expected, it's not realistic to fully understand the complexity of a client's system, and give an accurate estimate after one brief meeting. For most business solutions, a few days are needed to obtain and document the requirements of the project’s stakeholders and, in turn, transform those ideas into a more detailed roadmap.

Figure: You would never build a house without an architect Deliverables
The deliverables for the Specification Review depend upon how large the application is and the time spent on the review. On completion of the Spec Review, the client will receive the following:
Requirement analysis
- An architectural roadmap recommending technical solutions
- A breakdown of the required software application into its core components, likely to include the approximate number of main features (e.g. forms, reports, etc.)
- An integration plan
- A deployment strategy
- An MVP (Minimum Viable Product) will be identified, as well as a wish list - requiring the client to set the priorities for the project by defining what is in and out of scope for the MVP
- A detailed list of 'issues' associated with the existing system which impact future development and maintenance
- Hardware and licensed software recommendations
- Mock-ups if required
Product Backlog
- A list of Product Backlog Items (PBIs) will be broken down based on the requirements analysis and the architectural design
- These PBIs will then be estimated
Ballpark $ estimates
- The estimated number of Sprints
- The estimated number of developers
- The estimated cost of the project
These deliverables can be presented as either:
- A high-level PowerPoint presentation
- A Word document
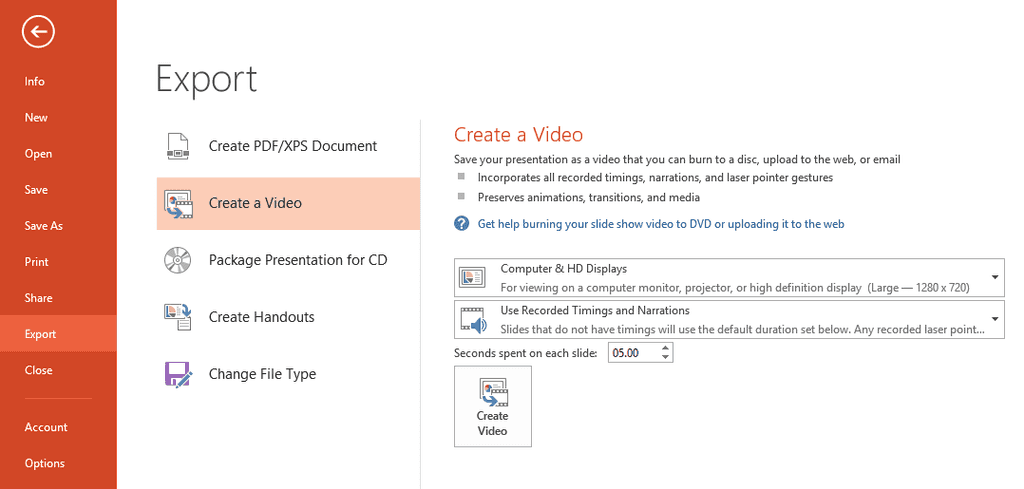
- A video presentation
From wireframes to the final product
During the Spec Review process, we create wireframes to give the client a preview of the functionality and look of their proposed solution.
These wireframes are utilized in key stages of the development process:
- The developers talk to the client to gain a deeper understanding of their needs
- The developers design the wireframes for the client to envisage and sign off
- These wireframes are the direct reference developers use to work from
- The developers send the product back to the client to test
- The developers showcase the final product with a Done Video
Let's take a look at a real-world example.
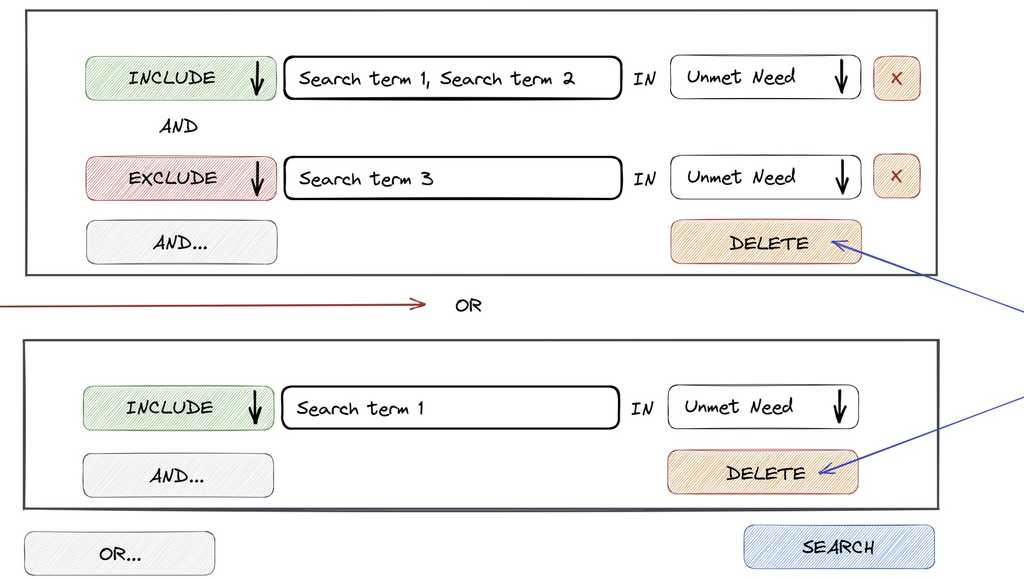
Figure: The initial wireframe from the Spec Review These wireframes were created during the Spec Review and provided insight into the functionality of the client's new search engine to both the client and the developer.
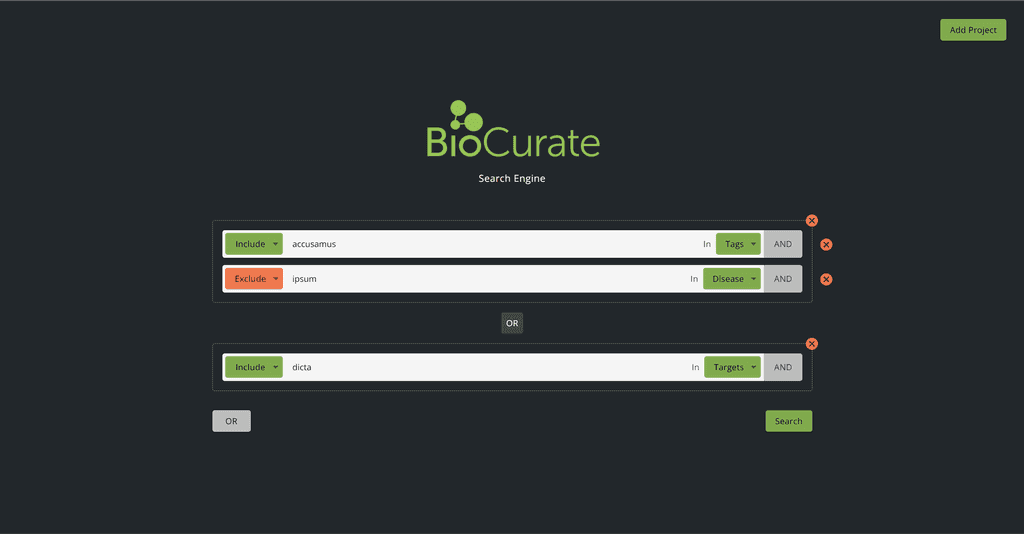
Figure: The final product based on these wireframes As you can see, the wireframes allow you to gain a 'glimpse into the future' and give the clearest possible depiction of the end product.
A client will often ask for a proposal or ballpark for the project. It is very difficult to give them the price for a large project without first conducting a Specification Review.
The Spec Review is a process that will demonstrate to the client whether you have the commercial sense to understand their business and have the technical and management capacity to complete the project.
It is paid work conducted after the initial meeting to determine the overall scope, feasibility, and ballpark costs of the project (i.e. $50k or $500k).
E.g. Mr. Northwind learns that the idea he presented at the initial meeting will cost approximately $80K and he has to determine if that is feasible to his business or if he will trim the functionality to better manage the cost.

Figure: A ballpark or proposal should start small and not be a big commitment "From this initial meeting, the ballpark is 6 months and $200k+GST"
Bad example - Big scary figure
"From this initial meeting, we will first need to conduct a Specification Review. This first step is $8k - a 2-day Specification Review"
Good example - Work in small chunks of work with details about what you will do
Spec Review length
The Specification Review is conducted by two experienced developers at the client premises in close consultation with the client. The time allocated for a Spec Review is generally 1 - 5 days depending on initial expectations of the project. The rule of thumb is 1 - 2 days of Spec Review per estimated month of project time.
The purpose is to understand the whole project but, if the project is greater than six months, focus primarily on the first six months.
Talk about business requirements
- Conduct workshops: Conduct workshops with different groups of users (e.g. management, back office, customer service) to build the "Product Backlog" which the business wants. This ensures that all users get their say. Some "nice-to-haves" might actually be quite easy to implement. Product Backlog Items can then be prioritized and fleshed out.
- Review documentation: Reviewing any documentation the client may already have. Remember clients are mostly looking to software consultants to assist them in solving business problems.
- Keep technology discussions short: Unless they have a specific business purpose, detailed discussions about technology with the client are unlikely to be useful. For example, most clients won't be interested in a discussion about whether to use .NET or Angular at this stage.
- Identify an MVP: Most client can't afford everything they want, so make sure you're keeping track of the minimum we can do to deliver value.
Do something valuable
Most software consulting experts will be able to provide a small improvement to the current system 'on the fly' during the Spec Review. This may be something as simple as adding an index to a table and thereby increasing the performance of a web page.
Use 'Corridor Conversations'
Corridor Conversations are a great way to set the clients expectations so you don't suprise them with a big number at the end of the Spec Review.See Do you have Corridor Conversations?
Estimates expressed in round numbers (or exact numbers for fixed price)
Remember, no politician challenging for leadership ever calls a vote before he or she knows the numbers; you too will avoid presenting a solution at a meeting if you aren't convinced the client is already agreeable.
Through the course of the Spec Review, the client will be aware that each month for senior software consultants is generally tens of thousands of dollars. Squabbling over $500 here or there in the ballpark phase is a level of detail neither side can be confident of. Clients need to be realistic about what they get for their money.
"Now that we've spent a few days speccing this out, we believe the solution will take approximately 6 months which is $204,000+GST."
Bad example - Far too firm a price when you don't know any of the detail
"Now that we've spent a few days speccing this out, our projection is the project will take a minimum of 6 months (around $200,000+GST) to complete but this may change depending on what is finally agreed in the Specification. The price will vary depending on resources used and the time that elapses over testing."
Good example - Leaves some wriggle room at these initial phases
Read When do you use approximate values for project costs?
Technology options
At this stage, you want to consider the most relevant technologies. For example, SSW will likely pursue recent Microsoft technologies. Some clients might want to do their own research or need some time to think about their options before agreeing to newer technologies.
Proposal
You should follow Rules to Better Proposals when documenting a Specification Review.
Test Please
The consultant must run a Test Please by another developer and your Account Manager before anything is formally presented to the client.
The main things the Account Manager will be looking for will be:
- Have you already had corridor conversations with the client so they're already expecting the ballpark estimate?
- Are the estimates realistic and still incorporating any relevant buffers? e.g. Project Management, bug fixing, etc.
Tip: Record a video of your PowerPoint presentation. Ideally a 5-minute summary is very handy for people that did not attend the meeting to decide if they should go ahead. Also if new developers join the project later on, this video is a nice handover.
You can record your presentation using Recording Studio in PowerPoint or Camtasia's PowerPoint Add-In Toolbar.
Example Schedule for a 1-day Specification Review
You want to have all the required work for a Spec Review done within the allocated time, so it’s important you leave time to implement the required changes after you present and before you email the final version.
- 9 am: Meet with the client and discuss requirements
- 11 am: Start work on the backlog and the PowerPoint (.PPTX) or Word Doc (.DOCX)
- 3 pm: Present to the client and gather feedback for changes
- 5 pm: Implement changes
- 6 pm: Send “As per our conversation” with Word or PowerPoint attachment
In a 2 or 3-day Spec Review, you should assume you’ll need more time to implement changes, so move the presentation time earlier to 2 pm.
Timesheets
Always track timesheets against a separate Spec Review project.
It makes project cost reporting difficult later if you don't, since the cost we're looking for is always the "post-Spec Review cost" that clients can compare to the estimate you gave in your Spec Review.
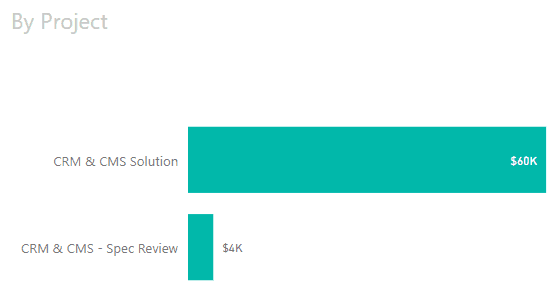
Figure: You wouldn't want these numbers combined, as it may look like a budget overrun The hallway is your friend. It's a place where you can gather a lot of information informally.
Formal meetings can have a "Us vs Them" feel - While the information collected and the conclusions of the Spec Review are presented formally at the end of the Review, it is important that the consultants convey key points to the client as they emerge through the course of the Review. The formal presentation is not the time to be presenting new information to the client.

Figure: Use corridor conversations to prevent nasty surprises Addressing key potential sticking points of budget and technology informally during the course of the Spec Review relieves the potential for unwelcome surprises during the Spec Review presentation. Canvassing the issues beforehand in casual 'corridor conversations' clears the decks for an agreement, rather than increasing the risk of heated discussions if you surprise a client at a formal meeting.
Some other topics that should have corridor conversations are:
- Estimated Cost and Time
- Key Technologies
- Key Infrastructure
For example, ask the client "...building the cube will add around 2 months of development time, shall we leave this out of the current scope, or do you want it in?"
Ensure that any discoveries or decisions are properly documented.
The most important part of being in a Spec Review is adding value to the conversations. Your insights and feedback should contribute to improving the specifications, identifying potential issues, and suggesting enhancements. By actively engaging and sharing your expertise, you help ensure that the final product meets high standards of quality and functionality.
How do you make sure that your presence is adding value to the discussion and the product?
Tip #1: Know when to speak up
Knowing when to speak up can be one of the most difficult tasks for some people. Often when talking in a group, finding a spot to add in a point is difficult. When you have a question or something of value to add, try using the phrase, "Before we move on..." or use the Teams hand 👋 feature. If you don't speak up, important information might be missed or features may be left unrefined.
Tip #2: Think of other developers
Sometimes you might not have all the expertise to architect a clients' solution. If you need outside expertise, remember that you can ask quick questions to other developers. You can let the client know that this isn't your specialty and that you'll ask a specialist and get back to them shortly.
Tip #3: Don't be afraid to double check a requirement
Make sure you understand what they want, do not be afraid to repeat and double check a requirement. It's better for you to understand it now then to go back and ask them again later.
Tip #4: Recommend ready-made solutions
Talk about already made solutions. There are often already made solutions to these very same problems. Be sure to Google beforehand. Present the Pros and Cons of these against a bespoke solution. Sometimes the ready-made solution solves their problem without any further work required.
Tip #5: Refine the problematic requirements
Talk about the most problematic parts. These are the areas that should have the most details, so make sure everybody is fully aligned about what is required.
Tip #6: Ask great questions
Questions are the key in understanding client needs. Asking a few simple questions goes a long way. Some examples:
- What is the goal of the product?
- Where will the product be hosted?
- Are there any performance requirements?
- Are there any reliability requirements? E.g. Has to respond in x seconds
- What are the security requirements?
Even the most seasoned analysts might occasionally overlook certain details in a Specification Review. Leveraging technology, especially AI, not only augments our capabilities but also acts as a safety net for those unintentional oversights.
The role of AI in enhancing reviews
- Tool, Not Replacement: AI greatly aids in generating Specification Reviews. Yet, the expertise and discernment of a human are irreplaceable. AI provides a foundational understanding, but professionals provide the nuanced depth.
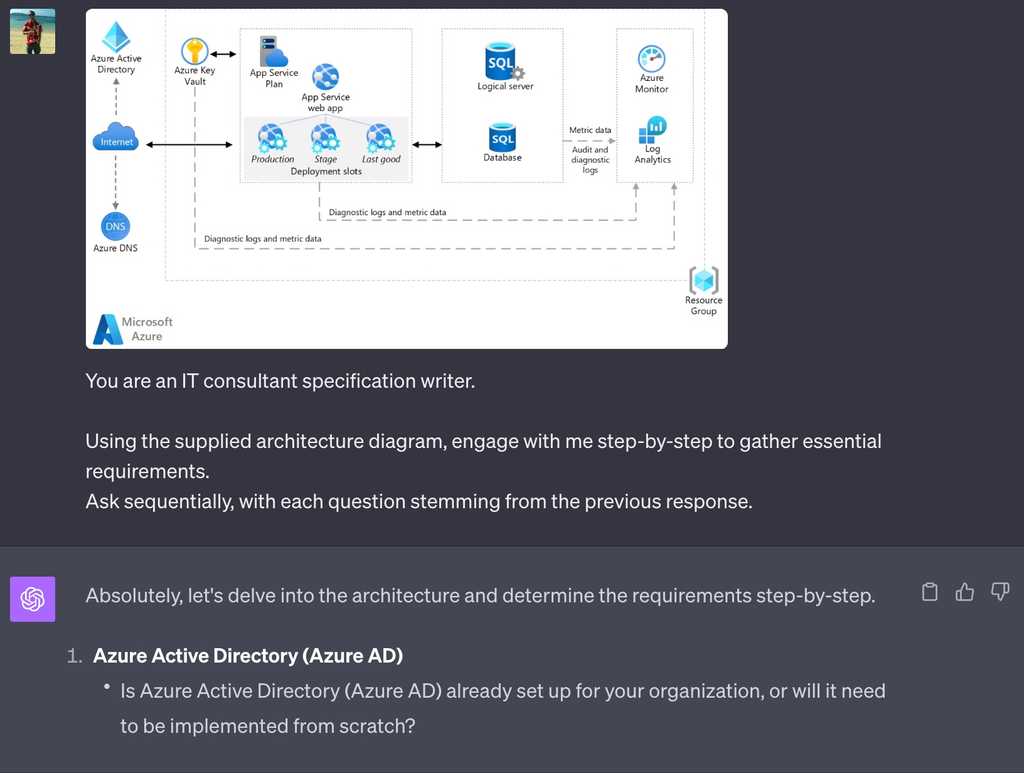
- Interactive AI: Foster a dynamic interaction with AI. Instead of providing it with a predetermined set of requirements, let the AI ask progressive questions. This way, it captures the intricacies of the project scope.
Prompt: "You are an IT Consultancy specification writer.
Engage with me step-by-step to gather essential requirements. Ask sequentially, with each question stemming from the previous response."
Figure: Good example - AI adapts and evolves its questions based on ongoing answers, offering more tailored results
Prompt: "Use these requirements to draft a Specification Review:
- Web application on Azure
- Capture user feedback
- User sign-up process ..."
Figure: Bad example - Missing critical elements like security considerations, data migration paths, or integration with existing systems
- Customization Over Templates: While templates offer consistency, they may not always cater to project-specific nuances. Every project is unique, and relying solely on templates can lead to gaps in the specification.
Value Additions from AI
- Generating PBIs: Harness AI to create Product Backlog Items (PBIs) with both speed and consistency.
-
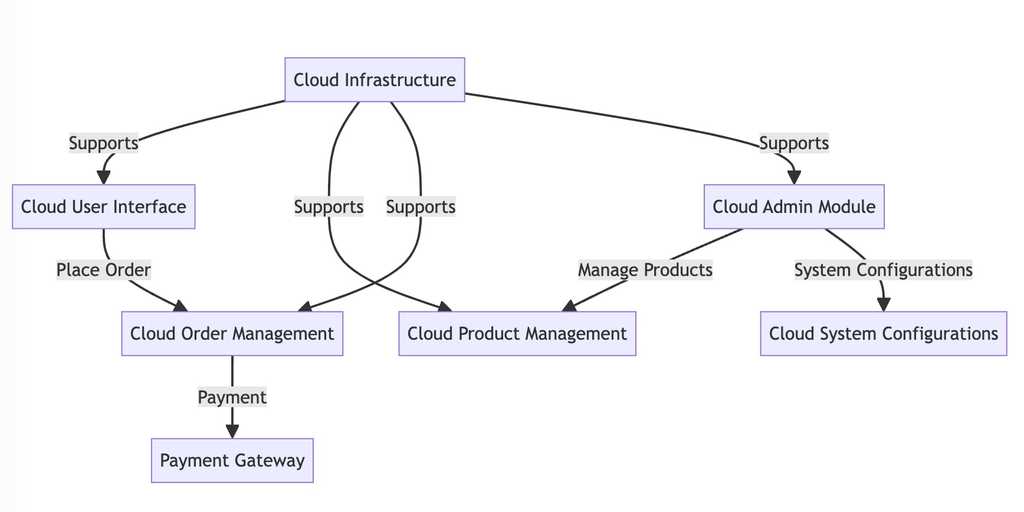
Architecture Visualization: With tools like Mermaid, AI can manifest complex data into clear, interactive architecture diagrams.
graph TB
CUI[Cloud User Interface]
CPM[Cloud Product Management]
COM[Cloud Order Management]
CAM[Cloud Admin Module]
CPG[Payment Gateway]
CI[Cloud Infrastructure]
CUI -->|Order Placement| COM
COM -->|Payment Processing| CPG
CAM -->|Product Management| CPM
CAM -->|System Configurations| CSC[Cloud System Configurations]
CI -->|Supports| CUI
CI -->|Supports| CPM
CI -->|Supports| COM
CI -->|Supports| CAM
- From Architecture to Specification: Entrust your AI with an architecture blueprint. See it draft an initial Specification Review, ready for human refinement.
Example
Prompt: "You are an IT consultant specification writer.
Engage with me step-by-step to collect essential requirements.
For each section, provide comprehensive paragraphs detailing the rationale behind the given information.
Ask me one question at a time, and then only ask the next after I have answered the last one.
At the end, give me the opportunity to give you more information if needed
Upon completion, gather the information based on my answers and then:
- Provide me the Specification Review. Also include the current state of the solution. Be sure to include detailed explanations of each section, adding why we recommend the approach and what the benefits are.
- Develop Product Backlog Items (PBIs) corresponding to the tasks required to fulfil the specifications.
- Provide the Mermaid syntax to draft both the present and projected architectural flow diagrams."
Figure: Good example - A good prompt to get the conversation started
In harnessing AI, it's pivotal to recognize its value as a tool. Its true strength emerges when combined with our expertise, elevating the final output to unmatched quality.
Usually, a specification process is done with the client before beginning work on a project, just like you would never build a house without getting an architect to create a plan.
As you might appreciate, it is not realistic to understand the complexity of your system and give you a realistic estimate after a brief meeting. Our experience tells us we will need to spend a few days to obtain and document the requirements from your project’s stakeholders. This will help you turn your ideas into a more detailed roadmap.

Figure: Remember... a batter aims to hit the ball way out of the ballpark. Don't set an indefensible boundary too early by estimating too small The deliverables for the Specification Review depend upon how large the application is and the time we have spent on the review. You should have the following:
Requirements Analysis
- An architectural roadmap recommending technical solutions
- A breakdown of the required software application into its core components, likely to include the approximate number of main features (e.g. forms, reports, etc.)
- An integration plan
- A deployment strategy
- An MVP (minimum viable product) will be identified, as well as a wish list - requiring the client to set the priorities for the project through defining what is in and out of scope for the MVP
- A detailed list of 'issues' associated with the existing system which impact future development and maintenance
- Hardware and licensed software recommendations
- Mock-ups (if required)
Summary Product Backlog
- A list of Product Backlog Items (PBIs) broken down based on the Requirements Analysis and the Architectural Design
- These PBIs will then be estimated
Ballpark Estimates
- The estimated number of Sprints
- Estimated cost of the project
With the Specification Review, the client can see whether the consultant understands their business and the requirements for their software development project.
The ballpark estimate allows them to decide whether the project is feasible for their budget and time-frame.
Estimates contain 2 main classes of work:
- Relating to the particular product (e.g. create page 'customers.aspx')
- Relating to the project as a whole (e.g. management, administration, testing, software audit etc.).
PBIs may only make up about 60% of the total project time. Project Managers and developers should not think that the only work being charged on a project are coding tasks.
General project costs
Management costs can change depending on how much management the client requires. You should recommend a suitable level of management. 'Management, accountability and transparency' has a cost.
You should add general project costs as a % of the work items generally in line with the following (note that these numbers are just best guesses):
- Testing: 20%
- Bug Fixes: 20%
- Software Audit (if relevant): 4 hours per Release - usually conducted by two experienced Architects
- Fixes from the Software Audit: 5%
- DevOps: 10%
- Project Management: 15% - this includes items like stand up meetings, timesheets, standard updates, reviews, etc.
- Unknowns (for risky projects): 10%. While this is arbitrary it raises awareness for everybody that there are things we still don't know!
Project specific costs
Estimates for a project should be done by a developer, checked by another developer, and finally triple checked by an Account Manager. While every project is different in some way, there are common elements.
SSW has built an estimates calculator to assist in creating estimates. See the Estimates Calculator here.
If the client requires a fixed price quotation, a 20% premium is added to the estimates for the Sprints specified in the Specification Release only (i.e. a fixed price is not given on the entire project). Requests for variations to a fixed price contract must wait until the contract is completed. If development is based on a fixed price contract, work is completed offsite only to facilitate project management and prevent unauthorized scope development.
Note: A suggestion for Microsoft - It would be great if Azure DevOps had functionality to “Add Standard Items" to a Sprint.
How to create an estimate for a Spec Review (Summary)
This process can take up to a few days, so if you're just after a ballpark, use epics instead of PBIs (Product Backlog Items).
Here are the 8 steps:
- List all of the PBIs into a Backlog in Azure DevOps (or visualstudio.com), sizing them with story points
- Open Excel and connect to the above Backlog
- In Excel, add a column called "Hours"
Note: Once we move to estimating in time, this is no longer Scrum - In Excel, copy this list and paste into another spreadsheet called "Estimates Calculator" (see below for how to use this), in order to add all of the extra items (Testing, DevOps, Project management, etc.)
Note: It would be great if Azure DevOps had functionality to “Add Standard Items" to a Sprint - Run a Test Please on the numbers
- Add a screenshot of this spreadsheet to your Specification Review document under Costing Summary
- Present to the client
- When the estimate is approved by the client, start work following Rules to Better Scrum using Azure DevOps (Work Items).
Extra - How to use "Estimates Calculator"
Open the Estimates Calculator and do the following:
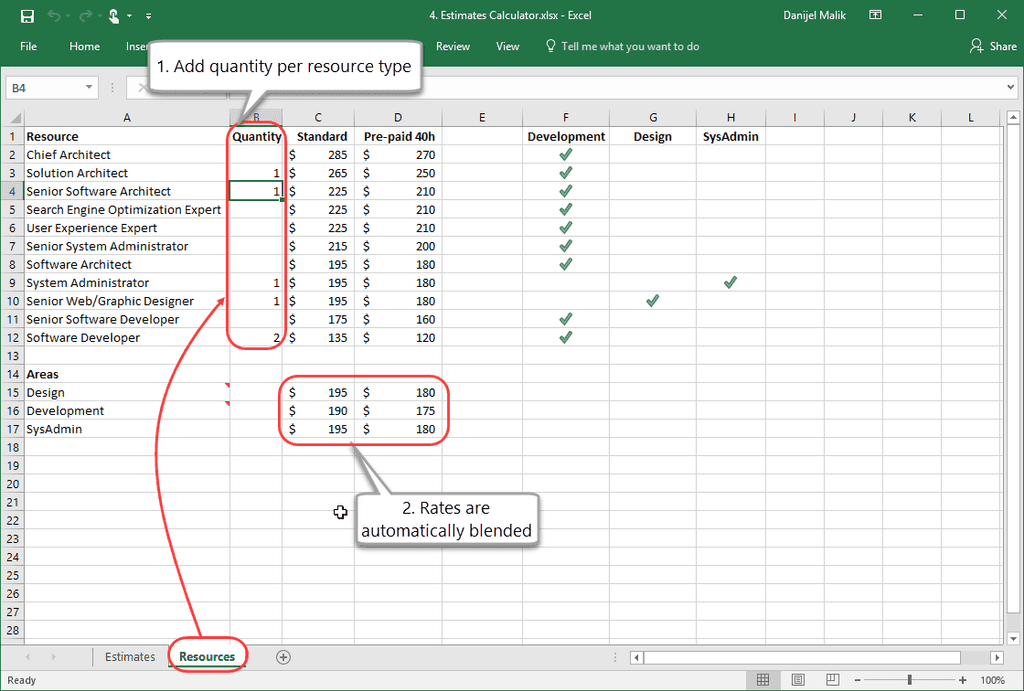
Figure: Set the types and numbers of resources who will be working on the project 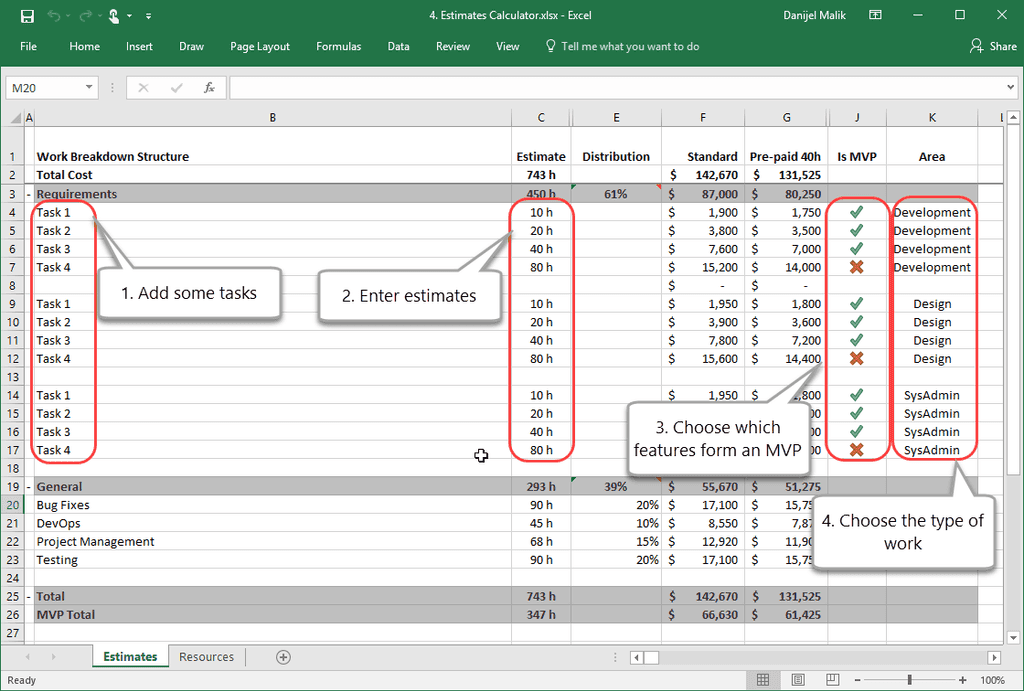
Figure: Enter your PBIs and estimates Why Microsoft Project isn't recommended
Microsoft Project is sophisticated waterfall planning software that has powerful features for auto-scheduling and dependency allocation (Note: Project allows you to add 2 people to a task, and then the calculations and dependencies are all worked out). However:
- In MS Project, tasks are auto scheduled based on dependency and resource allocation (who is assigned to it). This generates an estimated completion date which is never accurate, due to annual leave, public holidays and general shuffling of people in the team
- It gets the summing wrong (the totals don't seem to update and no way to trigger it)
- It's hard to synchronize with timesheets (as it doesn't connect to 3rd party timesheet systems out of the box – however, it does have its own time sheeting system... that is missing billing information!)
The findings of the Spec Review should be presented by the developers and the Account Manager at a meeting with the key decision makers of the project for review and acceptance. It is important that all the required people are in a room together to review the plan. It is also valuable to record this meeting.

Figure: It's a lot easier to get a signature when you've got the right people in the room If you've run the Spec Review successfully the client should not be surprised by anything you present. This means discussions should focus on issues such as what particular requirements could be added into the scope for the MVP, or what releases can be completed by what date, rather than spending the meeting helping the client regain consciousness after they blacked out from seeing the price.
To ensure all relevant stakeholders and key decision-makers have the opportunity to participate in the Spec Review presentation, at the beginning of the engagement, the lead Solution Architect should send an appointment to all parties for 3 PM on the final day of the Spec Review.
“I will send you a proposal when I get back to the office”
Figure: Bad example – A common mistake is to tell the client you will complete it later
“Let’s schedule a meeting now for Wed 3 pm. I will send a meeting invite to all the stakeholders”
Figure: Good example – This is an appointment with a specific time for the next schedule
The benefits are:
- You are striking while the iron is hot
- All parties benefit while the information is fresh in their minds
- The client won't experience the inevitable delays when you go back to the office and get stuck on other client issues that appear more urgent
What does the client get at the conclusion of the Spec Review?
- Option A - Email (if they want to minimize documentation time)
- Option B - Word document (if they need to get approval from someone higher up)
- Option C - PowerPoint presentation (if they are the decision maker, and they don't want a doc)
- Option D (Recommended) - Video of PowerPoint presentation with narrations exported to a video (the best option to gather more feedback, you can even gather public feedback E.g. PointBank
Note: Make sure to name your video according to including version numbers in your file. Publish your video to YouTube afterwards so you can easily share it with colleagues and clients.
Video examples of presentations
Figure: Good example - SugarLearning Specification Video
Figure: Good example - TimePro Invoicing Specification Video
Once again, the presentation needs to pass a 'Test Please' from another senior employee before the meeting takes place.
Different clients will have different levels of documentation on what they want to be built. You need to be ready to do a Spec Review for any one of the following possible cases:
There are 5 levels/types of Specifications:
1. I have an idea
Run from this
or
Verify they have a really hefty bank account!2. High-Level Requirements Document
This will read like a wish list with no details and many unanswered questions. High-Level requirements are very vague and open to many interpretations.
3. Detailed Requirements Document
The details have been fleshed out and allow developers to write Functional and Technical Specifications.
- We need a login page for northwind.com
- Must match existing site look and feel
- Username is already in the Users table in the ABC database (SQL Server)
- Password should be at least 8 characters
- .NET is already used for the existing site so that is what this should use of course
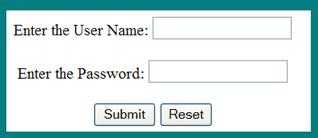
Figure: Detailed Requirements have more of the details you want 4. Functional Specification
This will include detailed mock-ups for the UI, use cases/user stories and might be at a level to allow for fixed price quoting on the project. Functional Specifications go into more detail about the user interface and interactions in the system.
- We need a login page for northwind.com
- Must match existing site look and feel
- Users table must be defined and added to the ABC database (SQL Server 2008)
-
Username consists of user first initial and first 7 characters of the last name
- For example Joe Jones -> jjones
- Password should be at least 8 characters
- Site uses .NET 4 and this interface must be added to existing project
- This is the layout for the login interface
- A red asterisk (*) should be displayed if a value is left blank and Submit is pressed
5. Technical Specification
This is the blueprint for the application. There should be no unanswered questions and should allow for a fixed-price quote.
- We need a login page for northwind.com
- Must match existing site look and feel
- Users table must be defined and added to the ABC database (SQL Server 2008)
-
Username consists of user first initial and first 7 characters of the last name
- For example Joe Jones -> jjones
- Password should be at least 8 characters
- Site uses .NET 4 and this interface must be added to existing project
- Define the data model explicitly

- Must work with IE7, IE8, IE9, and FF3
- Must display correctly at 1024x768 resolution
- Must support ANSI characters for Username and Password
- Will not support mobile browsers
- Will not be tested with localization (assumes en-us local on US versions of software)
- SQL Membership provider will be leveraged
Product Backlog Items (PBIs) can be described in the form of a "User Stories" when appropriate. It ensures the developers will know the context for a PBI.
As a [type of User]
I want [some goal]
So that [some reason]Figure: User Story - template for description
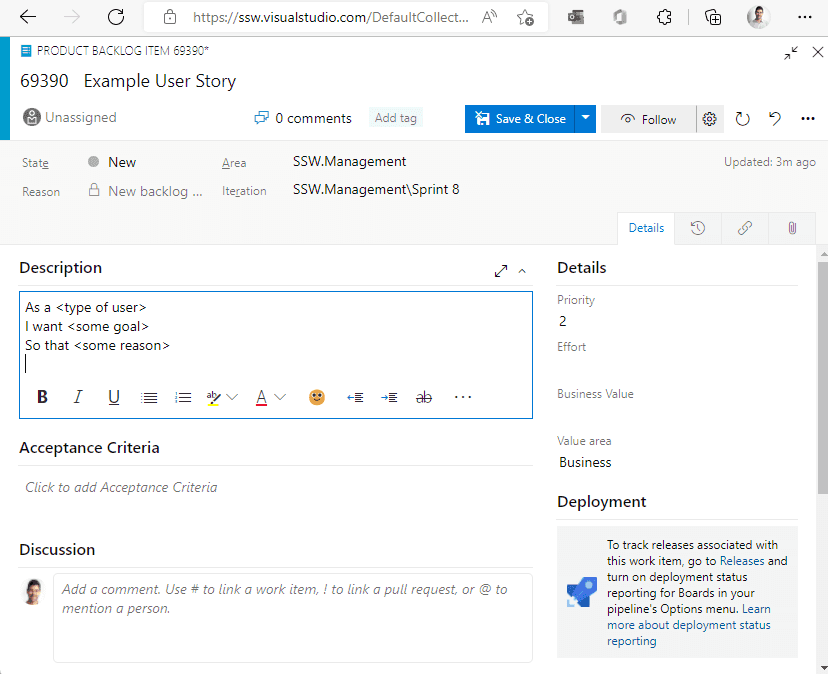
Figure: User Story example in an Azure DevOps PBI 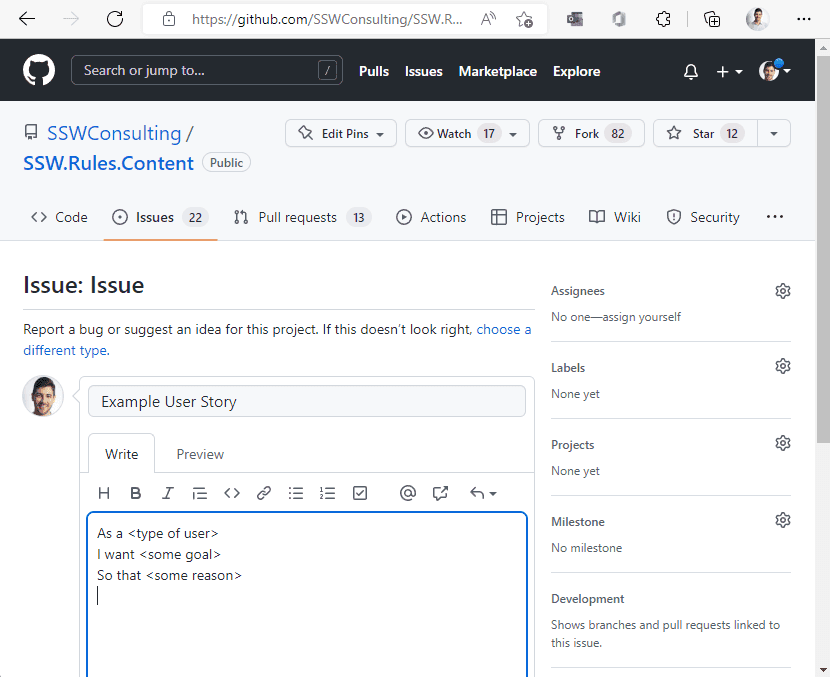
Figure: User Story example in a GitHub Issue "I want to be able to search for customers."
Figure: Bad example - The user story is too vague and broad in scope
"As a Marketing Manager,
I want to be able to search for customers by country and last name,
So that I can find their numbers and call customers that are close to me."Figure: Good example - Clear user story following the INVEST principle
Specification Reviews can be a long process and not having access to the relevant parties that hold the vision and the budget can create obstacles.
Critical stakeholders are people with a sound understanding of the business requirements and control over the budget. These stakeholders are rarely technical.
When organizing the Spec Review, clearly communicate the importance of stakeholder attendance. There's no point in conducting a Spec Review without the critical stakeholders who ensure that business requirements are accurately recorded.
Make sure the stakeholders are aware of what is needed ahead of time. If all relevant stakeholders aren't available, be sure to warn that this will cause issues down the line. Remember, if no one in the Spec Review holds both the budget and vision, the product that you write up will look a lot different from what the business needs.
Getting accurate information from a client during a Spec Review ensures that the full scope of the project is captured and there are no surprises later on. Accurately refining the product avoids waste.
Here are some tips that should help focus in on a feature.
Tip #1: Check if the Product Owner can explain and show their process
Look at how they perform the task manually and listen to them explain the process.
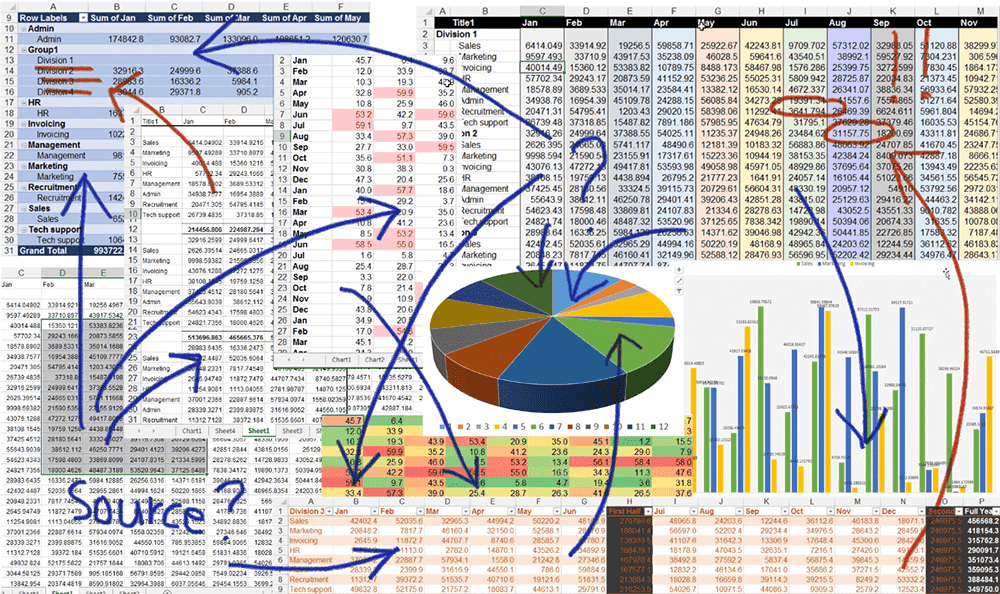
Figure: Look at the manual process in this complicated Excel. If the process has never been done before, do it in Excel first Tip #2: Draw a Mock-up or process flow diagram as you listen to the requirements
Creating mockups or diagrams of the feature will be highly beneficial as the client can see the feature visually.
Tip #3: Consider a Prototype
Consider building a functional prototype (works, but throw away code).
Tip #4: Record Specification Reviews
Recording the Specification Review is another great way to make the information as clear as possible. Being able to look back and clearly lookup what was mentioned, saves re-asking questions.
Tip #5: Consider a Journey Map
Journey Maps help to highlight which person is responsible for decisions at various stages.
E.g. On this Journey Map observe the experience for the Producer and the Loan Officer. See how they move through the steps of obtaining and maintaining a farm loan.
The map highlights the emotional journey as described by these customers, including their points of pain and delight. In addition, you’ll find the technologies, systems, and touchpoint types used through the process.
From USDA Direct Farm Loans Journey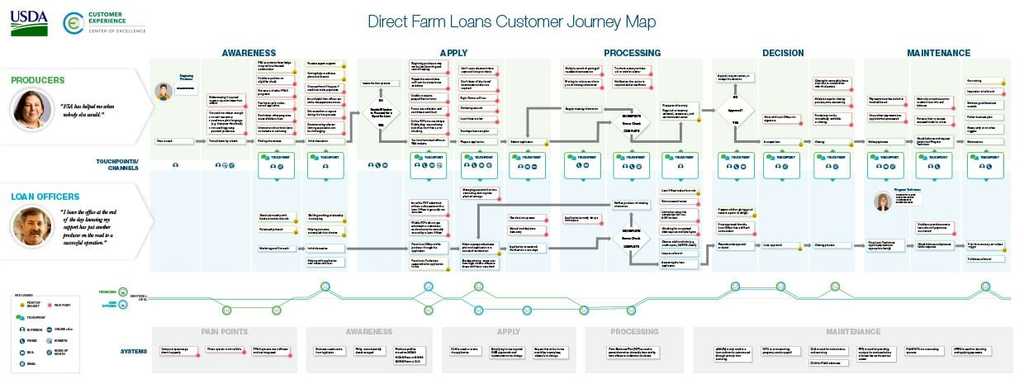
Figure: A Journey Map for 2 stakeholders See the high-res version PDF.
Tip #6: Does the client know why you need to understand?
“I am not a code monkey. I solve business problems with code. I need to understand that problem to do that well.”
From Bryan Finster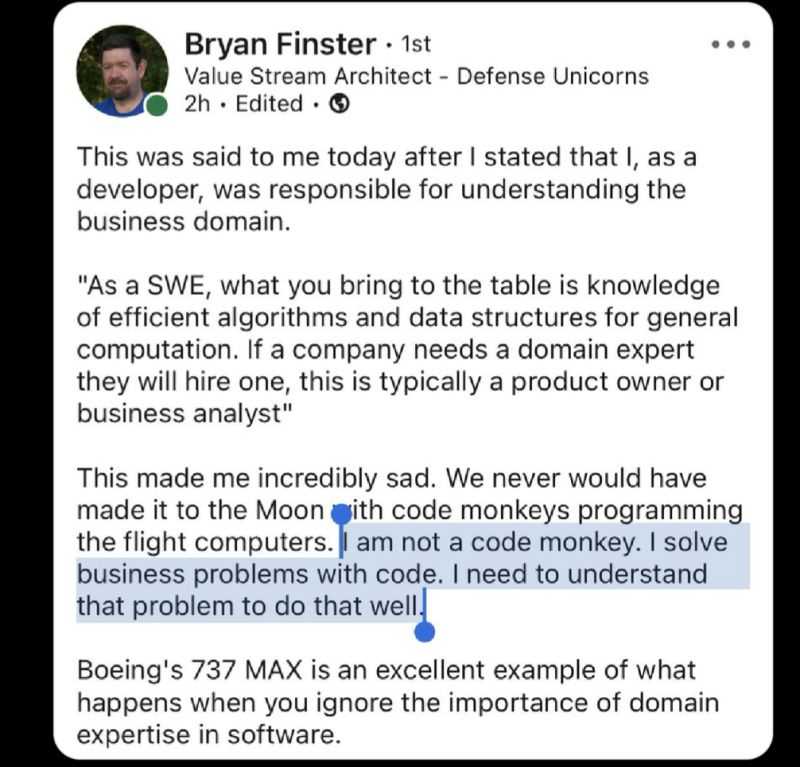
Source: Bryan Finster on LinkedIn A client will often ask for more features than are really necessary for the MVP. They may also think that implementing a feature is easier than it is.
There are a few things you can do to control the scope of the project and deliver the client the most value.
Tip #1: Flag problematic tasks as soon as possible
If a feature is going to take a long time or isn't going to deliver much business value, make sure to flag it to the client and make sure it really is a priority. Explain that you can always deliver the feature at a later date after they go live. By following these steps, only the features in the initial project are developed, saving the client time and money.
Tip #2: Estimate as you go
When you are doing a Spec Review, make sure you estimate tasks as you go. That way you can flag problematic tasks as soon as possible. Once you estimate a task, get another developer to check it incase you missed anything.
Tip #3: Flesh out requirements
If an estimate looks high, the requirements might not be fully fleshed out. Double check if the requirements are clear enough, otherwise follow-up with the client to discuss further.
When a Spec Review concludes, the journey towards project kickoff is only partially complete. For instance, imagine a scenario where the client had multiple questions and slight hesitations about the estimates provided during the Spec Review. Without a structured follow-up, these hesitations could evolve into concerns, possibly stalling the project before it even begins.
At the end of the Spec Review presentation with the client, work out a good time for the follow-up meeting and book it into their calendar immediately.
Objectives of the follow-up meeting
The follow-up meeting is a crucial step in ensuring a smooth transition from the Spec Review to the initiation of the project. Here's why and how we conduct this meeting:
1. Reaffirming priorities
Revisit the MVP backlog to ensure there has been no shift in priorities. It's essential to keep the project aligned with the client's expectations and business objectives.
Client: "We initially thought Feature A was crucial, but now we believe Feature B should take precedence."
Account Manager: "No problem, we can re-evaluate the backlog and adjust the estimates accordingly."
Good example - Adapting to client’s evolving priorities maintains alignment and trust
2. Encouraging new insights
The Spec Review often sparks new ideas or considerations. Encourage the client to share any fresh insights or concerns, which could be pivotal for the project.
3. Clarifying estimates and timelines
Present an updated estimate reflecting any changes post Spec Review, ensuring clarity on the number of Sprints, developers needed, and the overall cost.
4. Outlining next steps
Clearly outline the subsequent steps, identifying any immediate actions required from either party to move forward.
5. Improving through feedback
Retro - Solicit feedback on the Spec Review process to continuously refine it, enhancing the experience for future projects.
6. Addressing legal and administrative details
Delve into any T&Cs, NDAs, or other administrative details requiring attention before project commencement.
Appointment template
To facilitate the scheduling of the follow-up meeting, here's a template that Account Managers can use:
Title: {{ YOUR COMPANY NAME }} and {{ CLIENT NAME }} - Post Spec Review catch-up Required: {{ CLIENT }}; {{ SPEC REVIEW DEVS }} Hi {{ CLIENT NAME }}
Thank you for your time during the Spec Review.
I've scheduled this catch-up for us to run through the following:
- Review and possibly re-prioritize the MVP backlog based on any new insights
- Discuss any updated estimates and timelines
- Outline the next steps towards project kickoff
- Address any legal or administrative details
- Collect your feedback to improve our process
- Answer any further questions you might have
We aim to ensure that you are well-informed and comfortable with the roadmap ahead.
Please let us know if the proposed date and time work for you, or suggest an alternative at your convenience.
Looking forward it.
Regards,
Figure: Follow up appointment after a Spec Review
At the end of the Spec Review encourage the project to go ahead with the current resources, while it is fresh in their heads.
Say words to the effect of:
"The resources allocated to your project depend on availability. All efforts will be made to allocate the original resources used on the Spec Review, but that cannot be guaranteed.
If you decide today or tomorrow, then we can use the same resources...
Regardless, it is always better to move ahead while the project is fresh in the developers' heads."Spec Reviews are a vital part of architecting a new solution for a client, they are the plans upon which a new project is modeled. They serve as a key stage in the pre-sales process for software development consultancies as they create an opportunity for the developers to demonstrate expertise and provide immediate value to the client. For these reasons alone, it is evident that those who are assigned to carry out this exercise must be well-trained in the matter.
Importance of Specification Reviews
As the documentation delivered at the end of the Spec Review is the foundation upon which the project is built, it is imperative that the proposed solution meets the client's needs as closely as possible, this includes proposing the correct choice of technologies (factoring in their budget from corridor conversations) and providing realistic estimates of time required per resource.
Involving developers with no experience in Spec Reviews can lead to significant issues; underestimates, a misunderstanding of the right tech for the job, or a miscommunication between the developer and the client could all have huge implications on the success of the project down the line. This highlights the need for a structured training approach.
Learning Through Shadowing
Shadowing two experienced developers during a Spec Review is the most effective training method, providing real-world experience that allows the trainee to get stuck in and learn the process hands-on.

Figure: Shadowing is the best way to learn A developer who is shadowing should incur no cost to the client, this should allow the trainee to feel less pressured to perform, creating a healthy environment for them to learn. This also means the client to gains value, as they are getting an additional skilled resource at no additional cost.
Required Shadowing and Assistance
Before being able to partake in an unsupervised Spec Review, the trainee developer must complete 2 phases of training:
- Shadowing Phase: Developers must shadow at least 1 Spec Review, observing and understanding the review's different aspects - they will act as a 'third' resource, assisting the other developers at no additional cost to the client.
- Assistance Phase: Developers must then assist in at least 1 Spec Review as a 'secondary' developer, applying their observations and understanding their role in the process - they will be a billable resource, but will follow the lead of another experienced developer.
After successfully completing the shadowing and assistance phases, developers are ready to conduct Spec Reviews independently, equipped with the necessary knowledge and experience.
Approvals
If an Account Manager wants to add an additional dev to shadow a Spec Review, they should get cross-approval from another Account Manager, to make sure it's necessary.
A User Journey Map (aka Customer Journey) is a visual aid that allows the clear communication of user needs.
Video: What is User Journey Mapping? (7 min)These artifacts should be used at the beginning of a project during the early stages of research and design. This allows user requirements to properly inform design decisions made during development, and can help teams build a strong common understanding of a project. Capturing feedback in a Journey Map during or even after development, can provide high value as well. Pain points discovered in this way can reveal opportunities or areas for immediate improvement.
What is a User Journey Map
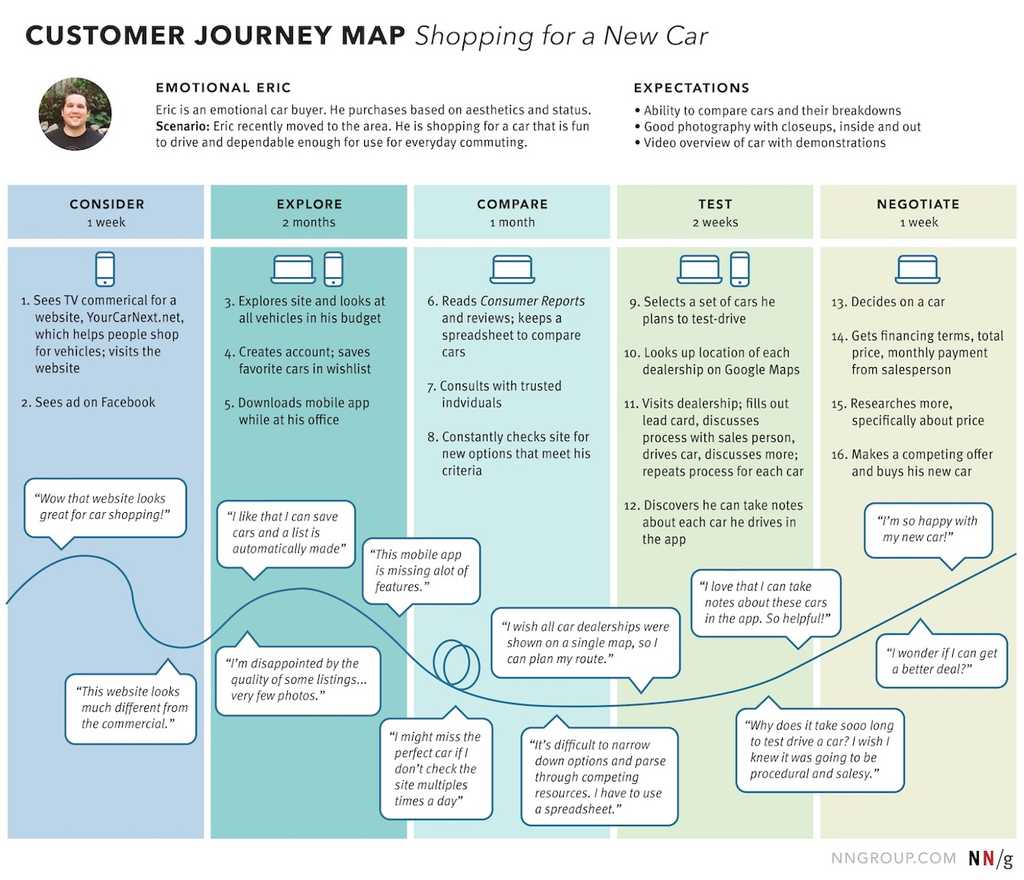
Figure: Observe the user's experience and pain User Journey Maps are used to understand how a customer interacts with your product or services. There are many ways of presenting this information. Take a look at Smaply's example Journey Maps.
The key things captured in a User Journey Map are what steps/stages the customer goes through and also some indication of user sentiment at the time. Often the user journey will be mapped out and then research done to gauge user sentiment at each point in the journey.
This can be done using wireframes or mockups rather than going through the entire build of the software. This way any potential pain-points for users can be identified and improved before going through the costly exercise of developing software.
They are also used in follow up research to identify problems in existing software and systems. This is especially true in sales processes, where it is very easy to identify where user drop off occurs.
Service Blueprints
Sometimes the coding starts too early and, on some projects, the Product Owner needs more help to visualize what's being proposed. A great way to get in sync is to use Service Blueprints.
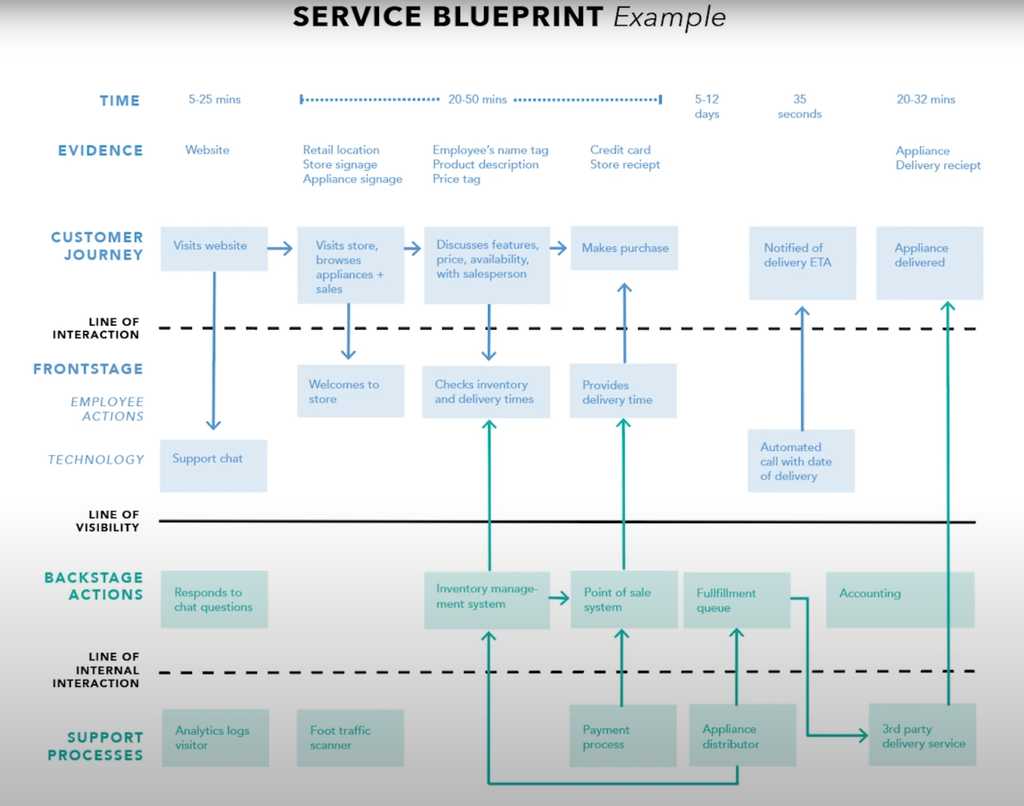
Figure: See all the flows through the application A Service Blueprint is a more detailed and process oriented document. This covers the steps from the User Journey Map and clearly details where and how the user journey will interact with the system being built. It also captures the various processes required inside the software. Often it will allow almost all API interactions to be captured, making it much easier for the developers to understand exactly what the various parts of the system are intended to do and what the user might be doing when they are called.
When to use them
Both these types of diagrams provide excellent documentation that is easily digestible, even by non technical people. They are especially valuable to verify with the Product Owner and to help the team understand the product vision. Because the Product Owner can easily understand what is happening, they can provide much better feedback than if they were simply provided UI wireframes or traditional documentation.
The team should produce these artifacts, typically not the Product Owner - this ensures what was in the Product Owner's head has made it to the team.
User journey mapping tools
Often when building systems it isn't super clear what all the nuts and bolts should be. The complexity of projects can vary quite a lot - and getting customers to tell us what they need is not easy. There might be several major stakeholders or domain experts each with slightly different ideas understanding that causes contention in how the system functions. Being a good consultant requires good listening and then good analytical skills to determine the customer's technical needs.
Event Storming is a fun collaborative modeling technique invented by Alberto Brandolini that enables members from different teams and disciplines to participate in workshops to learn how to break down complex business domains and processes.
Video: Do you know the value of Event Storming? with William Liebenberg (6 min)
The benefits of Event Storming
Having the client just talking to our consultants for a couple of days can be intense and it's difficult to stay engaged (on both sides), this is where Event Storming shines. Event Storming is fun and helps us to break down the complex requirements with hands-on client participation. We also get an awesome deliverable that we can use to develop a backlog and "better" estimates.
Another benefit of Event Storming is helping you determine the correct System Architecture. For instance choosing between a Monolith or Microservice architecture by looking at the groupings of domain events, commands and policies (aka Bounded Contexts if you are talking in pure Domain Driven Design DDD terms).
Event Storming can be done at different levels
There are multiple levels that Event Storming workshops can be run at. Each level continues to refine and enrich the domains with new concepts until a full end-to-end flow of the system is visualized. This end-to-end flow is valuable to the business itself but also helps accelerate software design and development.
Big Picture (aka 30,000 foot view)
- Explore the whole business across multiple boundaries by gathering people who each own/understands one part of the truth
- All Domain events are described in past tense (past tense because it's an event that happened, its a fact that cannot be changed)
- Capture hotspots or points of contention in a domain (this is usually when the experts don't all agree on a concept)
- Map the relationships between the domain and external dependencies
Example events:
🟧 InvoiceCreated
🟧 InvoiceReceived
🟧 EmailSent
🟧 ReportUpdated
Process Modeling (aka 10,000 foot view)
- Model a single business process from beginning to end and ensure no ambiguity or contention exists by clarifying all the business rules
- Enforce a timeline so that you can move events into the right order, and eventually see a process or flow emerging.
- Attach the actors, their motivations, and any dependencies required for executing actions (aka Commands)
- Enable stakeholders, domain experts and developers to communicate via ubiquitous language (all participants are able to communicate using the same terminology)
Software Design
- Now we have an end-to-end model of the system
- All relevant concepts are captured and documented
- The software design phase can proceed using methods from Domain-Driven Design (DDD), Clean Architecture and CQRS. Each sticky note can potentially turn into a Product Backlog Item during the software development phase.
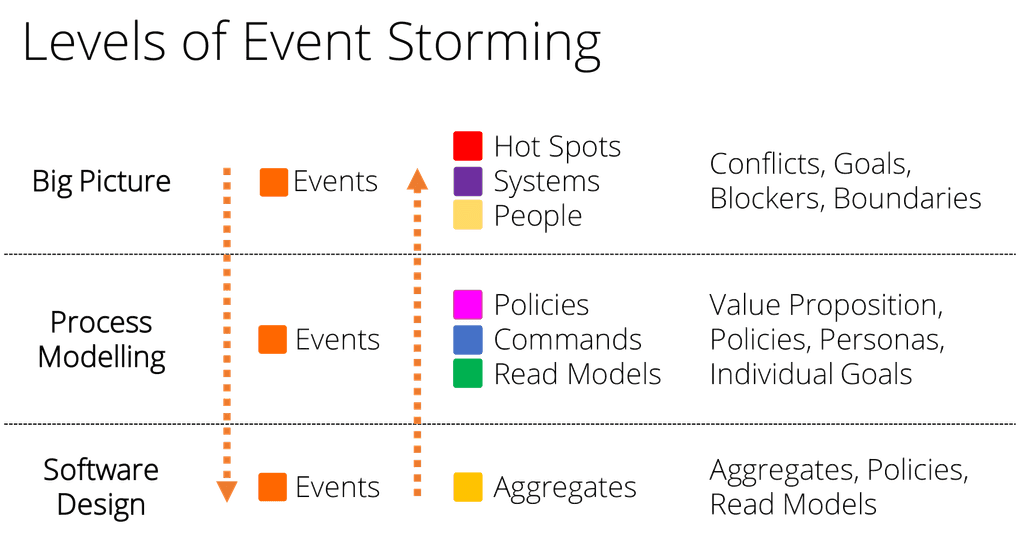
Figure: Levels of Event Storming Notice as you traverse the levels from top to bottom that new concepts are introduced that help describe the domain or process which gets us closer to being able to build a concrete software solution.
How to start an Event Storming workshop
To start an Event Storming workshop, get all the stakeholders, domain experts and developers into a room or virtual call.
From here everyone starts to write out all the events they think are necessary on the sticky notes and put the sticky notes on the real or virtual wall.
Check out how to run an Event Storming workshop for detailed steps and more information on how to prepare and run an Event Storming workshop.
Key concepts in Event Storming
Different colored sticky notes should be used to denote different concepts:
Domain Events - Orange
Actors (aka Personas) - Light Yellow
Policies (aka Business Process) - Pink
Commands - Blue
Aggregate - Yellow
External System - Purple
Read Model - Green
You can use whatever colors you can find, as long as a legend is always visible to the team.
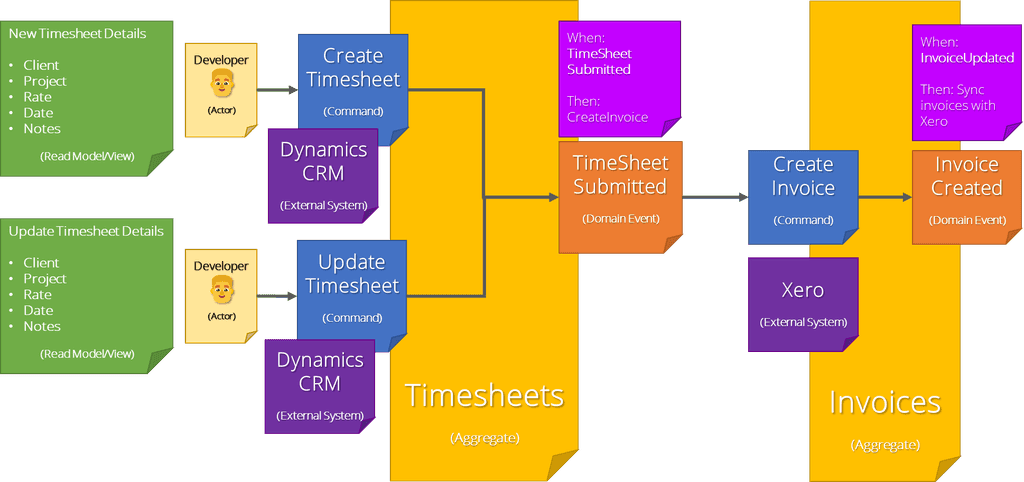
Figure: Example of Domain Events, Commands, Actors, etc. arranged underneath the Aggregate 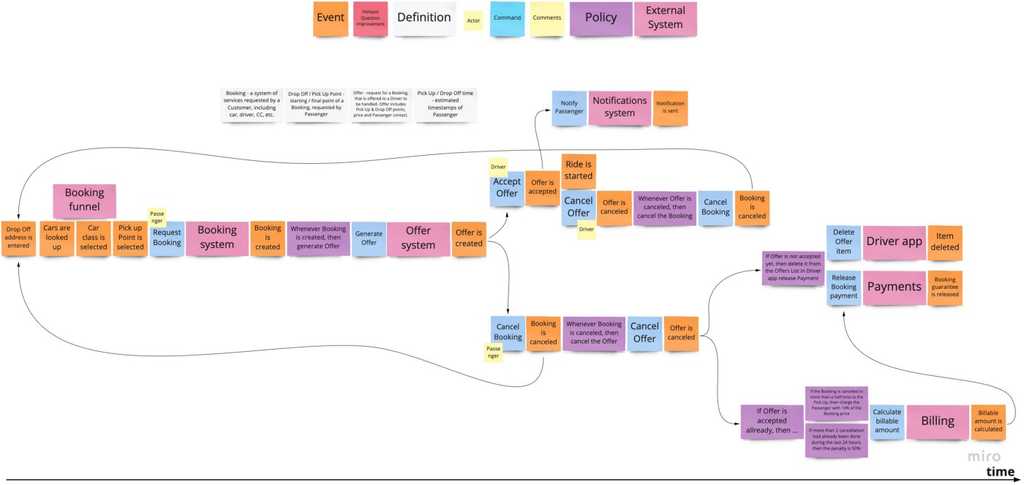
Figure: Example events and timeline of a booking system Event storming is fun! Running a successful workshop requires preparation and understanding of the Event Storming process.
Every workshop has an Event Storming Master (aka Facilitator or Moderator) to guide participants through the workshop.
What are the responsibilities of the Event Storming Master?
The person taking on the role of Event Storming Master does not need to be the project Scrum Master or Technical Lead - as long as they know and understand the Event Storming concepts and discovery steps then they can run the workshop.
Before a workshop
Before a workshop, the Event Storming Master is responsible for preparing the Event Storming workshop session, which will include:
- Finding the right participants
- Allowing the right amount of time
- Finding the right space (physical or virtual)
Invite the right people
It is important to invite the right people to the workshop. It is a problem if you're missing key participants or having too many participants.
- Developers or Engineers usually ask the right questions
- Domain experts are the people who will answer the questions
- Dedicated Event Storming Master that will help guide the participants through the workshop
Schedule the right amount of time
Depending on the size and complexity of the project you would typically need between 2 to 4 hours for a good Event Storming workshop session.
During a Specification Review you can schedule this workshop on the first day. Typically on the second day you can use the Event Storming visuals to help design your system and software architecture and produce better estimates.
During a workshop
During a workshop, the Event Storming Master is responsible for helping participants to:
- Follow the Event Storming rules
- Focus on the learning the modelling of the business domain
- Ask the right questions when getting stuck
- Timeboxing the discovery steps
Preparation - In person workshop
- Different colored sticky notes
- Marker pens
- Long roll of paper or
- Wide white-board or
- Office glass walls or windows
It is important to make sure that the common terms are recorded and clearly visible during the workshop.
Finally, make sure that the legend (explaining all the key concepts of Event Storming) is clearly visible.
Preparation - Choosing the right visualization tool
Real-time collaboration (remote or in-person) has become the default choice for many teams. Instead of sticky notes and white-boards we can use tools such as:
These tools will eliminate the worry of low-quality sticky notes falling off the white-board and your markers drying up!
For remote sessions, collaboration might not be as smooth as the in person events. However, it is also easier to arrange the attendees to join a remote session when the team is not all in a single location.
Discovery steps
You can break the workshop down into a number of distinct discovery steps. Each step adds more detail to the business domain or process you are trying to understand.
- Domain events
- Concerns and questions
- Domain Commands and Personas
- Read Models and Aggregates
- External Systems
- Policies
Step 1: Discovering Domain Events
Use the orange sticky notes for Domain Events.
The domain experts and stakeholders can simply start recording the events that occur in a business domain or process. The events don't necessarily need to be in a precise timeline order (yet).
Domain events are always rooted in the past tense to represent a fact. Facts cannot be changed because they actually happened.
For example, we can have domain events such as 'Invoice Created', 'Email sent', 'Timesheet Updated'.
It can be expected that not all the participants will be aligned with the business domain or process at the start, but as the workshop progresses everyone will start to "get into the zone" and ideas will be put onto the board quickly and smoothly.
When there are concerns or contention, the participants can discuss and rearrange the events until it is resolved and everyone is aligned in their thinking. Sometimes the contention is due to a different terminology, so it is important to record the common terms and make sure that they are clearly visible to all participants.
The Event Storming Master should check the stickies to ensure that the basic rules are being followed (such as ensuring events are in the past tense), but instead of just correcting the stickies directly, they can be marked or rotated to be corrected at the end of the step. The Event Storming Master should not interrupt the participants while they are putting events on the board.
Step 2: Discovering Concerns and Questions
Use the red sticky notes on corresponding domain events when a concern or question is raised.
This will make it clear to participants that not everyone is aligned and will prompt further discussions until everyone is aligned.
Step 3: Discover Domain Commands
Use the blue sticky notes for Commands (also known as Actions).
Use the light yellow sticky notes for Users / Actors / Personas.
Commands are the result of a User making a decisions and executing an operation.
In this step we dive into the Mechanics and Core components of the domain. The discussions about commands and actions will prompt us to ask questions such as "Why does user X need to perform a particular command?"
Once the events ordered chronologically we can start seeing a flow emerge.
Step 4: Discover Read Model and Aggregates
Use green sticky notes for the Read Model data sources / projections.
Read Model shows the data that a User needs data to make a decision.
At this point you should be able to start building up the Aggregates (entities).
Step 5: Discover External Systems
Use purple sticky notes for External Systems or Dependencies.
External Systems represents parts of the business domain or process outside of our control such as:
- API Services
- Departments
- Other organizations
We expect external systems to respond to our Commands and/or Queries.
Step 6: Discover Policies
Use pink for Policies (aka Reactions).
Policies are the glue between the Commands and Events.
Policies are considered the reactive logic that represents the rules of a business domain or process. This reactive logic allows or denies the target event to be triggered.
Always spoken in terms of 'When-X Then-Y' or 'Whenever'.
For example:
- When a user logs > 8 hours work, then send a warning email and add to overtime
- Whenever an invoice is updated with < 8 hours, then send a warning email
End Result
Lots of sticky notes arranged chronologically that shows:
- Commands & Events grouped with Aggregates
- Defined Read Models with data that Users need to make decisions
- Identified External Systems / Dependencies
- Identified Policies (reactive logic) that apply to the process
If you ran an in-person workshop using sticky notes and a white-board you should capture the end-to-end flow by taking a photograph or by digitizing it with one of the diagraming tool listed in Preparation - Choosing the right visualization tool.
Make sure that he flow is stored in a central repository where everyone can access it.
Having access to this visual flow will:
- Help new team members onboard
- Clear up confusion when parts of the system is not understood
- Accelerate the software design and development of the system or new features
At your company, you never want to have a person asking "Where is that file?"The answer should be "The answer is Teams, the question is irrelevant".
Microsoft Teams is a great solution for organizing client files and conversations. Create a new Team for each of your clients, and if you have multiple projects for one client, use Channels to keep them separate. There's no need to create a new Team just for a new project.
Once you have this set up, it is likely that you want to have a link between your Teams instances and the associated CRM record.
In the video, Adam Cogan describes how they connect Dynamics 365 and Teams with an extra field. They change the Account table to add a custom column 'Teams-URL'.
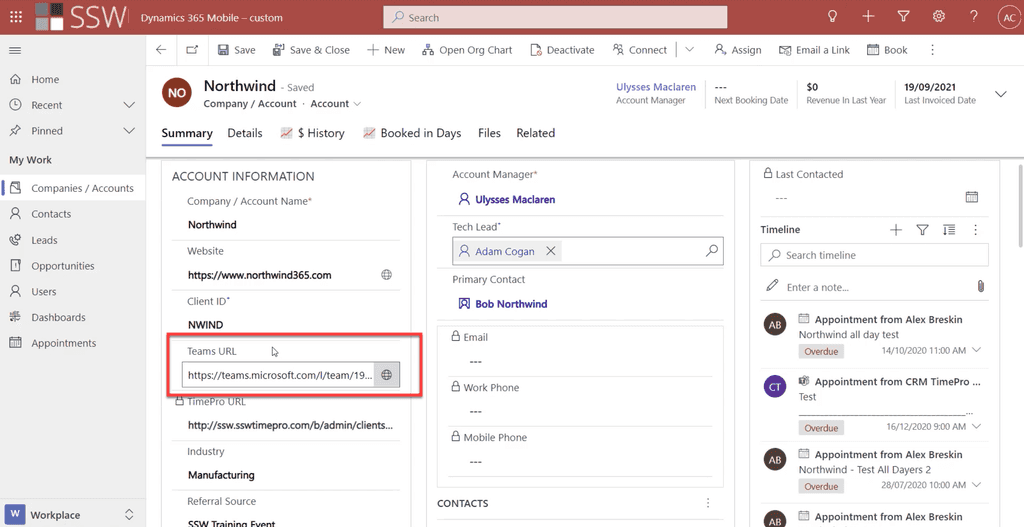
Figure: CRM | Company/Account Form – added Teams URL field Note: Each client should have its own Team. You might have two associated clients - e.g. Northwind Australia and Northwind USA - but if they are separate legal entities and have separate accounts in CRM, they should have separate Teams.
Level 1: Manual method
To get that URL, simply click the ellipsis next to your Team name and click "Get link to Team".
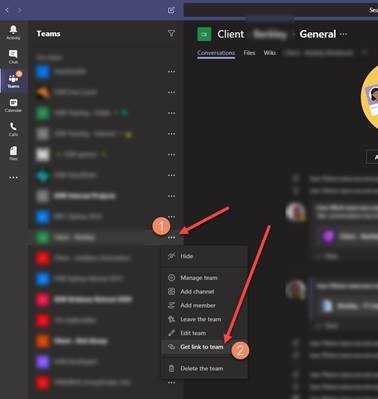
Figure: Get the Teams URL Level 2: Automatic (Basic)
Add a button to the Ribbon to provision a new team and link to it.
How to add the button to the Dynamics Ribbon?
- Option A - Customize the command bar - Power Apps | Microsoft Docs (new approach - customizing command bar using the command designers)
- Option B (old approach) - Ribbon Workbench
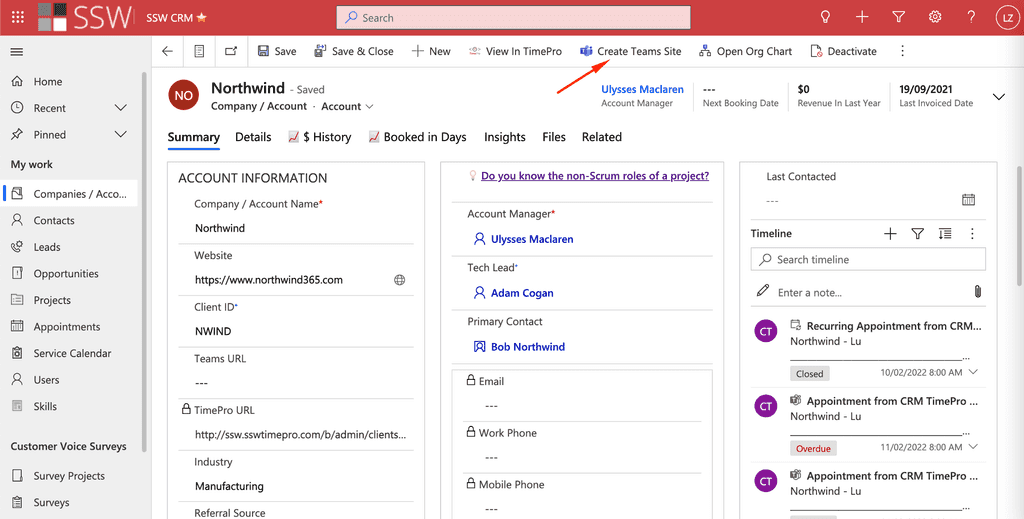
Figure: Use the Ribbon Level 3: Automatic (Advanced - best UX)
Using a PCF control you can add a button directly into the form that can do everything for you.
Click on this section on your CRM Dynamics to have a Team created:
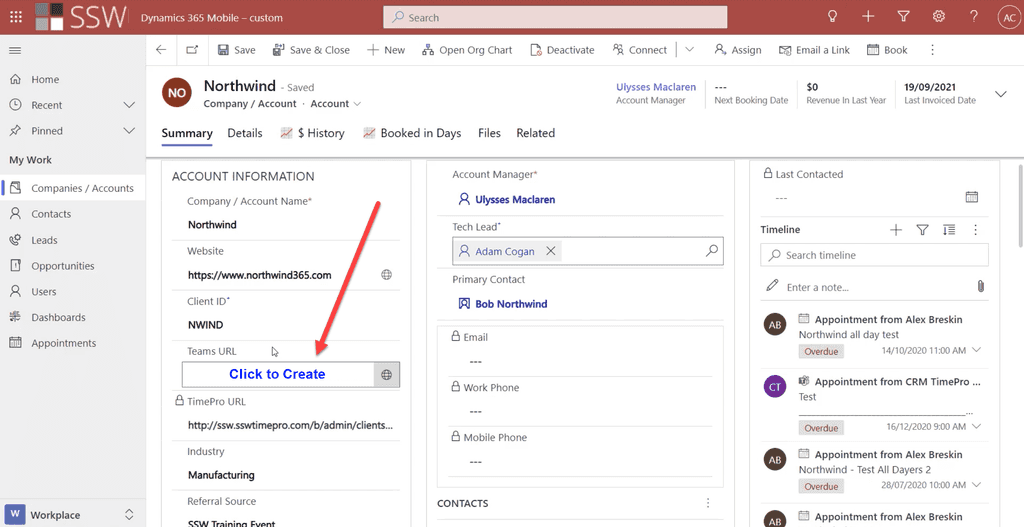
Figure: PCF control allows you to add a button to create a Team Notes:
- Alternatively, this process can even be automated using Azure functions and Graph API to provision a new Team every time a new client is created in CRM. This has the disadvantage that every single Account would get a Team...and that could create a real mess of unused Teams
- The Team's name can get out of sync if the Dynamics client name is changed, therefore you need one extra flow that is called when the client name is changed to keep them in sync
Very often you can come to the end of the Sprint and have incomplete features that either can’t be shipped or can be shipped but don't add any value to the end user or Product Owner. If you are given a feature that is going to take weeks, then split it by following this rule.
You are taking on unnecessary risk with a PBI that takes more than 2 days' effort.
Your project could be a very small project spanning just a few weeks/few Sprints or it could be a big project spread across months with multiple Sprint Reviews and multiple teams involved. The massive PBI problem finds its way in all projects. Inspite of all devs being available to work, no blockers, no last minute issues hijacking the Sprint, you could still end up either not pushing things to production or pushing some half-done feature that can't be used.
How to avoid incomplete features at Sprint's end
There are a few steps to take that help avoid this problem:
- Check the PBI is well-defined
- Review the PBI estimate
- Check if you need a spike
- Check the PBI fits in with the Sprint Goal
- Avoid monolithic Product Backlog Items (PBIs). If the estimate is 2 days or more, it can probably be broken down further to make it more manageable
- Consider turning it into a parent PBI with many child PBIs using Epics (Azure DevOps) or Tasks/Sub-tasks (GitHub)
How to break up PBIs
When you break a monolithic PBI down, try to see if you can break this into shippable features that the customer can use. From a user perspective, it might be better to have a new UI page with only 2 textboxes that actually save data to the DB than have a page with all UI elements but the save button doesn’t work.
If shippable features isn't going to work then another good way of splitting up a PBI is to think about what little pieces of functionality can be demoed to the Product Owner in the Sprint Review.
Say you are doing the Sprint Planning and you see a PBI that says “Sync data with Xero” but not much else. It's been estimated as an 8-day task, which will almost certainly take multiple Sprints. Here are some ways to approach it:
Example 1 - Sync Data with Xero - UI First
- Start by having a PBI that shows the sync status of invoices. Then, during the Sprint Review you might not have any backend working, but at least you can show off a nice little UI addition.
- Next, you might have the logic for syncing the invoice to Xero when you save it. Now in the Sprint Review, you can show that little UI piece changing as it syncs.
- After that, you might do the reverse, and implement the web hooks to sync from Xero to the app. Then, in the Sprint Review you will be able to show the sync status changing the other way.
- Finally, the last part might be to implement a manual sync fallback in case the automatic sync fails.
Example 2 - Sync Data with Xero - Backend First
- Start by having a PBI that just calls the Xero API with the required data. During the Sprint review, you can then use Postman to demo this API call and Xero getting updated.
- Similarly, the next PBI could be the web hooks from Xero calling your APIs to send data back which again you can demo via Postman or the Xero developer portal
- The next PBI can be the API getting triggered via the UI or as required by the app. This part will lend to the demo quite easily.
If for some reason you do end up with incomplete PBIs at the end of the Sprint, check out Ending a Sprint - Do you know what to do with partially completed PBI?
Subject: Sync data to Xero Figure: Bad example - This is a monolithic 8-day task
Subject: Xero Sync #1 - Update UI to show sync status for invoices and receipts Subject: Xero Sync #2 - Update the "Save" option in "Invoice Details" page to push data to Xero Subject: Xero Sync #3 - Create endpoints for Xero web hooks to push data from Xero to client app Subject: Xero Sync #4 - As a backup, add a manual option to re-sync data with Xero in case either system was down Figure: Good example - The same monolithic task, broken down into 4 smaller tasks which can all be shipped incrementally
When writing a large scale enterprise application you want to make sure you only have to write it once. Choosing the right software architecture for your system is crucial for its long term success and maintainability. The right software architecture will allow your software application will scale too meet new requirements. Choosing the wrong software architecture can turn adding new features and maintaining your code into an increasingly frustrating exercise in futility.
Popular architectures
Here are some of the popular architectures and factors to consider when deciding the best fit for your project:
Clean Architecture
Clean Architecture emphasizes separation of concerns, making your system easier to maintain and scale. This architecture is designed to keep the business logic independent of the frameworks and tools, which helps in achieving a decoupled and testable codebase.
See more on Rules to Better Clean Architecture.
You can find our CA template on GitHub
Vertical Slice Architecture
Vertical Slice Architecture structures your system around features rather than technical layers. Each feature is implemented end-to-end, including UI/API, business logic, and data access. This approach improves maintainability and reduces the risk of breaking changes.
This modular approach to software development can introduce inexperienced teams to the idea of shipping features as functional units with no shared knowledge of the domain entities, infrastructure layer, or application layer within another subsystem, further preparing them for future development environments that may use Modular Monolith or Microservices Architecture.
See more on Rules to Better Vertical Slice Architecture
You can find our VSA template on GitHub
Modular Monolith
A Modular Monolith organizes the system into modules that encapsulate specific functionalities. While it runs as a single application, it retains some benefits of microservices, such as independent module development and testing. It’s a good middle-ground between a monolith and microservices.
See more on Rules to Better Modular Monoliths.
Microservices
Microservices architecture involves splitting the application into small, independently deployable services. Each service focuses on a specific business capability and can be developed, deployed, and scaled independently. This approach is beneficial for complex and large-scale applications with multiple teams working on different parts.
See more on Rules to Better Microservices.
Architecture decision tree
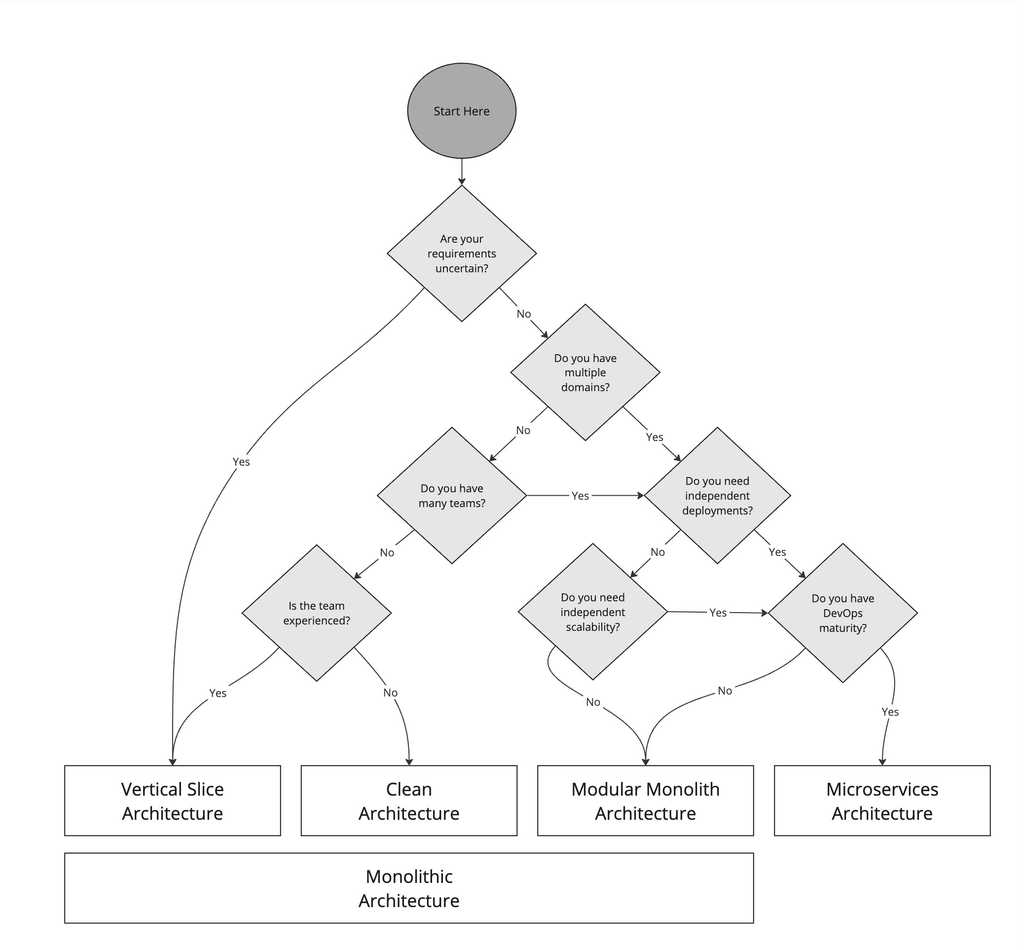
Figure: Architecture Decision Tree It's important to keep in mind that these architectures are not mutually exclusive.
Within a Modular Monolith Architecture, each module could be implemented using Clean Architecture or Vertical Slice Architecture. Similarly, a Microservices Architecture could use Clean Architecture or Vertical Slice Architecture within each service.
Also, from a pragmatic point of view a combination of Modular Monolith and Microservices might provide the best of both worlds. The majority of the system could be implemented as a Modular Monolith, with a few key services implemented as Microservices to provide scalability and flexibility where needed.
Factors to consider
- Are your requirements certain?
If requirements are likely to change, Clean Architecture or Vertical Slice Architecture can offer more flexibility. - Do you have multiple domains?
For applications with multiple domains, Modular Monoliths or Microservices can provide better separation and modularity. - Do you have many teams? If you have many teams, Microservices or Modular Monolith can help in reducing inter-team dependencies and allow parallel development.
- Do you need independent deployments? If independent deployments are necessary, Microservices is the best choice due to its isolated nature.
- Do you need independent scalability? Microservices allow each service to be scaled independently based on its specific needs, which can be more efficient and cost-effective.
- Do you have DevOps maturity? Microservices require a mature DevOps culture to manage deployments, monitoring, and scaling effectively. Without this, the overhead can be overwhelming.
- Is the team experienced? The complexity of Microservices can be challenging for less experienced teams. Vertical Slice Architecture although simple, has fewer guardrails when compared to Clean Architecture and can lead to a mess if not managed correctly. This leads to recommending Clean Architecture for less experienced teams that need more structure.
Examples
Here are some practical scenarios to illustrate the decision-making process:
Scenario 1: Startup with uncertain requirements
You are building an MVP with a small team and expect the requirements to evolve rapidly.
✅ Choice: Clean Architecture or Vertical Slice Architecture - These architectures offer flexibility and are easier to refactor as requirements change.
Scenario 2: Medium-sized business with limited DevOps maturity
You have a mid-sized team, and your organization is still developing its DevOps practices.
✅ Choice: Modular Monolith - A Modular Monolith provides some modularity benefits without the full complexity of Microservices, making it easier to manage with limited DevOps capabilities.
Scenario 3: Large enterprise with multiple domains and teams
You are developing a large-scale application with multiple business domains and have several teams working in parallel.
✅ Choice: Microservices - Microservices allow independent development, deployment, and scaling, which suits large and complex applications.
By carefully considering these factors and understanding the strengths and limitations of each architectural style, you can choose the best architecture for your system, ensuring a balance between flexibility, scalability, and maintainability.
- Are your requirements certain?
